After Effects blending modes are a powerful yet often underestimated set of tools that dictate how layers interact with each other in your compositions. For newcomers, the sheer number of options can seem daunting, leading many to overlook their potential. However, understanding and utilizing these modes can dramatically enhance your visual effects work and elevate your stylistic design choices, from creating seamless VFX integrations to crafting stunning double exposures.
What are Blending Modes and How Do They Work?
At their core, blending modes are instructions that tell a layer how to combine its visual information with the layers positioned beneath it in the timeline. When you apply a blending mode to a layer, After Effects analyzes that layer and all the layers below it, rendering the final composite based on the chosen mode. The default mode is "Normal," which simply displays the top layer without any alteration.
The magic happens when you move beyond "Normal." After Effects processes layers from the bottom up. It first calculates the masks, effects, and transformations of the base layer. Then, it moves to the next layer above and performs the same calculations. Finally, it merges the top layer with all the layers beneath it, guided by the selected blending mode.
A helpful tip for quickly exploring blending modes is to select a layer, hold down the Shift key, and press the + or - keys on your keyboard. This allows you to cycle through the available blending modes rapidly, providing an immediate visual understanding of their effects.
The Math Behind the Magic
While the visual results are often intuitive, there's a mathematical foundation to how blending modes operate. As described in "Creating Motion Graphics with After Effects," blending modes can manipulate color values by adding, subtracting, multiplying, or screening them. For instance, if a mode adds color values, it increases the brightness of a pixel by summing the corresponding red, green, and blue channel values. Conversely, subtraction decreases brightness. Multiplication scales down color values, similar to how colored gels affect light. Understanding these underlying principles can lead to more precise control and predictable outcomes.
Categorizing Blending Modes for Clarity
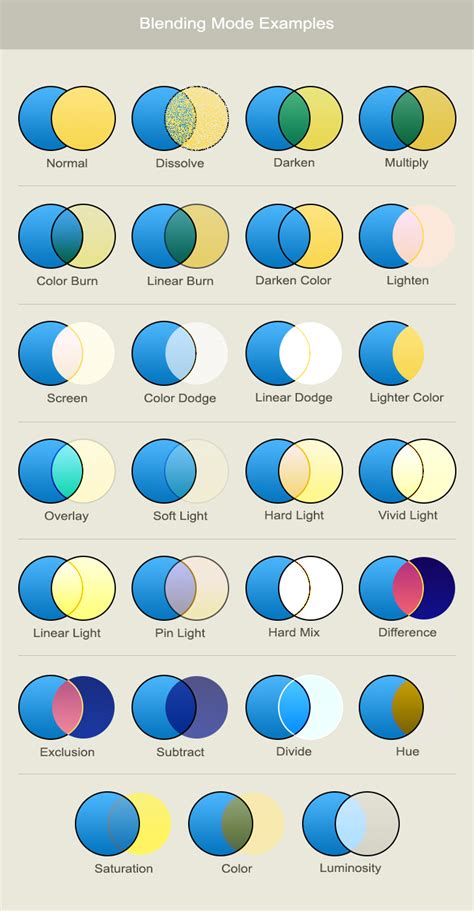
To navigate the extensive list of blending modes, it's helpful to understand their categorization. After Effects groups them into several distinct categories, each offering a unique approach to layer interaction. Before diving in, consider the desired outcome and which category might best achieve it. While some "classic" modes exist for legacy compatibility, focusing on the modern options will serve most contemporary projects.
Normal Modes: The Foundation
The "Normal" category includes the default "Normal" mode itself, along with "Dissolve" and "Dancing Dissolve."
- Normal: As mentioned, this is the default. The source layer is displayed as is. If its opacity is reduced, the underlying layers become visible. This simple functionality is often all that's needed for basic compositing.
- Dissolve & Dancing Dissolve: These modes don't truly blend pixels. Instead, they create a dithered pattern where pixels are randomly chosen from either the source or the underlying layer, based on the source layer's opacity. At 50% opacity, roughly half the pixels will be from the top layer and half from the bottom. "Dancing Dissolve" adds a frame-by-frame variation, creating a subtle animated effect.
Subtractive Modes: Darkening the Image
The subtractive modes, as their name suggests, darken the resulting image. Black in either layer will result in black, while white will have no effect.
- Darken: This mode compares the color channel values (red, green, blue) of corresponding pixels in both layers and selects the darker value for each channel. This ensures the resulting image is always as dark or darker than the individual layers.
- Darker Color: Similar to "Darken," but instead of comparing individual color channels, it compares the overall resulting color of each pixel and chooses the darker one. This mode doesn't perform true blending but rather a direct pixel-by-pixel selection.
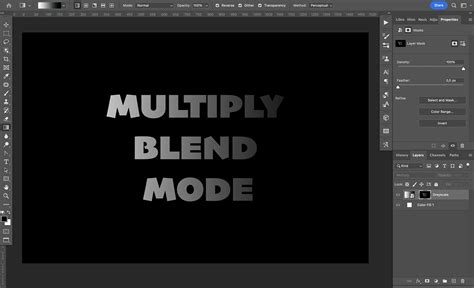
- Multiply: This is a highly useful mode that scales down color values. It multiplies the color channel values of the top layer by the color channel values of the bottom layer. This creates a darkening effect, similar to placing multiple colored gels in front of a light. It's excellent for subtle adjustments and creating natural-looking tints.
- Linear Burn: This mode uses the top layer's color information to decrease the brightness of the bottom layer. It typically results in a darker image than "Multiply" and can often yield more saturated colors.
- Color Burn & Classic Color Burn: These modes increase the contrast of the underlying layer based on the color information of the source layer. If the source layer is white, it has no effect. The result generally falls between "Multiply" and "Linear Burn." The order of layers is crucial here, as the bottom layer's influence is often more prominent. "Classic Color Burn" is an older version with some limitations.
Additive Modes: Brightening the Image
The additive modes are generally the opposite of their subtractive counterparts, making the image brighter. White in either layer results in white, while black has no effect.
- Add: This mode adds the color values of each RGB channel together, always resulting in a brighter image. It's incredibly useful for compositing elements shot on black backgrounds, such as fire or light leaks, as the black background becomes transparent.
- Lighten: The inverse of "Darken," this mode compares the color channel values of corresponding pixels and selects the lighter value for each channel.
- Lighter Color: The opposite of "Darker Color," this mode selects the lighter overall color between the two layers.
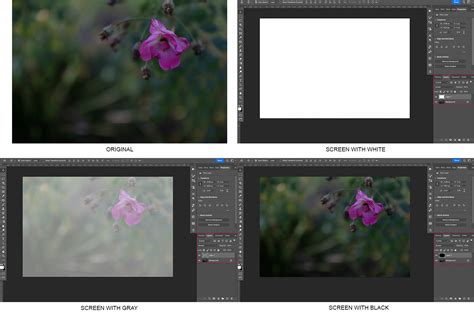
- Screen: This is the opposite of "Multiply" and is another highly versatile mode. It essentially simulates projecting multiple images onto a single screen. It's ideal for making dark areas transparent, allowing lighter image content to show through. Many users find "Screen" indispensable for compositing elements with white backgrounds.
- Linear Dodge: At 100% opacity, this mode appears identical to "Add." However, when the opacity is reduced, it becomes less saturated than "Add," offering a subtler brightening effect.
- Color Dodge & Classic Color Dodge: These modes decrease the contrast of the underlying layer by increasing its brightness, based on the source layer's color information. They are the inverse of "Color Burn" and generally result in brighter images. The stacking order is important, as the bottom layer tends to dominate the result. "Classic Color Dodge" is the older version.
Complex Modes: Luminance-Based Interactions
The complex modes operate based on luminance, meaning they behave differently for areas lighter or darker than 50% gray.
- Overlay: This is one of the most frequently used and powerful modes. It applies "Multiply" to the darker portions of the top layer and "Screen" to the lighter portions. The result is a blend that effectively overlays the top image onto the bottom, preserving highlights and shadows while enhancing mid-tones. Layer order matters significantly here.
- Soft Light: Similar to "Overlay," but with a more subtle effect. Areas lighter than 50% gray on the top layer "dodge" (lighten) the bottom layer, while darker areas "burn" (darken) it. It's a gentler version of dodging and burning.
- Hard Light: This mode is a more intense version of "Overlay." It applies "Multiply" to darker areas and "Screen" to lighter areas with greater force, causing the top layer to show through more prominently.
- Linear Light: Even more extreme than "Hard Light," "Linear Light" also operates on dodging and burning principles based on gray levels but with increased intensity. The top layer will be more dominant.
- Vivid Light: This mode further intensifies the effect, adjusting the contrast of the bottom layer to create a very high-contrast result.
- Pin Light: This mode intelligently selects between the top and bottom pixels based on brightness. It's a hybrid of "Darken" and "Lighten," influenced by the 50% gray threshold.
- Hard Mix: This is a very extreme and often surprising mode that outputs only one of eight basic colors: red, green, blue, cyan, magenta, yellow, black, and white. While not always useful on its own, it can be a powerful tool for specific compositing tasks, such as pushing contrast by duplicating a layer and applying "Hard Mix" to the top one, then adjusting its opacity.
Difference Modes: Creating Contrasts and Inversions
These modes often produce unusual and abstract results, but they have valuable utility applications.
- Difference & Classic Difference: These modes subtract the color values of the two layers, often resulting in inverted colors and vibrant, "trippy" visuals. A key utility is aligning two similar images; applying "Difference" to the top layer will reveal any discrepancies as bright artifacts. Duplicating a layer and applying "Difference" results in a black image, which can be useful for isolating subtle changes. "Classic Difference" offers slightly more color saturation in transition tones.
- Exclusion: Similar to "Difference" but with less contrast and saturation. Areas around 50% gray in either layer will result in gray, making it a less extreme, more muted version of "Difference."
- Subtract: This mode subtracts the top layer's color values from the bottom layer. Brighter areas in the top layer lead to darker results, and vice-versa.
- Divide: This mode divides the underlying color values by the source color values. Since black is 0 and white is 1, dividing by dark areas can significantly brighten the image.

HSL Modes: Hue, Saturation, and Luminance Control
The HSL (Hue, Saturation, Luminance) modes offer precise control over specific color attributes. The name of the mode dictates which attribute is retained from the top layer.
- Hue: Retains the hue from the top layer and uses the saturation and luminance from the bottom layer.
- Saturation: Retains the saturation from the top layer and uses the hue and luminance from the bottom layer.
- Color: Uses both the hue and saturation from the top layer, while taking luminance from the bottom layer.
- Luminosity: Uses only the luminance from the top layer, while taking hue and saturation from the bottom layer.
Matte Modes and Utility Modes: Transparency and Special Cases
These modes function differently, primarily affecting transparency rather than color values.
- Matte Modes (Stencil Alpha, Stencil Luma, Silhouette Alpha, Silhouette Luma): These modes use the source layer as a matte, similar to the "Track Matte" function but affecting all layers below instead of just one. "Stencil" modes reveal layers beneath based on the matte's alpha or luma values, while "Silhouette" modes block out layers beneath.
- Alpha Add: This is a crucial utility mode for solving a common compositing problem. When joining layers with anti-aliased edges (slight transparency at the edges), seams can appear. "Alpha Add" adjusts the alpha channel calculations to create seamless joins, especially useful with 3D layers.
- Luminescent Premul: This mode addresses an issue with premultiplied alpha channels where edges can appear overly bright. It helps prevent clipping of color values that extend beyond the alpha channel, improving compositing results, particularly with lens flares and light effects.
Beyond Layer Blending: Frame Blending Modes
It's important to distinguish layer blending modes from frame blending modes. Frame blending modes are used during time remapping or frame interpolation to control how intermediate frames are generated. Options include "Pixel Motion," "Pixel Motion (Frame Blending)," and "Optical Flow," each offering different approaches to motion analysis and synthesis.
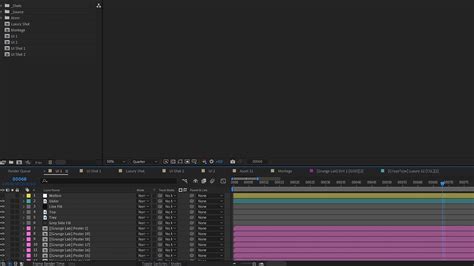
Practical Application: Creating an Effect with Hard Light
Let's illustrate the power of blending modes with a practical example. To create an effect where a dancer moves across a model's face using the "Hard Light" blend mode:
- Add your primary face shot to the timeline.
- Create a new Adjustment Layer above the face layer.
- Apply "Levels" and "Hue & Saturation" effects to the Adjustment Layer. Adjust "Levels" for contrast and "Hue & Saturation" to balance the image.
- Precompose the face layer and the Adjustment Layer (
Cmd/Ctrl + Shift + C). Make this precomposition invisible for now. - Drag your second shot (the dancer) to the timeline below the first shot. Add another Adjustment Layer.
- Search for "Colorama" in the Effects panel and apply it to this new Adjustment Layer.
- In "Colorama," click "Output Cycle" and select the "Grey Ramp" preset.
- In the color picker, click to the left of the circle and select Black. Click to the right and select White. Adjust the arrows to fine-tune the ramp.
- Make your precomposed face layer visible again.
- Select the face layer in the timeline and set its blending mode to "Hard Light."
This step-by-step process demonstrates how "Hard Light" can intricately blend the dancer's movement with the facial features, creating a stylized and integrated visual.
Animating Blending Modes: A Workaround
Directly keyframing blending modes in After Effects or Premiere Pro isn't possible. To change a blending mode at a specific point in time, you need to split the layer at that point and then apply the new blending mode to the subsequent section of the layer. This method provides precise control over when blending mode transitions occur.
Photoshop Layer Styles vs. After Effects Blending Modes
It's worth noting the distinction between Photoshop layer styles and After Effects blending modes. While Photoshop layer styles (like drop shadows, glows, and bevels) can be imported into After Effects and retain some blending properties, they behave more like effects that precede transformations in the render order. Blending modes, on the other hand, operate on the layer's composite output. When importing Photoshop files, you can choose to retain editable layer styles or merge them into footage.
Conclusion: Experimentation is Key
After Effects blending modes are indispensable tools for both VFX artists and motion designers. While this guide provides a comprehensive overview, the best way to truly master them is through experimentation. Play with different modes, combine them with other effects, and explore their unique capabilities. From subtle atmospheric adjustments to dramatic stylistic transformations, blending modes offer a vast creative playground.