Adding an arrow to your design in Photoshop is a versatile technique, perfect for drawing attention to specific details, illustrating direction, or simply enhancing visual communication. Whether you're creating an invitation, a class project, or a complex graphic, Photoshop offers multiple intuitive methods to craft the ideal arrow. This tutorial will delve into various approaches, from utilizing pre-set shapes to drawing custom designs, ensuring you can create arrows that seamlessly integrate with any graphic design style.
Leveraging Pre-Set Arrow Shapes
Photoshop provides a convenient library of pre-designed arrow shapes, offering a quick and efficient way to add this element to your work. This method is ideal for users who need a straightforward solution without extensive customization.
Accessing the Shapes Panel
To begin, navigate to the Window menu in the top toolbar of Photoshop and select Shapes. This will open the Shapes panel, which houses a collection of various shape presets. Within this panel, you'll find a dedicated section for arrows.
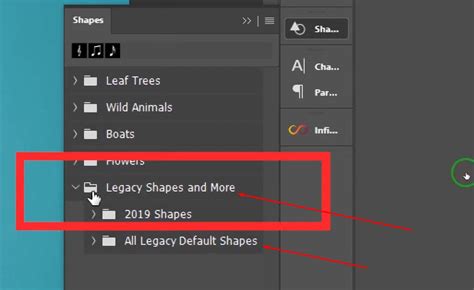
If you don't immediately see the arrow shapes, you might need to load legacy content. Click on the hamburger menu (an icon with four horizontal lines) in the top-right corner of the Shapes panel. From the dropdown, select Legacy Shapes and More. This action will populate your Shapes panel with additional, older shape sets, including a comprehensive collection of arrows.
Locating and Applying Arrow Shapes
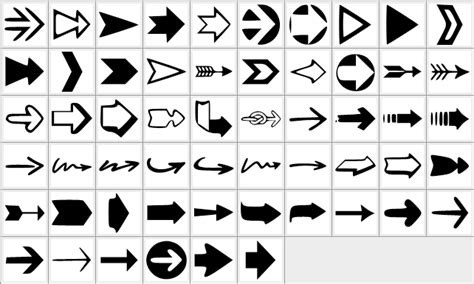
Once the Legacy Shapes are loaded, you can further refine your search. Click on the Shape thumbnail in the Options bar at the top of your screen. A fly-out panel will appear, allowing you to explore different shape categories. Dig into the All Legacy Default Shapes folder, and then navigate to Arrows. Here, you will find a set of approximately 20 custom arrow shapes. Select the arrow shape that best suits your needs.
With your chosen arrow shape selected, click and drag your mouse cursor across your Photoshop project canvas. This action will add the arrow to your design as a new layer. You can immediately see a live preview as you drag, allowing you to gauge its initial size and placement.
Customizing Pre-Set Arrows
After adding a pre-set arrow, you'll likely want to adjust its appearance. Focus on the Options bar at the top of your screen, which displays settings specific to the selected shape tool. Here, you can modify the Fill and Stroke of the arrow.
Click on the colored square labeled "Fill" to select the main color for the interior of your arrow. Similarly, click on the "Stroke" option, which features another colored box, to choose the color for the arrow's outline. You can also adjust the stroke's thickness using the adjacent slider or input field.
To save your customized arrow for future use, open the Arrow Styles panel (which may appear after customizing, or you can access it via the Window menu). Within this panel's menu, select "New Arrow Preset" to store your unique design.
Drawing Arrows with the Custom Shape Tool
For greater creative control, the Custom Shape tool allows you to draw freeform arrows or precisely craft unique arrow designs. This method offers the most flexibility, enabling you to create arrows of any style and complexity.
Selecting the Custom Shape Tool
The Custom Shape tool is typically found within the broader Shape tool group. Press U on your keyboard to activate the Shape tool. Then, click and hold your cursor on the highlighted icon in the toolbox (usually a rectangle or similar shape) until a dropdown menu appears. Select the Custom Shape tool from this menu.
Applying and Transforming Arrows
With the Custom Shape tool selected, open the Shapes panel (Window > Shapes) again. You can then select any of the available custom shapes, including those within the arrow sets. Click and drag on your canvas to draw the selected arrow shape.
Once the arrow is on your canvas, you can adjust its orientation and size. Press Ctrl+T (or Command+T on a Mac) to activate the Free Transform tool. This will surround your arrow with a bounding box with handles. To rotate the arrow, hover over one of the corner handles until your cursor turns into a curved line with two arrows. Click and drag to spin the arrow to the desired direction. You can also click and drag the corner handles to resize the arrow. Holding down the Shift key while resizing will maintain the arrow's original proportions, preventing distortion. Press Enter to commit your transformations.
The Custom Shape tool also allows for more intricate drawing. You can click and drag along a curve to create a freeform arrow. For more advanced manipulation, you can add anchor points using the Add Anchor Point Tool to modify the shape's contours, for example, by adding an extra point to the bottom of a triangular arrowhead.
How To Draw Shapes In Photoshop (The Shape Tool Explained!)
Crafting Arrows with the Line Tool
The Line tool is a fundamental yet powerful instrument for creating straight lines that can be transformed into arrows. This method is particularly useful for geometric or technical-style arrows.
Accessing and Using the Line Tool
To access the Line tool, click and hold the Rectangle tool icon in the toolbar. A flyout menu will appear, from which you can select the Line tool. Alternatively, you can use the keyboard shortcut Shift+V repeatedly until the Line tool is selected.
Drawing and Adding Arrowheads
With the Line tool active, click on the workspace where you want the start of your arrow to be. Hold down the mouse button and drag your cursor to where you want the arrow to point. As you drag, an outline of the line with an arrowhead will be created.
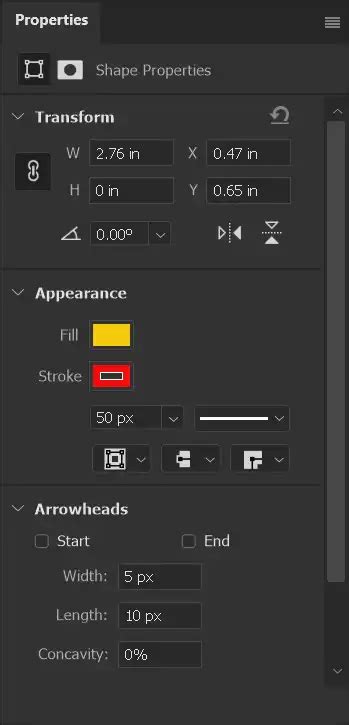
To add arrowheads, locate the Options bar at the top of your screen. You will see a gear icon on the right-hand side of the Options bar. Click this gear icon to access the Arrowheads settings. Here, you can check the boxes for "Start" and/or "End" to add arrowheads to one or both ends of your line. You will need to specify the Width and Length of the arrowhead. You can also adjust the Concavity of the arrowhead.
You can create multi-angled arrows by adding multiple connected line segments with the Line tool. This allows for more complex directional indicators.
Customizing Line Tool Arrows
The Line tool also offers options for Fill and Stroke. While the "Fill" option is less relevant for a simple line, the "Stroke" option is crucial. Click on the Stroke option (a colored box) in the top menu bar to choose the color of your arrow. You can then change the stroke size to control the thickness of the arrow's shaft. If you don't need a stroke, you can set it to 0px and make it transparent.
When using the Line Tool, it's important to set the type to "Shape" in the Options bar. Ensure your fill is set to transparent if you only intend to use the stroke for the arrow's appearance.
Drawing Arrows with the Brush Tool
For a more organic, hand-drawn aesthetic, the Brush tool provides a freehand method to create arrows. This approach is excellent for achieving a unique, artistic look.
Selecting and Configuring the Brush Tool
Press B on your keyboard to select the Brush Tool. In the main toolbox on the left side of your screen, you can choose from a variety of brush shapes. Select a brush tip that suits the desired smoothness or texture of your arrow. Use the slider to adjust the brush size.
Freehand Arrow Creation
Move your cursor to the desired starting point of your arrow. Click and hold the mouse button down to begin drawing. Drag the cursor across the screen to draw the main line of your arrow. You can also use the Custom Shape tool to draw a freeform arrow by clicking and dragging along a curve. Drawing a free-style arrow will be easier if you are using a drawing tablet.
Refining Brush-Drawn Arrows
After drawing the main line of your arrow with the brush, you can add an arrowhead. This often involves switching to the Custom Shape tool or Line tool to add a pre-defined arrowhead, or freehand drawing a triangular shape.
If you need to reposition or resize your brush-drawn arrow, select the Move tool by pressing V or clicking its icon in the toolbar. Then, you can drag the entire arrow layer to a new location or use Ctrl+T (Command+T on Mac) for free transform adjustments.
Advanced Arrow Techniques and Customization
Beyond the basic creation methods, Photoshop offers advanced features to enhance your arrow designs, including adding feathers, creating custom brushes, and combining shapes.
Adding Arrow Feathers
To add decorative feathers to the end of your arrow, you can draw thin rectangles and position them at a 45-degree angle. Use the smart guides in Photoshop to assist with alignment as you move these feather shapes. You can duplicate a feather, flip it horizontally using the Edit > Transform > Flip Horizontal command, and position it on the opposite side. Locking the main arrow shape layer can make it easier to add feathers without accidentally altering the primary arrow.

Creating Custom Arrow Brushes and Patterns
Once you have a satisfactory arrow design, you can leverage it to create custom brushes or patterns. Define your arrow as a custom shape, and then use the Define Brush Preset or Define Pattern commands. If you want to use the arrow with transparency in a pattern, it's advisable to delete the background layer before defining the pattern to ensure seamless tiling.
Combining and Transforming Shapes
Photoshop's strength lies in its layer-based system, allowing you to combine multiple arrow shapes and transform them in countless ways. You can repeat the process of creating new arrow shapes, then duplicate, transform, rotate, and shift them throughout your image to create complex arrow artworks, double arrows, or arrows with multiple arrowheads.
Applying Styles and Effects
You can further stylize your arrows by applying layer styles. This includes effects like adding a rusty look, a metallic finish, or using filters for blur, smudge, or color adjustments. These effects can transform a basic arrow into a visually striking element.
Conclusion: A World of Arrow Possibilities
Photoshop provides a rich toolkit for creating arrows, catering to every need from quick annotations to elaborate graphic elements. By mastering the Custom Shape tool, Line tool, and Brush tool, along with advanced techniques for customization and styling, you can imbue your designs with clear direction and visual impact. The ability to save custom shapes, brushes, and patterns ensures that your unique arrow designs can be reused across numerous projects, streamlining your workflow and enhancing your creative output. Remember, there is rarely just one way to achieve a desired outcome in Photoshop, encouraging experimentation and personalized design solutions.