Have you ever marveled at the depth and realism in a screen-printed design and wondered how it's achieved? The answer often lies in the use of halftones. While seemingly a simple pattern of dots, halftones are a sophisticated graphic technique that transforms continuous-tone imagery into a reproducible format for printing processes like screen printing. This method is not merely a neat trick; it's a fundamental element that allows for the creation of soft gradients, intricate details, and eye-catching artwork, taking designs from basic to exceptional.
The Essence of Halftones: An Optical Illusion
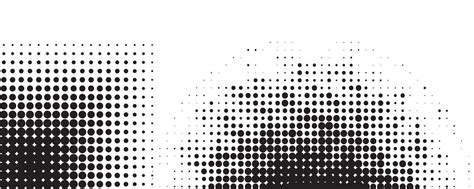
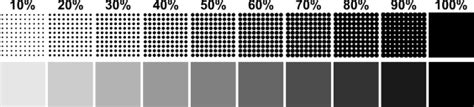
At its core, a halftone is a representation of a continuous-tone image using dots of varying size or spacing. This process relies on a basic optical illusion: when the halftone dots are small and closely spaced, the human eye interprets these patterned areas as if they were smooth tones. Think about a black-and-white photograph. You can't use a hundred shades of grey ink to replicate it perfectly in screen printing. Instead, halftones break down the image into a series of dots, where the size or density of these dots dictates the perceived shade. Large dots allow more ink to pass through the screen, creating darker areas in your design, while smaller dots create lighter areas. The distance between the dots also plays a critical role; dots that are close together will create darker shades, contributing to the illusion of depth and realism.
A Historical Journey: From Woodcuts to Digital Precision
Halftones have a long and fascinating history, born out of a desire to realistically reproduce photographs in print. Before the development of halftone printing, pictures in newspapers and other publications often relied on woodcut or wood-engraving techniques. These methods, while capable of capturing likenesses, often resembled hand-drawn sketches rather than photographic reproductions. Commercial printers sought a practical way to realistically reproduce photographs, but traditional mechanical printing processes were limited to printing areas of ink or leaving blank areas.
The concept of halftone printing is credited to William Fox Talbot in the mid-19th century. Several different kinds of screens were proposed over the following decades. William Leggo produced an early version, and Frederic Ives of Philadelphia patented the first truly successful commercial method in 1881. Although Ives found a way to break up the image into dots of varying sizes, he did not initially use a screen. In 1882, Georg Meisenbach in Germany patented the "autotype" halftone process, which used single-lined screens that were rotated during exposure to produce cross-lined effects. This relief halftone process proved almost immediately successful. The development of halftone printing methods for lithography appears to have followed a largely independent path.
Prior to digitized images, special photographic techniques were developed to break grayscale images down into discrete points. One of the earliest methods was "screening," where a coarse-woven fabric screen was suspended before the camera plate. This broke up the incoming light into a pattern of dots through interruption and diffraction effects. Other techniques involved using a "screen" of parallel bars (a Ronchi ruling) combined with a second exposure at a different angle, or exposing through a screen-plate with crossing lines etched onto its surface.
The Mechanics of Halftone Creation for Screen Printing
The process of creating halftones for screen printing typically begins by converting your design into a halftone pattern using graphic design software. Programs like Adobe Photoshop and Illustrator are popular choices, though downloadable apps can also be utilized.
The fundamental steps involve:
- Converting the Image to Grayscale: This ensures that the halftone process focuses on the image's tonal values rather than color.
- Adjusting Contrast: It's crucial to adjust the contrast to ensure that details are clear and distinct. The values of the image are critical for legibility when halftones are applied. This can be done using tools like "curves" in the selected layer. If the artwork isn't adjusted properly, the defined highlights and shadows can be lost, diminishing the recognizability of the image. Clarity at a distance is key to achieving an appealing and recognizable print.
- Applying Halftone Settings: In software, this is often done through a "halftone" or "bitmap" filter. Key parameters include:
- Lines Per Inch (LPI): This represents the number of lines of dots in one inch, measured parallel to the screen's angle. A higher LPI means more lines, resulting in finer dots and greater detail, which requires a higher mesh count screen for printing. For instance, a common rule of thumb is to divide the mesh count by 5 to determine the optimal LPI. For greater detail, dividing by 4 can yield a higher LPI.
- Dot Shape: While round dots are the most common and suitable for light images, especially skin tones, other shapes like elliptical (appropriate for images with many objects) and square (best for detailed images, though not ideal for skin tones) are available.
- Angle: This refers to the slight rotation of the dot grid. Dots falling at right angles (0°, 90°, 180°, 270°) can align with the mesh threads, making them difficult to print. Angles that bisect the mesh, such as 22.5°, are generally preferred to ensure dots miss as many threads and knuckles as possible.
The size of the dots directly influences how much ink gets through the screen. Large dots allow more ink, creating darker areas, while smaller dots allow less ink, creating lighter areas. The distance between dots also contributes to the perceived shade.
The Role of Screen Printing Supply in Halftone Success
Achieving quality halftones goes beyond just your artwork and software settings; it heavily relies on the caliber of your screen printing supply. Your screen printing supply plays a significant role in your success.
- Screen Printing Ink: The type of ink used is crucial in the final appearance of your halftones. Different inks yield different effects. For instance, some inks have higher viscosity and can hold finer detail, while others might be more prone to spreading, exacerbating dot gain.
- Screens: The mesh count of your screen directly influences the LPI you can effectively print. A higher mesh count (finer threads) is necessary for printing higher LPI halftones, allowing for more detail.
- Photo Emulsion: The photo emulsion you select is critical. When exposed to light, it hardens and forms the stencil for your design. A high-quality photo emulsion will provide a crisper edge to your halftones, enabling finer detail reproduction.
- Printing Equipment: The consistency and pressure applied by your printing equipment, including squeegees and platens, also impact the final print.
Understanding Dot Gain and Its Mitigation
A common challenge in halftone printing is dot gain. This occurs when the ink dots spread into the fabric or substrate during the printing process, appearing larger and therefore darker than intended. This is particularly pronounced in the midtones. Screen printers often account for dot gain by choosing a specific percentage (e.g., 30%) to compensate for this spread during the artwork preparation phase.
How to control dot gain in flexography?
Advanced Halftone Techniques and Color Reproduction
Once you've mastered the basics, you can explore more advanced techniques that leverage halftones:
- Grayscale Printing: This is a straightforward method for printing full-color images as a single-color grayscale or halftone. Full-tone color photographs or drawings with complete tonal ranges can be reproduced using a single color of ink, often black on a light garment, but any color can be used. The resolution and clarity depend on the LPI used.
- Duotone Printing: This involves using two colors of ink to create a richer range of tones and shades. A black halftone might be printed alongside a second color, like a warm brown, creating a sepia-toned effect. This offers the feel of a full-color print at a much lower cost and provides a sophisticated, artsy look.
- Simulated Process Printing: This advanced technique is used to recreate full-color images with screen printing using a limited color palette. It involves printing multiple layers of colored halftones that build up to a full-color design. By carefully layering and coloring these halftone layers, experienced printers can create highly detailed, colorful prints. This is often the process used to print complex images onto dark garments.
- 4-Color Process (CMYK) Printing: This is a complex process involving breaking down a full-color image into its four constituent colors: Cyan, Magenta, Yellow, and Black. Each color is printed as a halftone, and their combination recreates the tonal and color range of the original image. This method is typically recommended for automatic presses due to its complexity. While CMYK printing on apparel can resemble simulated process, the dot patterns and perceived color mixing differ from traditional lithography.
Halftones in the Digital Age: From RIPs to Dithering
In the 1980s, halftoning became integrated with the new generation of imagesetter film and paper recorders, which evolved from earlier "laser typesetters." These machines could generate all elements of a page, including type and photographs. Early laser printers could also generate halftones, but their limited resolution (around 300 dpi) restricted the screen ruling to about 65 LPI.
Digital halftoning uses a raster image or bitmap where each monochrome picture element, or pixel, can be either on or off (ink or no ink). To emulate photographic halftone cells, digital halftone cells must contain groups of monochrome pixels within a fixed-sized area. The fixed location and size of these pixels can compromise the high-frequency/low-frequency dichotomy of photographic halftoning, as clustered multi-pixel dots cannot grow incrementally but in jumps of a whole pixel. To minimize this, digital halftone monochrome pixels must be very small, often numbering from 600 to 2,540 pixels per inch or more.
Today, Raster Image Processing (RIP) software is commonly used in screen printing to manage halftones. While programs like Adobe Photoshop can create them, using RIP software is often the most efficient and easiest way to achieve professional results. RIP software translates the design into a format the printing equipment can understand, including applying halftone patterns based on user-defined parameters like LPI and angle.
Inverse Halftoning: Reconstructing the Original
Inverse halftoning, or descreening, is the process of reconstructing high-quality continuous-tone images from their halftone versions. This is a challenging task because different source images can produce the same halftone image, meaning information is lost during the halftoning process. Applications for inverse halftoning include editing halftone images, where simple modifications like altering brightness require preserving the regular halftone pattern.
Various techniques exist for inverse halftoning:
- Low-Pass Filtering: Applying a low-pass filter in the spatial or frequency domain can remove the high-frequency information of the halftone pattern, blurring the image and reducing the pattern. However, choosing the correct bandwidth is crucial to avoid excessive blurring or a noisy image.
- Wavelet Decomposition: Decomposing the halftone image into its wavelet representation allows for the selection of information from different frequency bands, potentially enhancing edges.
- Machine Learning Algorithms: Artificial neural networks, particularly Convolutional Neural Networks (CNNs) and Generative Adversarial Networks (GANs), are increasingly used for descreening. These learning-based approaches can identify and reconstruct patterns, even generating lost details. However, their effectiveness is dependent on the quality and completeness of the training data.
- Lookup Table (LUT) Method: This method doesn't involve filtering. It works by computing a distribution of the neighborhood for every pixel in the halftone image and using a pre-computed lookup table to provide a continuous-tone value for a given pixel and its distribution. This requires knowing the halftoning strategy in advance and recomputing the table for each new pattern.
The Enduring Relevance of Halftones
The halftone process, whether in its historical photographic form or its modern digital iterations, remains a cornerstone of visual reproduction. In screen printing, it's not just about recreating images; it's about unlocking creative possibilities. By understanding how halftones work, the interplay of dots, ink, and screen, and the critical role of your screen printing supply, you can elevate your designs and produce prints with remarkable depth and realism. Whether you're a hobbyist looking to improve your craft or a business aiming to offer sophisticated printing services, mastering halftones is an essential step on your screen printing journey.