Creating authentic watercolor textures and effects in Adobe Photoshop is a valuable skill for graphic designers and artists alike. Whether you're aiming to craft seamless patterns for digital use or transform photographs into painterly artworks, Photoshop offers a versatile toolkit. This guide will walk you through the process of creating your own high-resolution watercolor textures, turning them into reusable patterns, and then applying them to achieve stunning watercolor effects on images. We'll explore techniques ranging from manual creation using scanned artwork to leveraging Photoshop's filters and brushes for a more automated approach.
Crafting Seamless Watercolor Textures from Scratch
Artistic textures are essential for every graphic designer’s toolbox. And what can be more useful than a seamless high-res watercolor texture? Indeed, you can overlay any layer using it as a Photoshop pattern! How cool is that? This section details a method to create such a texture in seven easy steps, starting from the raw materials.
Step 1: Preparing Your Source Artwork
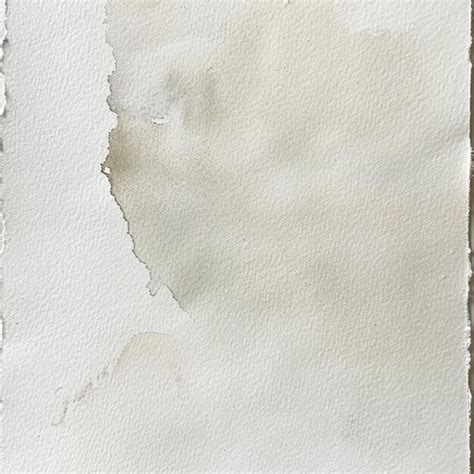
The best place to start with would be a source artwork for our seamless texture. To create it, I use watercolor paper (A4 format works for me best), a brush, a container of water, and watercolors. If you’re up to something unusual, you can find a tutorial on how to mix watercolors into fantastic backgrounds. For this tutorial, I'll stick to a simple yet catchy combination of yellow and red. You, for a starter, can use only one color. I promise it would still give a nice genuine watercolor texture.
So, after your painting is completely dry, you need to scan it in 300 ppi resolution and PNG format. To save time, you can use pre-scanned artwork. The key is to ensure the scan captures the texture and subtle color variations inherent in watercolor.
Step 2: Importing and Initial Adjustments
Create a new document in Adobe Photoshop with a 1200x1200 pixel size and 300 ppi resolution. Open your scanned watercolor artwork within Photoshop. Drag and drop it onto the newly created document, placing it as Layer 1 above the Background layer. At first, it might look a little bit too blurry and grainy. To make it sharper, resize the layer with your artwork by decreasing its size using the Free Transform tool (Cmd+T or Ctrl+T). This can help to bring out the finer details of the watercolor.
Step 3: Isolating the Texture Area
Now, using the Rectangular Marquee Tool (M), select an area equal to the size of your artboard. Once the selection is made, right-click on it and select "Layer Via Cut" from the contextual menu. This action creates a new layer containing only the selected portion of your artwork, which will be transformed into a seamless pattern.
Step 4: Detecting Seams with Offset Filter
After isolating the texture, choose Filter > Other > Offset. This filter is crucial for pattern creation as it helps to offset your image horizontally and vertically, allowing you to see where your pattern has its seams. Try to make the four squares that appear in the preview equal. Usually, they render equal automatically, but sometimes you should tweak the Horizontal and Vertical offsets manually. After you get the desired result, press OK.
Step 5: Eliminating Seams with Content-Aware Fill
Now, the goal is to get rid of the visible seams and make your texture completely tileable. To achieve this, use the Rectangular Marquee Tool (M) with a Feather parameter set to 3 pixels. Select a small area around a seam with the Marquee Tool, then press Shift+Delete (or Backspace). In the Fill dialog box, set the Contents to "Content-Aware," Mode to "Normal," and Opacity to "100%." Press OK or Enter on your keyboard to apply the effect.
Next, repeat this step diligently until all seams are gone, ensuring you are delighted with how your texture looks. This operation is also helpful if you want to get rid of specks, hairs from the brush, or any other imperfections in the source artwork.
Step 6: Iterative Refinement for Seamlessness
We go back and repeat Step 4 (Offset filter) and Step 5 (Content-Aware Fill) iteratively until the texture is completely seamless. This iterative process ensures that any new seams introduced by the filling process are also addressed. Thus, we achieve the result we’ve been looking for - a perfectly tileable watercolor texture.
Step 7: Defining and Testing the Pattern
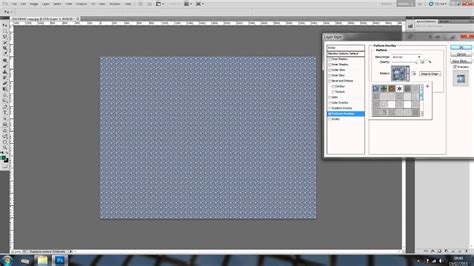
One step is left - to create a Photoshop pattern. Define it by choosing Edit > Define Pattern and title it something like "Watercolor Pattern." It’s time for a final seamless test. Create a new document twice the size of your original pattern tile (e.g., 3000x3000 pixels at 300 ppi resolution). Choose an initial layer and click on the 'fx' icon to add a layer style. Select "Pattern Overlay."
Pick your freshly-saved pattern from the pattern menu with 100% scale and press OK. Now, take a long, hard look at the canvas, trying to detect any signs of seams on the pattern. In case you find some, go back to your original "Watercolor Pattern.psd" file, locate the flaw, and remove it using Step 4 and Step 5 again. After you finish with polishing, you will have your seamless watercolor texture ready for use.
It’s really easy to export your pattern for further use or sharing.
Transforming Photographs into Watercolor Art
Watercolor is one of my favorite non-photography art mediums. It has texture, and blended colors, and it’s overall just a beautiful form of art. And the best part is, it’s easy to create a watercolor effect in a photograph! Photoshop CC allows you to create endless types of styles and effects in your photos. This section will walk you through the exact steps to convert any photograph into a watercolor painting.
Preparing Your Image for Transformation
First, open a photo in Photoshop. Then, convert the image layer into a Smart Object. To do this, right-click over the layer (in the black space and NOT over the thumbnail or layer name) and select "Convert to Smart Object." Note: Another thing you might need to do here is to convert the image mode to 8-bit depth. You can do this by going to Image > Mode and selecting the "8 Bits/Channel" option. This ensures compatibility with certain filters.
Smart Objects in Photoshop: Learn The Basics
Applying Artistic Filters for a Painterly Look
Go to Filter > Filter Gallery and add the "Dry Brush" filter (located in the "Artistic" section at the top). Adjust the sliders until you achieve a pleasing brush-stroke effect. Remember that, because you turned the layer into a Smart Object, you can always go back to adjust the sliders later.
Next, go to Filter > Filter Gallery again and add the "Cutout" filter (also in the "Artistic" section). This filter will help to simplify the image, mimicking the way colors are applied in a painting. Don’t worry if your image looks a bit abstract at this stage.
Enhancing Details and Texture
Now, double-click the small icon to the right of the top-most Filter Gallery filter in the Smart Filters section of the Layers panel to refine its settings. Then, double-click the small icon to the right of the "Smart Blur" filter (Filter > Blur > Smart Blur) in the Smart Filters. This filter can help to smooth out areas and create softer transitions, characteristic of watercolor.
Next, double-click the small icon to the right of the "Find Edges" filter (often found under Filter > Stylize, though it can also be accessed via the Filter Gallery in some versions) in the Smart Filters. This filter can mimic the pencil traces that sometimes show through watercolor paintings, adding an extra layer of realism.
Adjusting Tones with Curves
To further refine the watercolor look, go to Image > Adjustments > Curves. Click in the upper-right quadrant of the curve graph to create a new point and drag it upwards. This will lighten the highlights. Click in the lower-left quadrant to create a new point and drag it slightly downwards. This will darken the shadows. You can also click the point on the lower-left corner of the curve graph and drag it up vertically along the left side of the graph to further enhance contrast and create a more dramatic watercolor feel.
Adding Realistic Paper Texture
To make your watercolor effect more realistic, you'll need to add a paper texture. You can do this by importing a real watercolor paper texture image. Go to File > Place > Embedded and select your paper texture. Whichever technique you used, the paper photo should now appear as the top layer of your watercolor image. Be sure to adjust the size of the canvas so that the paper covers the entire image.

Revealing the Watercolor Effect with Layer Masks
Go back to the layer with your transformed watercolor image. At this point, you might only see the paper texture if the paper layer is above it and set to a blending mode that allows the image to show through. If not, ensure your watercolor image layer is visible.
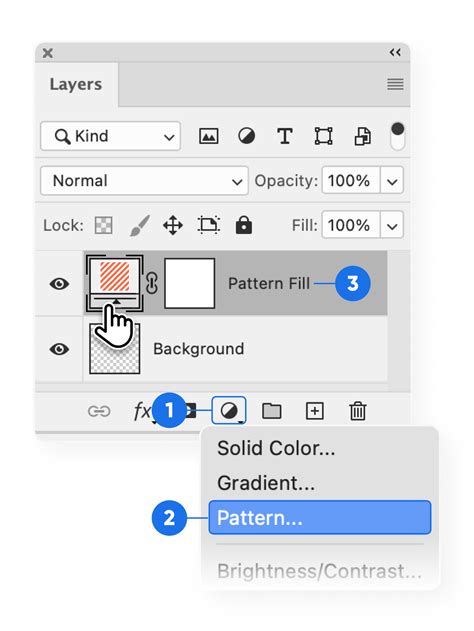
Now, select the layer with your transformed watercolor image. Press and hold the Opt (Mac) or Alt (Win) key and click the "Add Layer Mask" icon at the bottom of the Layers panel. This will create a black mask, hiding the entire layer.
Next, open the Brushes panel (go to Window > Brushes). Make sure you have downloaded and loaded some watercolor brushes. You can find many custom watercolor brush packs online. Select one of your watercolor brushes. Make sure the brush is set to a larger size (the exact size will depend on your overall image resolution).
Start painting on the layer mask with a white brush to reveal the watercolor effect of your image underneath the paper texture. Make sure to change the brush size often (you can also change the brush tip after a while). This will make the watercolor effect in Photoshop look more real, and it’ll look different every time!
Advanced Techniques and Workflow Considerations
Creating a believable painterly effect in Photoshop is tough. It often requires countless hours designing a unique workflow and original techniques to make the most authentic paint effects possible. Getting a realistic watercolor effect is all about recreating the natural imperfections and variations that occur when we paint by hand.
Utilizing Custom Brushes and Layer Masks
As with most Photoshop techniques, this effect relies on the careful use of Layers and Layer Masks to hide and show parts of a photo, paint with precision, and seamlessly combine multiple elements. We include custom watercolor Photoshop Brushes that will help you create a hand-painted look. From soft edges to subtle details, these brushes provide all the variation you’ll need to create a convincing painterly effect.
Integrating Seamless Patterns as Overlays
Seamless watercolor patterns, created as described earlier, can be directly applied as overlays. Begin by selecting the image layer in your Layers panel. Then, press and hold the Opt (Mac) or Alt (Win) key and click the "Add Layer Mask" icon. Next, open the Brushes panel and select a large watercolor brush. Paint on the layer mask to reveal the underlying image, allowing the watercolor pattern to blend in a natural way.
Exploring Photoshop Actions for Efficiency
An action is a way to automate a Photoshop process, very much like a preset. There are already many Watercolor Effect actions available for Photoshop, and they’re very easy to use. Of course, you won’t get as much control over the final result as with manual techniques. That said, some Photoshop actions do let you customize the effect slightly. In case you want to try creating the effect using an action, here’s a quick explanation of how they work:
First, install the action. To do this, go to the Actions panel. Open the hamburger menu, and choose "Load Action." Once the action is loaded, you’ll find it listed in the Actions panel. If you’re using Adobe’s watercolor action, you’ll see it as a folder because it has multiple steps. To use the action, open the folder and select the first step, often called "Setup." Follow the on-screen prompts, which might involve selecting the subject of your image using a tool like the Lasso tool or the Pen Tool.
Leveraging Illustrator for Pattern Swatches
For those who work extensively with vector graphics, converting your Photoshop watercolor pattern into an Illustrator pattern swatch is a valuable step. After creating your seamless watercolor pattern in Photoshop, you can export it. Then, in Adobe Illustrator, you can import this pattern and define it as a pattern swatch. This allows you to use your custom watercolor textures within vector projects, maintaining scalability and flexibility. To convert the pattern you create in Photoshop and convert it into an Illustrator pattern swatch, look for specific tutorials around the 8:20 mark in detailed video guides.
Understanding Watercolor Mediums and Their Digital Representation
Watercolor paints are thin and translucent, and the texture of the underlying paper plays a big part in the overall look. These techniques are designed to work on any photograph. Watercolor art will often have a subject painted over a relatively simple background. To recreate this style in Photoshop, you can make quick cutouts of people, plants, and animals. Learn how to use the Pen Tool, Lasso Tool, "Select Subject," "Select Color," and more to quickly remove a background and replace it with watercolor patterns.
The Role of Paper Texture
Since watercolor paints are thin and translucent, the texture of the underlying paper plays a big part in the overall look. This is why incorporating a realistic paper texture overlay is so crucial for achieving an authentic watercolor effect in Photoshop. Whether you scan your own textured paper or use a high-resolution digital texture, its presence adds depth and realism.
Simulating Brush Strokes and Color Blending
Learn how to use the Smudge Tool and Blurs in combination with custom Photoshop Brushes to create the look of soft brush strokes and watercolor paint. The goal is to recreate the natural imperfections and variations that occur when we paint by hand. This includes soft edges, subtle color bleeding, and the characteristic way watercolor pigments spread on paper.
Creating Realistic Cutouts
To emulate the style of watercolor art where a subject is painted over a simple background, mastering selection tools in Photoshop is key. You can learn how to use the Pen Tool, Lasso Tool, "Select Subject," "Select Color," and other selection methods to quickly isolate subjects. This allows you to then place them against a watercolor background or apply the watercolor effect specifically to the subject while leaving the background as is.
By combining these techniques, you can transform ordinary photographs into stunning watercolor artworks, create unique and reusable watercolor patterns, and enhance your digital design projects with the beautiful and organic feel of watercolor.
tags: #watercolor #pattern #photoshop