In an era where our lives are increasingly documented and shared through digital images, the need for robust privacy tools has never been more pronounced. Whether you're a professional photographer, a casual social media user, or simply someone who values personal privacy, understanding how to effectively blur faces in photos is an essential skill. This capability extends beyond mere anonymity; it allows for creative expression, such as strategically blurring backgrounds to emphasize a subject, or safeguarding identities when sharing images publicly. While the focus of this guide is on Picsart, it's worth noting the broader context: the ability to blur faces is a crucial aspect of digital literacy, reflecting an understanding of both technical possibilities and ethical considerations in our interconnected world.

Why Blur Faces? Understanding the Motivations
The act of blurring a face in a photograph serves multiple purposes, each stemming from a different set of needs and intentions. At its core, it's about control over how one's image is presented and perceived.
One of the primary drivers for blurring faces is privacy protection. In a world where images can be easily shared and disseminated across the internet, individuals may wish to obscure their identity for a variety of reasons. This could range from protecting children from unwanted attention to safeguarding personal information from those who might misuse it. For instance, if you're sharing a group photo online and not everyone has consented to be identifiable, blurring the faces of those individuals is a responsible and ethical practice. Similarly, in professional settings, blurring faces in documentary photography or event coverage can ensure that individuals who may not wish to be publicly identified are respected.
Beyond privacy, creative expression is another significant reason. Blurring can be used as an artistic tool to draw attention to specific elements within an image. By blurring the background, a photographer can create a shallow depth of field effect that isolates the main subject, making it stand out more prominently. This technique is common in portrait photography and product shots. Conversely, blurring a person's face can intentionally create a sense of mystery or anonymity, adding an artistic layer to the image. It can transform a straightforward photograph into something more evocative and open to interpretation.
Furthermore, ethical considerations play a crucial role. When sharing images that capture individuals in sensitive situations or without their explicit consent for identification, blurring faces demonstrates compassion and respect for their autonomy. This is particularly relevant in journalism and documentary work, where the welfare and rights of subjects are paramount. It’s about striking a balance between documenting reality and upholding individual dignity.
Finally, there's the practical aspect of content moderation and sharing. Sometimes, individuals might appear in a photo incidentally, and their inclusion might complicate sharing the image online due to privacy policies or personal preferences. Blurring their faces allows the uploader to share the photo without needing to seek consent from every minor figure present.
Understanding these diverse motivations is key to appreciating the utility and importance of mastering face-blurring techniques. It's not just a technical trick; it's a tool that empowers creators to manage privacy, enhance aesthetics, and act ethically in the digital realm.
Picsart: Your Go-To for Image Editing
Picsart is a widely popular and versatile photo and video editing application available on both iOS and Android platforms, as well as a web-based editor. Its user-friendly interface and extensive range of tools make it an accessible option for beginners, while its advanced features cater to more experienced editors. The platform’s strength lies in its comprehensive suite of editing capabilities, which include everything from basic adjustments like cropping and brightness to more complex manipulations such as adding effects, creating collages, and, crucially for our purposes, applying blurs.
The app’s design philosophy prioritizes ease of use. For new users, the intuitive layout means that common editing tasks can be learned quickly. For those looking to delve deeper, Picsart offers a wealth of creative possibilities. This accessibility is a significant factor in its widespread adoption. Whether you're editing a photo on your smartphone during a commute or working on a more elaborate project on a desktop, Picsart provides a consistent and powerful editing experience.
Within Picsart, the ability to selectively blur parts of an image is a core feature. This is not limited to simply applying a uniform blur across the entire photo. Instead, Picsart allows for precise control, enabling users to target specific areas, such as faces, for blurring. This precision is achieved through various tools that allow for masking and selective application of effects.
The app’s ecosystem also extends beyond its core editing functions. Picsart offers a community aspect where users can share their creations, discover inspiration from others, and even collaborate on projects. This social dimension further enhances the user experience, providing a platform for learning and growth within the realm of digital art and photography.
When considering how to blur faces on Picsart, it’s important to recognize that the app doesn’t necessarily have a single, dedicated "blur face" button. Instead, it provides the fundamental tools that, when used in combination, allow for sophisticated and targeted blurring. This approach empowers users to achieve the desired effect with a high degree of control, making it a powerful tool for both privacy and creative enhancement.
Method 1: Using the "Blur" Tool with Masking in Picsart
The most direct and versatile method for blurring faces in Picsart involves utilizing the "Blur" tool in conjunction with its masking capabilities. This approach offers the highest degree of control, allowing you to precisely target specific areas while leaving the rest of the image unaffected.
Step-by-Step Guide:
Open Your Image: Launch the Picsart app and tap the '+' icon to start a new project. Select the photo you wish to edit from your device's gallery.
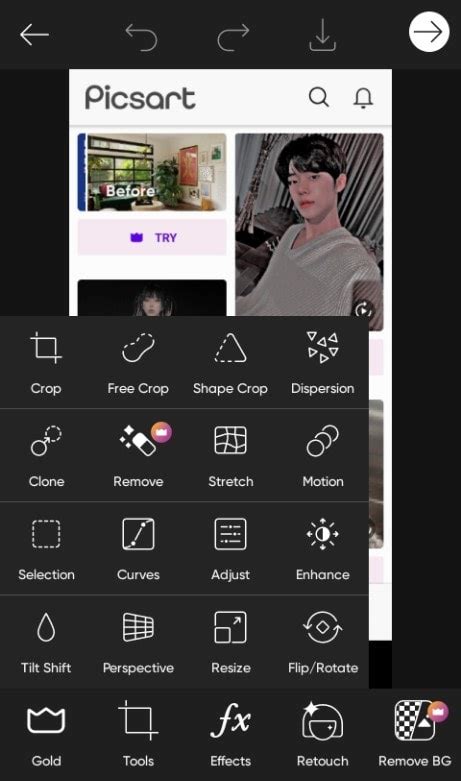
Access the Tools Menu: Once your image is loaded, navigate to the bottom menu bar and tap on "Tools." This will reveal a range of editing options.
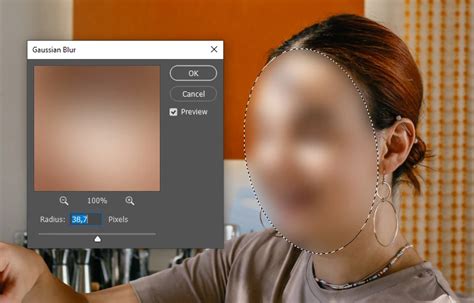
Select the "Blur" Tool: From the "Tools" menu, choose the "Blur" option. You will be presented with several different blur effects (e.g., Gaussian Blur, Motion Blur, Radial Blur). For a standard face blur, "Gaussian Blur" is often a good starting point.
Apply a General Blur (Optional but Recommended): Initially, you might want to apply a blur effect to the entire image. This is not your final goal, but it helps in visualizing the masking process. Adjust the intensity of the blur to your preference using the slider. Tap the checkmark (✓) at the top right to apply this initial blur.
Access the Masking Options: After applying the initial blur, you'll see an "Eraser" icon appear at the top of the screen, alongside other icons like "Undo" and "Redo." Tap on the "Eraser" icon. This is your key to selective editing.
Refine with the Eraser: The "Eraser" tool allows you to remove the applied blur effect from specific areas. Ensure the "Eraser" is selected (it will be highlighted). You can adjust the size, opacity, and hardness of the eraser brush using the sliders at the bottom. Carefully "erase" the areas of the photo that you do not want to be blurred. This means you are essentially revealing the original, sharp image underneath the blur.
Use the "Restore" or "Mask" Tool for Precision: If you accidentally erase too much, you can switch to the "Restore" tool (often represented by a brush icon or a similar symbol within the masking options) to reapply the blur effect to those areas. Alternatively, many blur effects in Picsart allow you to directly use a mask. After selecting a blur effect, look for a "Mask" icon (often a layered square). Tapping this will allow you to invert the blur, applying it only to the areas you select.
Targeting the Faces: Zoom into your image to get a clear view of the faces you want to blur. Using a brush size appropriate for the area, carefully erase the blur from everything except the faces. Alternatively, if using the mask feature, you would paint over the faces to apply the blur effect only to those selected regions.
Adjust Blur Intensity: Once the faces are isolated (either by erasing the blur everywhere else or by masking the faces to receive the blur), you can go back to the "Blur" tool settings (often accessible by tapping the layer or effect again, or by re-selecting the blur tool and then accessing its properties). Here, you can fine-tune the intensity of the blur specifically on the faces.
Finalize and Save: Once you are satisfied with the result, tap the checkmark (✓) to confirm the changes. Then, tap the download or share icon to save your edited image to your device.
This method provides granular control, allowing you to achieve a professional-looking blur that is seamlessly integrated into your photograph. It’s ideal for situations where you need to preserve the detail and clarity of the surrounding image while effectively obscuring facial features.
Method 2: Using Stickers for Face Blurring
Picsart offers a vast library of stickers, and this can be a creative and quick way to obscure faces, especially for more casual edits or when a stylized effect is desired.
Step-by-Step Guide:
Open Your Image: As with the previous method, start by opening your desired photo in Picsart.
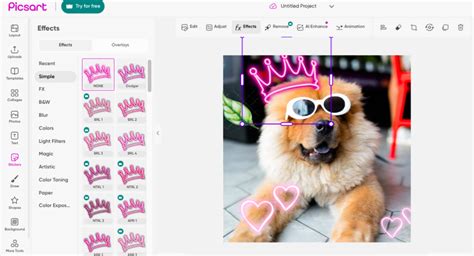
Navigate to "Stickers": In the bottom menu bar, tap on the "Stickers" option.
Search for Blur Effects: Use the search bar within the sticker library. Type in keywords such as "blur," "pixelate," "mosaic," "black bar," or even abstract shapes like "circles" or "squares." Picsart’s extensive library often has pre-made elements designed for obscuring content.
Select and Place a Sticker: Browse through the search results and choose a sticker that suits your needs. Some common options include:
- Pixelated Squares/Circles: These are designed to give a mosaic or pixelated effect, commonly used to obscure identities.
- Solid Color Bars: Black or colored bars can be placed over faces for a simple, direct method of concealment.
- Abstract Shapes: Sometimes, a strategically placed abstract graphic can serve the purpose of obscuring a face in a more artistic way.
Resize and Position: Once you've selected a sticker, it will appear on your image. Use the handles to resize the sticker to perfectly cover the face you want to blur. Drag the sticker to position it accurately over the eyes, nose, and mouth area, or the entire face as needed.
Adjust Opacity (If Applicable): Some stickers allow you to adjust their opacity. If the sticker is too prominent, reducing its opacity can make the edit look more natural or blend better with the image.
Duplicate for Multiple Faces: If there are multiple faces to blur, you can duplicate the sticker by selecting it and then tapping the "Duplicate" icon (often looks like two overlapping squares). Place and resize the duplicated sticker on each subsequent face.
Consider Layering: For a more integrated look, you might experiment with layering multiple stickers or using stickers with transparent backgrounds.
Finalize and Save: Once you are happy with the placement and appearance of the stickers, tap the checkmark (✓) to apply the changes and then save your image.
This sticker method is particularly useful for quick edits or when you want a more graphic or stylized look rather than a realistic blur. It's also very forgiving, as it doesn't involve complex masking and can be easily repositioned or removed.
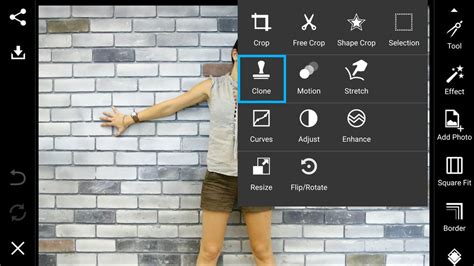
Method 3: Using the "Clone" Tool for Selective Blurring (Advanced)
While not its primary purpose, the "Clone" tool in Picsart can be employed in a more advanced technique to create a blurred effect by sampling and painting over areas of the image. This method requires more patience and precision but can yield very natural-looking results, especially when trying to blend a blurred area seamlessly with the surrounding texture.
Step-by-Step Guide:
Open Your Image: Load the photo you intend to edit into Picsart.
Access the "Tools" Menu: Go to "Tools" from the bottom menu.
Select the "Clone" Tool: Find and select the "Clone" tool. This tool is designed to copy pixels from one area of an image and paint them onto another.
Prepare Your "Source" Area: The key to using the Clone tool for blurring is to select a "source" area that is already blurred or has a texture that can be used to simulate blur. You might achieve this by:
- Pre-applying a Blur: Use the "Blur" tool (as in Method 1) to apply a gentle blur to a larger section of the image, perhaps a background area adjacent to the face. Then, use this blurred area as your source.
- Using Textured Areas: If your image has areas with soft textures (like a slightly out-of-focus background), these can serve as a source.
Set the Source Point: Tap and hold on the desired blurred or textured "source" area. A target crosshair will appear, indicating your source point.
Paint Over the Face: Now, move your finger to the face you want to blur. As you paint, pixels from your source area will be copied onto the face. By repeatedly selecting new source points from the blurred area and painting over the face, you gradually cover the sharp details with the softer texture.
Maintain Consistency: It's crucial to continuously sample new source points from the blurred area to avoid repeating patterns and maintain a natural look. Zoom in closely to ensure you are covering the facial features effectively.
Adjust Brush Settings: Use a soft-edged brush for the Clone tool to help blend the cloned texture more seamlessly. Adjust the opacity of the brush if needed to build up the blur effect gradually.
Combine with Other Methods: For best results, you might use the Clone tool to create a base blur and then refine it with the actual "Blur" tool (Method 1) for fine-tuning the intensity or edges.
Finalize and Save: Once the face is sufficiently obscured and blended, confirm your edits and save the image.
This method is more time-consuming and requires a good eye for detail and texture. However, it offers a high degree of control over the blending and can produce exceptionally natural-looking results, making it difficult to detect that an edit has even been made.
Beyond Basic Blurring: Enhancing Your Edits
While the core task is blurring faces, Picsart offers numerous ways to refine these edits and integrate them seamlessly into your images. Thinking about the context of your photo and the desired outcome can guide your choices.
Adjusting Blur Intensity and Feathering:Once you've applied a blur, don't settle for the default setting. Most blur tools in Picsart allow you to adjust the intensity. For a subtle effect, keep the blur level low. For complete obfuscation, crank it up. Equally important is the concept of "feathering," which refers to the softness of the edges of the blurred area. A hard edge can look artificial. By using softer brushes in the masking or erasing stages, or by employing tools that specifically offer edge feathering, you can create a more natural transition between the blurred and unblurred parts of the image. This is crucial for maintaining a sense of realism, especially in portraiture.
Using Different Blur Types:Picsart offers various blur filters beyond the standard Gaussian blur. Consider experimenting with:
- Motion Blur: This can create a dynamic effect, suggesting movement. It might be suitable if the person was moving quickly.
- Radial Blur: This creates a blur radiating from or towards a central point. It can be used to draw attention away from a face by blurring outwards from it, or conversely, to focus attention by blurring everything except a central point.
- Zoom Blur: Similar to radial blur, but creates an effect of zooming in or out.
Choosing the right type of blur can significantly impact the overall aesthetic and effectiveness of your edit.
Combining Techniques:The most sophisticated edits often arise from combining different tools and techniques. For instance:
- Use the Blur tool with masking for the primary face obscuring.
- Apply a sticker over the blurred area for a more stylized or graphic look.
- Use the Clone tool to blend the edges of the blurred area with the surrounding background texture.
This layered approach allows for greater control and a more polished final product.
Consider the Background:The effectiveness of your blur often depends on the background. A busy, textured background can sometimes help to naturally obscure facial details, making your blurring efforts more convincing. Conversely, a plain background might make artificial-looking blurs more noticeable. If your background is very sharp, you might consider applying a subtle blur to it as well, using masking to keep the subject (or the blurred face) in focus.
Contextual Relevance:Always consider why you are blurring the face. If it's for privacy, a simple, effective blur is usually best. If it's for artistic effect, you have more freedom to experiment with different styles and blur types. Understanding the end goal will help you choose the most appropriate techniques within Picsart.
I Sucked at Editing Photos, Until I Learned This.
Ethical Considerations in Face Blurring
The ability to manipulate images, including blurring faces, comes with a significant ethical responsibility. While powerful tools like Picsart offer creative freedom, it's crucial to use them thoughtfully and with respect for individuals' rights and privacy.
Informed Consent:The most fundamental ethical principle is informed consent. Whenever possible, you should obtain explicit permission from individuals before sharing images where their faces are visible. If consent cannot be obtained, or if an individual requests their face be blurred, then blurring becomes a necessary step. This is particularly important when dealing with minors, vulnerable individuals, or sensitive situations.
Purpose of Blurring:Consider the intent behind blurring. Is it to protect privacy, enhance artistic expression, or potentially to deceive or misrepresent someone? While Picsart is a tool, the ethical implications lie in how it's used. Using blurring to maliciously alter someone's appearance or to create false narratives is unethical. The goal should always be to use the tool responsibly.
Avoiding Misinformation:In the context of news reporting or documentary work, blurring faces must be done carefully to avoid creating misleading impressions. While protecting identities is important, the integrity of the information being conveyed should not be compromised. Ensure that the blurred image still accurately represents the situation being documented.
Digital Footprint and Permanence:Remember that once an image is shared online, it can be difficult to control its spread. Even if you blur a face, the original, unedited image might exist elsewhere. Be mindful of the potential for original images to resurface. For highly sensitive situations, consider whether sharing an image at all is the most appropriate course of action.
Balancing Creative Freedom and Respect:Digital privacy is a complex issue that requires balancing creative expression with respect for individuals. Learning how to blur faces is a technical skill, but applying it ethically requires a conscious decision to prioritize privacy and dignity. This demonstrates compassion and a commitment to responsible digital citizenship. It’s about understanding that while technology provides the means, human judgment and ethical considerations must guide its application.
By mastering the technical aspects of face blurring in Picsart and remaining mindful of these ethical considerations, users can navigate the digital landscape more responsibly, protecting privacy while still engaging in creative expression.