The allure of facial hair is a complex phenomenon, often marked by a love-hate dynamic. For many, the journey of growing a beard is fraught with challenges: it might grow too quickly, too sparsely, or at a pace that feels like geological time. Those who possess the natural ability to cultivate a full beard often inspire envy in others. Then there are those whose facial hair progresses at a glacial pace, leaving them resembling a wild creature for months before any semblance of human-like growth appears. They listen with a mixture of amusement and bewilderment to friends who must shave multiple times a day to combat a persistent five o'clock shadow. This tutorial, however, is fundamentally an exploration of creating custom brushes in Photoshop and mastering the perception and management of uniformity to achieve a realistic effect.
The Genesis of a Realistic Beard: Custom Brush Creation
The initial and most crucial step in generating a convincing digital beard lies in the meticulous creation of a single hair, which will serve as the foundational element for your custom brush. This individual hair must be crafted with as much precision as possible, as its quality directly impacts the overall realism of the final beard.
Crafting the Core Hair Strand
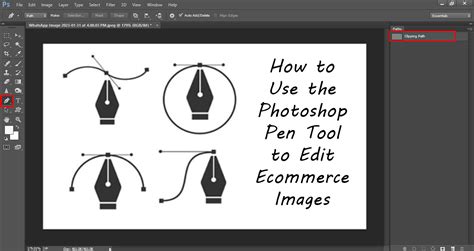
To begin this process, you will employ the Curvature Pen Tool (P) to draw two distinct points at a chosen distance from each other. Subsequently, select the Brush Tool (B) and navigate to the Brushes panel. Within this panel, locate and select "Legacy Brushes," then "Default Brushes," and choose the "Round Point Stiff" brush. Reverting to the Pen Tool (P), right-click on your canvas and choose "Stroke Path." This action will render your initial hair strand.
To transform this single hair into a reusable brush, proceed to "Edit" > "Define Brush Preset." This action prompts you to name your new brush; a fitting name such as "Beard" is recommended.
Refining Brush Settings for Natural Variation
Following the creation of your base hair brush, it is essential to establish a testing ground for its properties. Create a new document with dimensions sufficiently large to allow for ample experimentation and adjustment of your brush settings. Set your background and foreground colors to two representative shades of beard hair.
Within the Brush Settings panel (accessible via F5), a universe of customization awaits. While it is possible to achieve results with a mouse or trackpad, the process is undeniably more fluid and precise with a stylus, particularly a Wacom tablet. Aaron’s advice to thoroughly explore this section is invaluable, as it unlocks the potential for nuanced control. It is here, by manipulating parameters such as "Angle Jitter," "Scattering," and "Opacity," that the foundation for realism begins to take shape.
you're using the wrong brush settings...
The "Angle Jitter" setting is particularly critical for simulating the natural, varied growth directions of facial hair. Adjusting this parameter introduces randomness to the angle of each brush stroke, preventing a uniform, artificial appearance. Similarly, "Scattering" controls how spread out the brush marks are, allowing for the creation of sparser or denser patches of hair. Opacity, of course, dictates the transparency of each stroke, enabling the layering of hairs to build depth and volume.
Building the Beard: Layering and Texturing Techniques
With your custom beard brushes prepared, the next phase involves applying them to your chosen model's photograph, layering them strategically to construct a believable beard.
Establishing the Base Layer
Open the photograph you intend to work with. Create a new layer and apply a Layer Mask to it. This mask will serve as a guide for where the beard will be visible. For the initial base layer of the beard, double-click the "Beard" brush layer (or the layer where you've applied your custom beard brush) and navigate to the "Blend If" section. This non-destructive method allows for seamless integration of the beard into the existing skin tones.
Adding Detailed Hair Strands
Create a new layer, naming it "Detailed Hair." Select your desired beard colors and begin painting individual hair strands using your custom "Beard" brush. Aim to paint directly over the area defined by the mask on the layer below. Remember that facial hair does not grow uniformly; its direction varies significantly across different areas of the face.
This is where the Brush Settings panel (F5) becomes indispensable again. For each brush stroke, adjust the "Angle" and "Shape" of the hair to mimic the natural growth patterns. For instance, hair on the jawline might grow downwards, while hair on the cheeks could angle slightly forward.
Furthermore, vary the "Density" of the hair and the "Size" of your brush according to the specific area you are rendering. Begin by painting slowly, covering the area established by the base layer, and gradually increase the density of the hair where it naturally occurs. The more meticulous attention you pay to the directional flow of the hair, the more convincing the final result will be.
Introducing Stubble and Fine Details
To enhance the realism further, duplicate the "Detailed Hair" layer (Control-J). Double-click this duplicated layer and access the "Blend If" section once more. Drag the lower white marker to the left until the beard begins to recede, creating a subtle thinning effect.
Now, return to the original copied layer and ensure it remains visible. Select a "Soft Round" brush and paint with black on its Layer Mask. This action will selectively remove hair from the copied layer, effectively creating a softer, more diffused edge to the beard. Subsequently, reduce the brush size and paint with white to reveal a fine layer of hair around the perimeter of the face, adding a delicate transition that softens the overall appearance.
For an even more convincing effect, create an additional new layer and name it "Stubble." Employ a dedicated "Stubble" brush (or your custom beard brush with adjusted settings) to paint sparse, short hairs. As before, adjust the "Angle" in the brush settings to match the direction of stubble growth in the specific area. You can also modify the "Roundness" parameter to control the perceived length of these stubble hairs.
Enhancing Realism: Shading and Final Touches
The final stages involve adding depth through shading and making subtle adjustments that unify the digital beard with the subject's natural features.
Adding Depth with Shading
To imbue the beard with a sense of volume and dimension, introduce subtle shading. Navigate to the "Adjustments" panel and select "Hue/Saturation." Lower the "Lightness" value and increase the "Saturation" slightly. This adjustment creates a darker, richer tone that simulates the shadows within a natural beard, adding depth and preventing a flat, painted appearance.
Fine-Tuning for Convincing Integration
The beard is now largely complete, but minor adjustments can significantly elevate its believability. You might consider lowering the "Opacity" of the "Beard" layer to achieve a subtler effect, especially if the beard appears too prominent. Use the Layer Masks associated with each beard layer to paint with black in specific areas where hair might naturally be sparser or absent, or paint with white to introduce more hair where needed.
Experiment with different blend modes for the beard layers. "Multiply" can be effective for darkening and adding depth, while "Overlay" or "Soft Light" can help integrate the beard's color and texture with the underlying skin tones.
The key to a truly convincing digital beard lies in the understanding and application of uniformity management. By creating custom brushes that capture the essence of individual hair strands and then employing strategic layering, directional variation, and subtle shading, you can transform a simple photograph into a compelling depiction of natural facial hair. This process not only teaches you how to create a beard in Photoshop but also deepens your understanding of digital painting techniques and the nuances of visual realism.
If your goal is to create a beard in Photoshop or simply to learn how to Photoshop a mustache onto someone's face, this tutorial has provided a comprehensive approach to creating facial hair in Photoshop. For those seeking to expedite the process, pre-made facial hair Photoshop actions are available from resources like Envato Elements, offering a convenient shortcut to achieving professional-looking results.