Photoshop, a powerful tool for image editing and graphic design, offers a versatile array of options for manipulating text. While often associated with visual effects, understanding how to precisely align text is crucial for creating professional and aesthetically pleasing designs. This guide delves into various methods of text alignment in Photoshop, from simple centering to complex path-based placement and grid adherence, ensuring your typography is always precisely where you intend it to be.
Understanding Photoshop's Text Layers
Before diving into alignment techniques, it's essential to grasp how Photoshop handles text. When you use the Type Tool, Photoshop creates a dedicated text layer. This layer is dynamic, meaning you can edit the text content, font, size, color, and, importantly, its position and alignment. This layer-based approach offers immense flexibility.
Basic Text Alignment: Centering and Justification
One of the most common text alignment needs is centering. Whether you're placing a headline on an image or aligning a caption, Photoshop provides straightforward tools.
Centering Text on the Canvas
When you've finished typing and committed your text (by clicking the checkmark in the options bar, clicking elsewhere on the canvas, or selecting another tool), the Move Tool becomes your primary instrument for alignment.
- Select the Text Layer: In the Layers panel, ensure your text layer is highlighted.
- Activate the Move Tool: Choose the Move Tool (keyboard shortcut 'V'). It's represented by a cross with arrows at the ends.
- Utilize the Options Bar: With the Move Tool active and your text layer selected, observe the Options bar at the top of your screen. You'll find a set of alignment icons.
- To center your text horizontally across the entire canvas, click the 'Align horizontal centers' icon.
- For vertical centering, click the 'Align vertical centers' icon.
These two actions, when applied together, will perfectly center your text within the bounds of your Photoshop document.
Aligning Text within a Selection
Sometimes, you don't need to center text on the entire canvas, but within a specific area of your design. Photoshop accommodates this with a simple workflow:
- Create a Selection: Use a selection tool, such as the Marquee Tool, to draw a precise selection around the area where you want your text to be centered.
- Select the Text Layer: Ensure your text layer is active in the Layers panel.
- Use the Move Tool and Alignment Icons: With the Move Tool active, and both the selection and the text layer active, use the 'Align horizontal centers' and 'Align vertical centers' icons in the Options bar. The text will now align itself to the center of your active selection.
This method is invaluable when working with specific design elements or creating text within defined boundaries.
Paragraph Alignment and Justification
For more control over text within a text box, especially for longer blocks of copy, the Paragraph panel is indispensable.
- Access the Paragraph Panel: If the Paragraph panel isn't visible, go to the Window menu and select Paragraph.
- Select the Text Layer: Make sure your text layer is active.
- Explore Alignment Options: Within the Paragraph panel, you'll find a range of alignment options:
- Left Align: Aligns text to the left edge of the text frame.
- Center Align: Centers each line of text within the text frame.
- Right Align: Aligns text to the right edge of the text frame.
- Justify: This option aligns text to both the left and right edges of the text frame, creating clean, straight margins. There are various justification options, including 'Justify with last line aligned left,' which can prevent excessive word spacing on the final line of a paragraph.
The Paragraph panel also allows for fine-tuning of leading (line spacing) and tracking (letter spacing), which significantly impacts the visual appeal and readability of your text.

Advanced Text Placement: Type on a Path and Within Shapes
Photoshop offers dynamic ways to integrate text with shapes and paths, moving beyond simple linear alignment.
Type on a Path
This feature allows you to make your text follow the contour of a line, curve, or custom path.
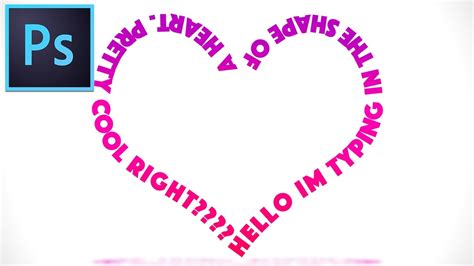
- Create a Path: You can create a path using Photoshop's Pen Tool or by selecting a shape layer and then converting its path. Alternatively, use the Custom Shape Tool and ensure the 'Path' option is selected in the Options bar. For instance, you can draw a heart shape.
- Select the Type Tool: Activate the Type Tool (keyboard shortcut 'T').
- Hover Over the Path: Move your cursor over the path you've created. Notice how the cursor changes - a small, wiggly line appears at the bottom of the Type Tool icon when it's ready to snap to a path.
- Click and Type: Click on the path. A blinking cursor will appear, and you can now type your text. The text will automatically follow the path.
- Edit Text on Path: You can select the text on the path and change its font, size, and color. To adjust the spacing between characters, select the text, hold down the Alt (or Option) key, and use the left and right arrow keys. The left arrow key moves characters closer, and the right arrow key moves them further apart.
- Reposition Text on Path: The Move Tool can also be used to adjust the position of the text along the path. You can drag the text to start or end points on the path.
Filling a Shape with Type
This technique allows you to place text inside a defined shape, with the text automatically flowing to fill the contours of that shape.
- Create a Shape: Use the Custom Shape Tool (or any shape tool) to draw a shape on your canvas. Crucially, ensure the shape is set to create a 'Path' in the Options bar, not a Shape layer or Pixels.
- Select the Type Tool: Activate the Type Tool.
- Hover Over the Shape's Path: Move your cursor over the path of the shape. This time, the cursor will appear with a circle next to the wiggly line, indicating it's ready to fill a shape.
- Click Inside the Shape: Click within the boundaries of the shape. A cursor will appear, and you can now paste or type your text.
- Text Flow: The text will automatically fill the shape. You can paste large amounts of 'Lorem Ipsum' or your own text. If the text exceeds the shape's capacity, you may see an overflow indicator (a small plus sign).
- Adjusting Text Size: To make the text visible within smaller shapes, select the text and adjust its size in the Options bar or Paragraph panel. You can also copy and paste text multiple times (Ctrl+C to copy, Ctrl+V to paste) to fill larger areas.
This method is excellent for creating text-filled badges, logos, or any design where text needs to conform to a specific form.
Utilizing Grids for Precise Alignment
For highly structured documents and layouts, Photoshop's grid systems provide a robust framework for aligning text.
Baseline Grid
The baseline grid ensures that text baselines align consistently across your document, which is particularly important for body text in multi-column layouts or when maintaining visual harmony across pages.
- Show the Baseline Grid: Go to View > Grids & Guides > Show Baseline Grid.
- Set Grid Preferences: To customize the grid, navigate to Edit > Preferences > Grids. Here you can define the 'Gridline every' value, which typically corresponds to your leading (line spacing) for body text.
- Align Text to the Grid: In the Paragraph panel, you can specify that text should align to the baseline grid. This ensures that the baselines of your text snap to the horizontal lines of the grid, creating a unified baseline rhythm.
- Zoom Threshold: Note that the baseline grid is only visible when your document zoom level exceeds a certain threshold set in Grids Preferences. This prevents the grid from appearing overly cluttered at high zoom levels.
The baseline grid is crucial for professional typesetting, ensuring that paragraphs, even those following headings or spanning columns, maintain consistent vertical alignment.
Document Grid and Column Grids
Photoshop also offers a standard document grid that can be customized in Edit > Preferences > Grids. This grid can be used to align text frames and other elements precisely. When working with multi-column layouts, you can create guides or use the grid to ensure text columns are evenly spaced and aligned.
For text frames, you can specify alignment to the top, center, bottom, or justify the text within the frame vertically. This is controlled in the Paragraph panel under vertical alignment options. For instance, choosing 'Justify' will distribute the text evenly between the top and bottom of the frame, filling it completely. However, caution is advised when vertically justifying multi-column text frames, as it can sometimes lead to awkward spacing.
Fine-Tuning Text Appearance
Beyond basic alignment, consider how text density, size, and spacing contribute to visual appeal.
- Text Density and Visual Appeal: The arrangement of text, its size, and the spacing between characters and lines all contribute to how dense the text appears. Achieving a balance that is both informative and visually appealing is key.
- Font Size and Spacing: When in doubt about centering text, err on the side of caution by using a slightly smaller font size and tighter spacing. This often results in a more polished and professional look, preventing the text from appearing too overwhelming or disconnected.
- Aligning Small Characters: For specific typographic needs, Photoshop allows for alignment of smaller characters (like subscripts or superscripts) relative to larger ones, ensuring typographic consistency.
By mastering these text alignment techniques in Photoshop, from simple centering to complex path-based and grid-aligned layouts, you can elevate your designs from amateur to professional, ensuring your message is not only seen but also presented with clarity and style.