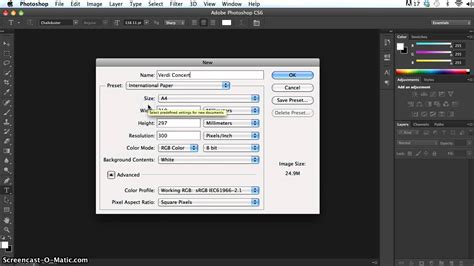
Selecting the best Photoshop resolution settings is a critical factor that can significantly impact the final output quality when optimizing images for the web, print, or other digital platforms. The appropriate resolution for your images depends entirely on the intended use and viewing distance. For web images, a resolution of 72 ppi is generally sufficient, while for print, a higher resolution of 300 ppi or more is recommended to ensure sharp and detailed prints. In Photoshop, you can adjust the resolution through the Image Size dialog box, which allows you to modify the width, height, and resolution of your image. Selecting the "Resample" option enables you to choose an interpolation method that determines how Photoshop calculates the new pixel values when resizing the image.
Pixels Per Inch (PPI) and Pixels Per Centimeter (PPCM): The Foundation of Detail
Pixels per inch (PPI) and pixels per centimeter (PPCM) are crucial measures of pixel density that directly impact the quality of printed images. PPI refers to the number of pixels contained within a linear inch of an image. PPCM, on the other hand, represents the number of pixels within a linear centimeter. Higher PPI/PPCM values indicate a higher concentration of pixels, resulting in finer detail and sharper prints. The recommended PPI/PPCM for print varies depending on the intended viewing distance. For high-quality prints viewed from a close distance, such as photographs or fine art reproductions, a PPI of 300 or higher is generally recommended.
When setting the resolution in Photoshop, it’s crucial to consider both the PPI/PPCM and the physical dimensions of the printed image. The resolution should be set to achieve the desired PPI/PPCM while maintaining the appropriate image size. Understanding the connection between PPI/PPCM and the best Photoshop settings for resolution empowers photographers and graphic designers to produce high-quality prints that meet specific requirements.
A digital image is composed of millions of pixels, each recording light information. Sensor resolution is measured in "effective megapixels" (MP), referring to the number of pixels on a camera sensor used to record an image. Screen resolution is also measured in pixels, commonly cited as the width and height, such as 1920 x 1080 (Full HD). Newer 4K displays boast a horizontal resolution of around 4,000 pixels (typically 3840 or 4096). While older monitors might have displayed 72 pixels per inch (PPI), a 24” Full HD monitor now displays about 92 PPI, and a 24” 4K monitor presents approximately 186 PPI.
The distinction between DPI (dots per inch) and PPI (pixels per inch) is important. While often used interchangeably, DPI specifically refers to print, representing dots of ink, whereas PPI refers to digital displays and the pixels of light. Many people mistakenly discuss DPI on screen, which is technically incorrect. "High-resolution" or "low-resolution" refers to pixel density; more density equals more resolution and detail. Insufficient resolution leads to noticeable softness or "jaggies" (pixelization), while excessive resolution results in unnecessarily large file sizes without improving display quality. The goal is to maintain image quality as close to the original as possible.
Every screen has a native resolution, for instance, 750 x 1334 pixels or 326 ppi on an iPhone Retina display. 326 refers to 326 square pixels fitting into one square inch of the display to perfectly match the screen size. For example, many HD monitors are 1920 pixels across by 1080 pixels high. Print resolution is measured in dots per inch (DPI), with LPI (lines per inch or line screen) used in commercial printing. More dots per square inch result in higher resolution and detail in a print. Typical print resolution is 300 dpi, though some inkjet printers perform better at 360 or 240 dpi. This means 300 dots of ink are printed per square inch of material. An image with less resolution will appear soft, while a larger image offers no benefit if the printer cannot print beyond its maximum resolution. A 939 x 932 pixel image can print at 3.13 x 3.1 inches and appear sharp at 300 ppi/300 dpi.
Resampling and Interpolation: The Art of Pixel Manipulation
Resampling plays a critical role in selecting the best Photoshop settings for resolution, as it determines how Photoshop calculates pixel values when resizing an image. When resizing, Photoshop employs an interpolation algorithm to create new pixels. Different interpolation methods use varying mathematical formulas to estimate the color values of new pixels based on surrounding existing pixels.
- Nearest Neighbor: This is the fastest and simplest method, but it can result in jagged edges and a loss of sharpness, especially when enlarging an image.
- Bilinear Interpolation: This method offers a smoother result compared to Nearest Neighbor but can introduce some blurriness.
- Bicubic Interpolation: This is a more sophisticated method, producing smoother and sharper results, particularly when reducing image size. Adobe has introduced further Bicubic variations, including Bicubic Smoother for enlargements and Bicubic Sharper for reductions. Photoshop CS6's "Automatic" setting selects the appropriate Bicubic method based on whether you are enlarging or reducing.
Understanding the effects of different resampling methods is crucial for selecting the best Photoshop settings for resolution. For instance, if you need to enlarge an image for printing, choosing Bicubic interpolation will help maintain sharpness and minimize pixelation.
The problem with sampling up (enlarging) an image is that image quality will be lost; the larger you make it, the more quality you will lose. When you change the size of an image, Photoshop must recreate pixels. Photoshop needs to know how to combine existing pixels and which ones to discard when scaling down, and how to create new pixels when scaling up. This process is called resampling. Even a single-pixel change resamples or rewrites the entire image. This is why creating the image at the correct size initially is ideal.
To resample, Photoshop performs calculations to recreate pixels. This mathematical process is called interpolation. Interpolation is important because certain types will yield better results for different image types.
Understanding Image Size in Photoshop - About Pixels, Resampling, and Resizing a Photoshop Image
For upscaling, "Preserve Details" often works exceptionally well for many images, especially line art and graphics. However, for simple line art, "Bilinear" can sometimes yield better results. For photographs, "Bilinear Smoother" can produce a more natural (though softer) result with fewer halos and artifacts. You can always apply sharpening to the result. The outcomes depend on the extent of scaling and the image's detail versus large gradient areas like skies. Therefore, it's advisable not to solely rely on automatic settings.
Adobe has introduced features like "Super Resolution" in Lightroom and Photoshop, which leverage artificial intelligence (AI) and machine learning (ML) to enhance image resolution. Super Resolution can quadruple the pixel count by doubling the image size, intelligently choosing the best pixels for context. This is particularly useful when cropping a small section of a photo for a headshot, where traditional resizing would lead to significant pixelation.
When you need more control over image resolution, especially for significant size changes or adding a specific number of new pixels, traditional resampling is the best choice. In the Image Size dialog box, checking the "Resample" box allows you to adjust print size and resolution independently, altering the pixel count. You can enter desired values for Width and Height under "Dimensions." If your image has layers with applied styles, select "Scale Styles" under the gear icon to scale these effects. You can also experiment with adjusting dimension or resolution without changing the pixel count; Photoshop will automatically adjust the other value while maintaining the aspect ratio. Deselecting "Resample" allows you to adjust resolution or document size without altering the pixel count, which changes how many pixels are displayed per inch. For example, an image with 3000 x 2000 pixels at 300 ppi will result in a smaller document size than the same image at 72 ppi.
Intended Use: Web vs. Print Resolution Demands
The intended use of an image plays a crucial role in determining the best Photoshop settings for resolution, as the requirements for web and print media differ significantly. Web images are typically displayed on screens with a relatively low pixel density, typically around 72 PPI. At this resolution, the human eye cannot discern individual pixels, making a lower resolution sufficient to maintain image quality while keeping file sizes manageable.
However, for print media, a higher resolution is necessary to ensure that images appear sharp and detailed when printed on paper or other physical materials. Understanding the intended use of an image allows photographers and graphic designers to select the appropriate resolution settings in Photoshop. By matching the resolution to the intended display medium, they can achieve optimal image quality and ensure their images are visually effective in their intended context.
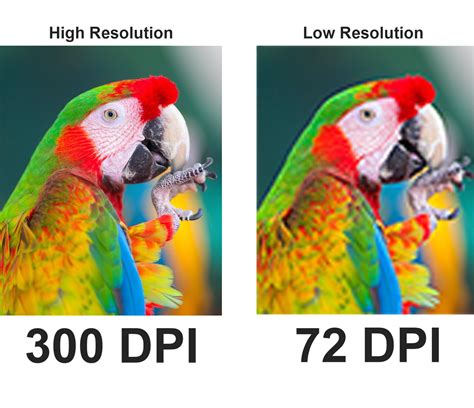
Image Size, Resolution, File Size, and Quality: The Interplay
Understanding the relationship between image size, resolution, file size, and quality is crucial for selecting the best Photoshop settings for resolution. Image size refers to the physical dimensions of an image in terms of width and height, typically measured in pixels. Resolution, as discussed, measures the number of pixels per unit of length (PPI or PPCM). A higher resolution image will generally result in a larger file size due to the increased number of pixels. However, a higher resolution also means the image will appear sharper and more detailed when printed or viewed at a larger scale.
The optimal image size and resolution depend on the intended use of the image. For web images, where file size is a primary concern, a lower resolution (such as 72 PPI) and smaller image size may be sufficient. Understanding the interplay between image size, resolution, file size, and quality empowers photographers and graphic designers to make informed decisions about the best Photoshop settings for resolution.
If someone asks for an image of a certain size, simply stating "4x6 inches" or "at 300dpi" is insufficient. File size, influenced by compression and file type, doesn't solely determine physical size. The overall pixel dimensions are key. Providing the target size and resolution is essential, for example, "4x6 inches at 300DPI/300PPI."
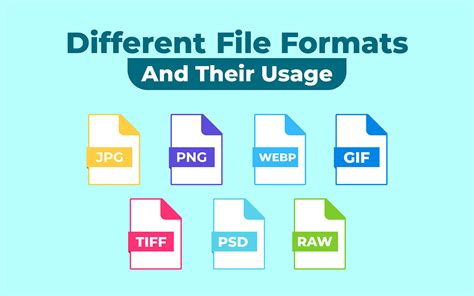
File Formats: Preserving Resolution and Quality
The choice of file format plays a significant role in selecting the best Photoshop settings for resolution due to the varying capabilities and characteristics of each format:
- JPEG: A widely used lossy compression format designed for web and digital photography. JPEG compression can introduce some loss of detail and artifacts, especially at lower quality settings. It is suitable for images with continuous tones, such as photographs, due to its good balance between image quality and file size.
- TIFF: A lossless compression format often used for professional photography and printing. TIFF files can maintain sharp details and accurate colors, making them ideal for high-resolution printing and editing.
- PSD: Photoshop’s native file format, supporting layers, masks, and advanced editing features. PSD files are not compressed, preserving the highest level of detail and image quality.
- PNG: Can maintain sharp details and accurate colors but can result in larger file sizes compared to JPEG or GIF files. PNG files are excellent for web graphics that require transparency.
Understanding the connection between file format and resolution settings empowers photographers and graphic designers to select the most appropriate format for their specific needs.
Practical Application and Workflow Tips
When optimizing resolution settings in Photoshop, it's crucial to achieve high-quality visual outputs. The process involves identifying the intended platform or medium for your image. Remember that resolution and image size are interdependent. Increasing image size while maintaining the same resolution can lead to pixelation, while decreasing the size can enhance sharpness. When resizing images, select the interpolation method based on your specific needs. Crucially, choose the file format that aligns with your intended use and quality requirements. Utilize Photoshop’s preview feature to visualize the effects of your resolution settings before committing.
The best Photoshop settings for resolution may vary depending on the specific image and project requirements. Consider the intended display medium, desired image quality, and file size constraints to fine-tune your settings. Mastering the art of resolution optimization empowers you to create images that are both visually appealing and fit for purpose.
For example, if you need to print an 8x10 image professionally, you'll typically require 8x10 inches at 300 ppi. If you start with an image at 300 ppi and need to increase it to 600 ppi for a professional publication, you can achieve this by doubling the resolution. The pixel dimensions will remain the same, but the document width and height will decrease by half. Conversely, halving the resolution will double the document width and height while keeping pixel dimensions constant.
A helpful analogy for understanding resolution is to imagine two friends each with a bucket of 5000 seeds to plant in a field. One friend plants 150 seeds per inch, while the other plants 300 seeds per inch. The friend planting 300 seeds per inch will have a denser, more detailed planting in the same area. Similarly, 72 ppi and 150 ppi images might be too low in quality for high-resolution prints, while 300 ppi and 600 ppi images can look crisp, but the 600 ppi image might be too small in physical dimensions for the intended output.
Ultimately, achieving high-resolution images often begins with using the right camera for the job. However, when that's not an option, or when working with older digital photos, Adobe Photoshop and Adobe Lightroom offer powerful tools to improve resolution and image quality. Experimenting with Super Resolution, resampling, and AI image upscalers can significantly push your image quality boundaries.
tags: #best #photoshop #resolution