The ability to precisely control linework and shading is a cornerstone of compelling digital art. One of the most empowering aspects of working within Adobe Photoshop is the immense flexibility offered by its brush system. Beyond the extensive library of pre-installed brushes and readily available brush packs, a truly remarkable feature is the capacity to create and share your own custom brushes. This allows artists to achieve a unique aesthetic and develop tools that perfectly match their creative vision. Whether you're seeking to elevate your digital paintings with specialized drawing brushes or simply expand your toolkit with preset Photoshop brushes, understanding how to import and manage these assets is crucial. This guide will walk you through the process of importing, loading, and installing ABR (Adobe Brush) files into your Photoshop application, unlocking a vast spectrum of artistic possibilities.
The Evolution of Brush Importing in Photoshop
It's important to note that the method for importing and accessing brushes has seen significant evolution with the most recent iterations of Photoshop. This evolution has streamlined the process, making it more intuitive and accessible for users of all levels.
In earlier versions of Photoshop, the management of brushes, particularly loading and replacing ABR files, often involved navigating to specific preset folders within the application's directory. This typically required locating the installation path, which might look something like: Application Support > Adobe > Adobe Photoshop XX > Presets > Brushes. Users would then manually place their ABR files into this designated 'Brushes' folder. This method was particularly relevant when the 'load/replace' functionality was a primary means of managing brush sets. The necessity of this approach was often tied to system permissions, which could sometimes present a hurdle depending on user account configurations.
However, the current workflow in contemporary Photoshop versions has dramatically simplified this procedure. The need to manually place files into specific system folders is largely a thing of the past, offering a more user-friendly experience.
Modern Methods for Importing ABR Brushes
The most current and straightforward method for importing ABR Photoshop brushes involves direct interaction within the Photoshop application itself. This approach bypasses the need for manual file system manipulation and offers immediate access to your new brush sets.
Accessing the Brush Tool: Begin by selecting any of the brush tools from the Photoshop toolbar. The Paint Brush tool is a common choice, but the Mixer Brush, Eraser, or any other tool that utilizes brushes will work.
The Brush Settings Panel: Once a brush tool is active, you will typically see a Brush Settings panel or a brush preset picker appear, often in the Options bar at the top of the screen or as a dedicated panel.
Importing ABR Files: Within this brush interface, you will find an option to import or load brushes. The exact wording might vary slightly between Photoshop versions, but look for an icon (often a gear or a hamburger menu) that provides access to brush management options. Select this option, and you should find a command such as "Import Brushes…" or "Load Brushes…".
File Selection: A file browser window will then open, allowing you to navigate to the location on your computer where your ABR brush files are stored. Select the ABR file (or multiple files) you wish to import.
Automatic Organization: Upon selecting the ABR file(s), Photoshop will automatically import them. A significant advantage of this modern method is that any brushes imported are added to your application in a group clearly defined by the name of the ABR file itself. This makes it incredibly easy to locate and manage your newly added brush sets without confusion.
Utilizing the Brush Preset Picker
Another highly efficient way to manage and import brushes, particularly in newer versions of Photoshop, is through the Brush Preset picker.
Locate the Brush Preset Picker: This is usually accessible from the Options bar when a brush tool is active, or by opening the "Brushes" panel (Window > Brushes).
Accessing Brush Management: Within the Brush Preset picker or the Brushes panel, you'll find a menu or icon that allows you to manage your brush presets. Click on this to reveal options like "Import Brushes…", "Load Brushes…", or "Replace Brushes…".
Selecting and Loading: Choose "Import Brushes…" and navigate to your ABR file. Once selected, the brushes will be added to your current brush library, typically appended to the end of your existing presets or organized into a new group based on the ABR file's name.
Creating Your Own Brushes: Unleashing Ultimate Customization
The ability to import brushes is powerful, but the ultimate control comes from creating your own. This allows you to craft brushes that are perfectly tailored to your artistic needs, whether for specific textures, unique stroke dynamics, or specialized effects.
Define Your Canvas: Start by creating a new document in Photoshop. The size and resolution of this document will influence the detail and quality of your brush tip. For most purposes, a square canvas (e.g., 500x500 pixels or larger) with a resolution of 300 DPI is a good starting point.
Paint Your Brush Tip: Use black and white to paint the shape of your brush tip. White areas will be transparent, black areas will be opaque, and shades of gray will create varying levels of opacity. You can use existing brushes, textures, or even custom shapes to create your brush tip. Think about the desired outcome - do you want a soft-edged brush, a textured stamp, or a dynamic scattering brush?
Isolate Your Brush Tip: Ensure that your brush tip is on a white or transparent background. If you have multiple elements, you might need to use selection tools and masks to isolate the desired shape.
Define Brush Preset: Once you are satisfied with the appearance of your brush tip, go to
Edit > Define Brush Preset....Name Your Brush: A dialog box will appear asking you to name your new brush. Choose a descriptive name that will help you remember its purpose.
Saving and Accessing Your Custom Brush: Your new brush will now appear in your Brush Presets panel. To save it permanently and make it easily shareable, you can then export it as an ABR file. With your custom brush selected in the Brush Presets panel, click on the menu icon (hamburger menu or gear icon) and choose "Export Selected Brushes…". Save the ABR file to a location where you can easily find it or share it with others.
How To Make Custom Brushes in Photoshop | Photoshop Tutorial
Understanding Brush Settings for Advanced Control
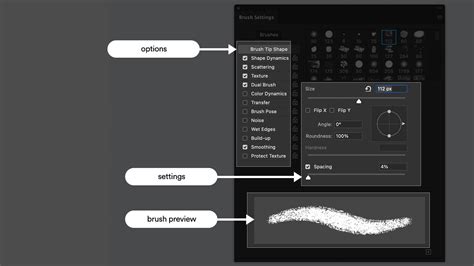
Beyond simply importing and using brushes, delving into the Brush Settings panel (Window > Brush Settings) unlocks a deeper level of control and customization. This panel allows you to fine-tune every aspect of a brush's behavior.
- Brush Tip Shape: Here, you can adjust the size, hardness, spacing, diameter, and angle of your brush tip. Spacing, for instance, determines how frequently the brush tip is stamped as you drag your cursor, affecting stroke smoothness and texture.
- Shape Dynamics: This section controls variations in size, angle, and roundness. You can link these variations to "Pen Pressure," "Pen Tilt," or "Fade" for dynamic and responsive brush strokes when using a graphics tablet.
- Scattering: This setting allows you to spread brush instances randomly around the stroke path. You can control the "Scatter" amount and the "Count" of instances.
- Texture: Apply a texture to your brush tip, giving it a more complex and realistic surface quality.
- Dual Brush: Combine two brush tips to create intricate and unique brush effects.
- Color Dynamics: Introduce variations in hue, saturation, and brightness to your brush strokes, adding richness and complexity.
- Transfer: Control opacity and flow jitter, allowing for subtle or dramatic changes in brush stroke transparency and density.
- Other Dynamics: This includes settings like Noise, Wet Edges, Build-up, and Smoothing, each offering further nuanced control over the brush's appearance and behavior.
By understanding and experimenting with these settings, you can transform a simple brush tip into a sophisticated tool capable of producing a vast array of artistic effects, from realistic watercolor washes to sharp, graphic linework and everything in between. The key is to think ahead about what look you’re going for and what kind of brush, with what specific settings, will help you achieve that effect most effectively. The ability to save your meticulously configured brushes by selecting "New Brush Preset" from the brush settings menu ensures that your custom tools are always at your fingertips, ready to elevate your next digital masterpiece.