Adobe Photoshop stands as the undisputed industry standard for image editing and graphic design, a powerful software from Adobe that empowers both professionals and hobbyists to bring their creative visions to life. At the heart of this creative powerhouse lies the Tools panel, a dynamic interface that serves as your gateway to a vast array of essential functions. Understanding the basics of the tools provided within this panel is crucial for anyone starting with Photoshop, as it unlocks a world of design techniques and provides efficient solutions to complex editing challenges. This comprehensive guide delves into every aspect of the Photoshop tools and toolbar, offering insights designed to help beginners grasp fundamental concepts while providing advanced tips for seasoned users. You will discover how each tool functions, learn keyboard shortcuts to accelerate your workflow, and explore methods for customizing the interface to enhance productivity. Whether you edit photos for a living or design graphics as a passion project, mastering these elements will undoubtedly transform your experience with the software.
Understanding the Photoshop Toolbar's Organization and Customization
By default, the Photoshop toolbar is presented as a vertical strip anchored to the left side of the application window. However, its flexibility allows you to reposition it, change its size, and even expand it into a shorter, double-column layout by clicking the double arrows at the top. This adaptability ensures that the toolbar can conform to your specific workspace and editing preferences.
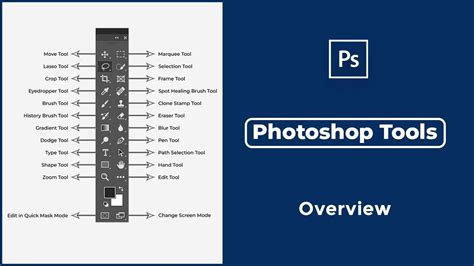
The arrangement of tools within the toolbar is not random; it follows a logical order, with related tools grouped together. At the top, you'll find the Move and Selection tools, followed by the Crop and Slice tools. Below these are the Measurement tools, and then the extensive Retouching and Painting tools. Further down are the Drawing and Type tools, and finally, navigation tools.
Each tool is represented by an icon, but Photoshop offers many more tools than are immediately visible. To access these hidden tools, you can click and hold on an icon, or right-click (Windows) or Control-click (Mac) on it. A fly-out menu will appear, listing the other tools grouped with the visible one. The tool initially displayed in each spot is known as the default tool, but Photoshop will display the last tool you selected. This means after choosing a different tool from a fly-out menu, the default tool might not be visible. To select it again, you'd need to click and hold or right-click on the currently displayed tool icon.
Customization is key to an efficient workflow. You can tailor the toolbar to your specific needs by rearranging icons, adding hidden tools, or removing those you rarely use. This is accessible via the "Edit > Toolbar" menu. Here, you can drag tools between the main toolbar and the "extra tools" section. Many experienced users create multiple toolbar presets, perhaps one for graphic design and another for photo retouching, switching between them as needed. This approach keeps your workspace uncluttered and focused. You can also hide tool tips or adjust icon sizes through "Edit > Preferences > Interface."
Furthermore, "spring-loaded" shortcuts add another layer of customization. By holding down a key, you can temporarily switch to a tool and then return to your previous selection upon release. For instance, holding ‘Z’ allows you to zoom in quickly while using the Brush Tool, minimizing interruptions and maintaining your creative momentum. Remember to back up your customizations, as Photoshop stores them in preference files that can be exported for safekeeping.
Keyboard shortcuts significantly enhance usability. Most tools have single-letter shortcuts (e.g., ‘V’ for Move, ‘M’ for Marquee). These allow for instantaneous switching, saving valuable time during edits. Professionals often memorize a multitude of these shortcuts to ensure a smooth workflow. At the bottom of the toolbar, you'll find quick access to foreground/background colors (swap with ‘X’, reset to black/white with ‘D’), quick mask mode, and screen modes, enabling fast adjustments without navigating through menus.
Selection Tools: Isolating Elements with Precision
Selection tools are fundamental to precise editing in Photoshop, enabling you to isolate specific areas of an image for targeted modifications.
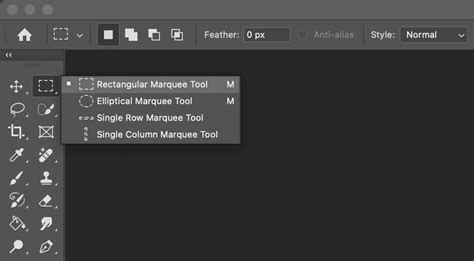
Marquee Tools (M): The Rectangular Marquee Tool creates straight-edged selections, ideal for cropping or duplicating patterns. Holding Shift while dragging forms a perfect square. The Elliptical Marquee Tool draws circular or oval shapes. Holding Alt (Option on Mac) while dragging centers the selection. These are perfect for creating vignettes or selecting round elements.
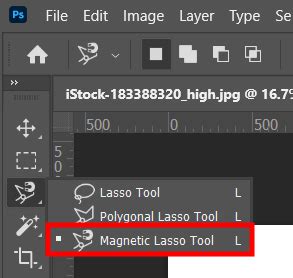
Lasso Tools (L): For irregular shapes, the Lasso Tool allows for freehand drawing, offering flexibility but requiring a steady hand for precise edges. The Polygonal Lasso Tool constructs selections with straight lines by clicking points, making it suitable for angular objects like buildings. The Magnetic Lasso Tool offers the most precision by automatically snapping to high-contrast edges, simplifying the outlining of complex forms such as hair or leaves. You can customize its width and contrast in the options bar for improved accuracy.
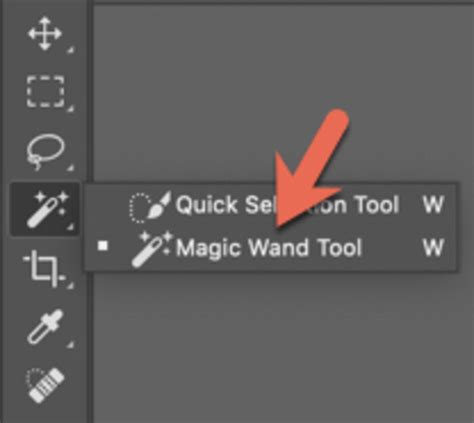
Quick Selection Tool (W): This tool functions like an intelligent brush, detecting and expanding selections as you paint over areas. It's highly recommended for quick selections, especially when objects have well-defined edges.
Magic Wand Tool (W): With a single click, the Magic Wand Tool selects pixels with similar color and luminosity values. The "Tolerance" setting in the options bar controls how closely other pixels must match the sampled pixel's color. A lower tolerance selects a narrower range of colors, while a higher tolerance selects a broader range. For instance, clicking on a white background with a low tolerance might only select pure white pixels, whereas a higher tolerance would include off-white or slightly shaded areas.
Object Selection Tool (W): Leveraging AI, this tool automatically isolates subjects within your photo. You can draw a loose rectangle or lasso around the object, and Photoshop will intelligently detect its edges. This is exceptionally useful for selecting portraits or product shots.
Refining selections is a common practice. You can add to an existing selection by holding Shift before using another selection tool, indicated by a small "+" sign next to the cursor. To subtract from a selection, hold Alt (Option on Mac) before using the tool, indicated by a "-" sign. Intersecting selections (keeping only the overlapping area) can be achieved by holding both Alt and Shift. You can also access advanced refinement options through the "Select and Mask" workspace.
Fill Tools: Adding Color and Gradients
Once you have made a selection, Fill Tools allow you to populate that area with color or gradients.
Paint Bucket Tool (G): This tool, sometimes called the Fill Tool, fills a selected area with your current foreground color. If no selection is active, it will fill the entire layer. You can adjust settings like Blending Mode, Opacity, and Tolerance in the Options Bar. For example, if you have a selection of a red t-shirt and your foreground color is blue, clicking within the selection with the Paint Bucket Tool will turn the t-shirt blue.
Gradient Tool (G): Instead of a solid color, the Gradient Tool fills an area with a smooth transition between two or more colors. In Photoshop 2024, this tool creates a new Gradient Fill Adjustment Layer, which is non-destructive and easily editable. You can choose from various preset gradients or create your own. The direction and extent of the gradient are determined by the line you draw over your selection. A short, straight line will create a sharp gradient, while a long, sweeping line will produce a more gradual transition.
Fill Command (Edit > Fill): This function provides another way to fill a selection with a solid color, pattern, or content-aware fill. Content-Aware Fill is particularly powerful for removing unwanted objects seamlessly, as Photoshop analyzes the surrounding pixels to generate a plausible replacement.
Crop and Slice Tools: Framing Your Composition
The Crop Tool is essential for refining your image’s composition and ensuring consistency.
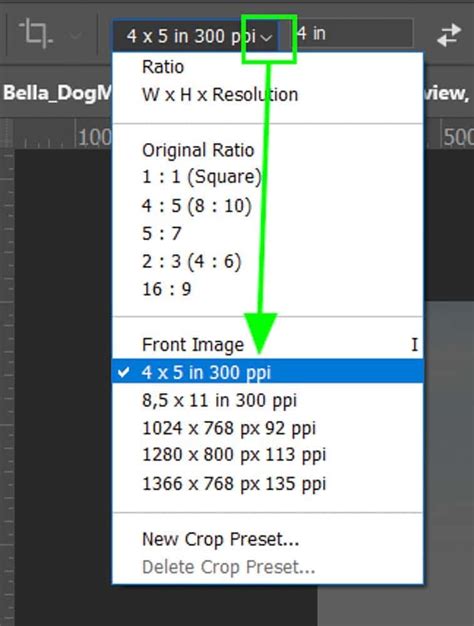
Crop Tool (C): This tool allows you to trim the edges of your image by dragging handles. You can also rotate the crop box to straighten horizons or use presets for standard aspect ratios (e.g., 16:9). Photoshop offers a real-time preview of the crop, so you see the changes before committing. You can specify exact dimensions, resolution, and aspect ratio in the options bar. For instance, if you have a series of product images that all need to be 1000px x 1200px at 72 ppi, you would input these values into the fields.
Crop Tool With Generative Expand: A newer feature in Photoshop 2024, Generative Expand allows you to extend the canvas beyond the existing photo's boundaries and fill the new space with AI-generated content that seamlessly blends with the original image. This is incredibly useful for changing aspect ratios or adding elements to an image.
Slice Tool (C): Primarily used for web design, the Slice Tool divides an image into sections for optimized web export. The Slice Select Tool allows you to adjust these existing slices. While less common in modern web development, it can still be useful for creating image maps.
Using these tools early in your workflow helps establish the final frame, eliminate distractions, and focus viewer attention. It's always recommended to work non-destructively by ensuring the "Delete Cropped Pixels" option is unchecked, allowing you to revert to the original image if needed.
Retouching Tools: Perfecting Your Images
Retouching tools are vital for elevating photos from good to stunning by removing imperfections and enhancing details.
Spot Healing Brush Tool (J): This tool removes blemishes and small imperfections with a single click. It automatically samples nearby pixels to blend seamlessly, making it ideal for skin imperfections or dust spots. Adjust the brush size for better blending.
Healing Brush Tool (J): Similar to the Spot Healing Brush, this tool requires you to Alt-click (Option on Mac) a source area before painting. It matches the texture, lighting, and color of the source area to the destination, making it excellent for cloning patterns like fabric or removing larger blemishes with more control.
Patch Tool (J): The Patch Tool allows you to select an area you want to fix and then drag that selection to a matching spot in the image. Photoshop intelligently blends the edges for a seamless repair.
Content-Aware Move Tool (J): This tool enables you to relocate objects within an image while Photoshop intelligently fills the original space with generated content that matches the surroundings.
Red Eye Tool (J): Specifically designed to correct red-eye in photographs, this tool darkens the pupils with a single click.
✨ Flawless Skin Retouching in Photoshop (Easy Tutorial for Beginners)
Painting and Brush Tools: Adding Creativity
Painting and brush tools allow you to add artistic flair, color, and texture to your images.
Brush Tool (B): This is one of the most frequently used tools in Photoshop. It simulates real brushes, allowing you to paint with customizable tips, opacity, flow, and hardness. You can achieve a wide range of effects, from soft airbrushing to sharp lines.
Pencil Tool (B): The Pencil Tool draws hard-edged lines, useful for pixel art or creating precise outlines.
Color Replacement Tool (B): This tool allows you to change the color of an area while preserving its texture and luminosity. It's ideal for recoloring objects without losing their inherent detail.
Mixer Brush Tool (B): Mimicking wet paint, the Mixer Brush Tool blends colors on your canvas. You can load it with colors and mix them directly for realistic painting effects.
History Brush Tool (Y): This brush allows you to paint back to a previous state from the History panel, essentially undoing changes selectively within a specific area.
Art History Brush Tool (Y): This tool applies artistic effects based on historical states, creating stylized interpretations of your image.
Eraser Tool (E): The basic Eraser Tool removes pixels as you drag through them. The Background Eraser Tool samples and erases backgrounds around edges, while the Magic Eraser Tool deletes similar-colored areas with a single click.
Experimenting with different brush presets, available from Adobe and third-party creators, can significantly expand your creative possibilities.
Drawing and Vector Tools: Creating Shapes and Paths
While Photoshop is primarily a raster-based image editor, it also offers robust vector tools for creating scalable graphics.
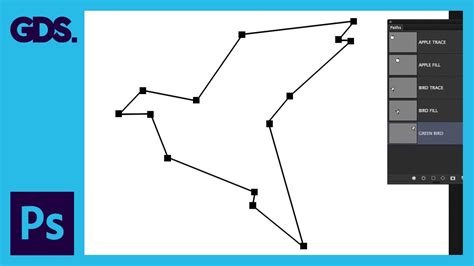
Pen Tool (P): The Pen Tool is paramount for creating precise paths by placing anchor points. Clicking creates straight lines, while dragging creates curves using Bezier handles. Mastering the Pen Tool is essential for creating clean vector shapes, masks, and selections. The Freeform Pen Tool allows for sketching paths, and the Curvature Pen Tool simplifies curve creation. You can add, delete, or convert anchor points using specialized tools within the Pen Tool group.
Shape Tools (U): This group includes tools for creating basic vector shapes like rectangles, ellipses, polygons, and lines. You can customize the fill and stroke color and width for these shapes. Holding Shift ensures proportional shapes (perfect squares or circles). These tools create vector layers that can be scaled without quality loss.
Direct Selection Tool (A) and Path Selection Tool (A): These tools allow you to select and manipulate individual anchor points or entire paths created with the Pen Tool or Shape Tools.
Type Tools: Incorporating Text
Type Tools are essential for adding text and messaging to your designs.
Horizontal Type Tool (T): Creates standard left-to-right text. You can click to start typing or drag to create a text box for paragraph formatting. Font, size, color, and other properties are adjusted in the options bar.
Vertical Type Tool (T): Orients text from top to bottom, useful for specific design layouts or Asian typography.
Type on a Path Tool (T): Allows text to follow a custom path, such as curving around a circle.
Type Mask Tools (T): These tools create selections in the shape of text, which can then be used to fill with images or patterns.
Warping text via the options bar offers creative effects like arcs, bulges, or waves. Layer styles can further enhance text with shadows, glows, or strokes. For optimal scalability, always use vector text.
Navigation and Measurement Tools: Exploring Your Canvas
These tools help you navigate and measure elements within your document.
Hand Tool (H): Pans across your image, allowing you to move around large documents. Double-clicking the Hand Tool icon fits the entire image to the screen.
Zoom Tool (Z): Magnifies or reduces the view of your image. Click to zoom in, Alt-click to zoom out. "Scrubby Zoom" in preferences allows you to drag left or right to zoom.
Eyedropper Tool (I): Samples colors from your image. Clicking anywhere on the image sets your foreground color to the sampled color. Holding Alt while using the Eyedropper allows you to sample the background color. The Color Sampler Tool lets you place persistent color samples for reference, displaying their RGB values.
Ruler Tool (I): Measures distances and angles on your canvas. The "Straighten" feature in its options bar is invaluable for correcting tilted horizons in photos.
Note Tool (I): Allows you to add annotations to your document, useful for collaboration.
Count Tool (I): Enables manual counting of objects within an image.
Frame Tool (K): Creates placeholder frames that can be easily filled with images. This tool simplifies layout creation and image placement.
Advanced Tools and Features
Photoshop 2024 introduces significant advancements, including AI-powered features that streamline complex tasks.
Generative AI Features: Tools like Generative Fill and Generative Expand leverage artificial intelligence to create or extend image content based on text prompts or existing image data. This opens up new possibilities for content creation and manipulation.
Object Removal Tools: Beyond Content-Aware Fill, Photoshop offers advanced tools that intelligently identify and remove unwanted objects, often with remarkable accuracy.
Lens Blur Filter: This filter simulates the depth-of-field effects of a camera lens, allowing you to create pleasing background blurs and isolate subjects.
Tips and Best Practices for Using Photoshop Tools
To maximize your efficiency and creativity in Photoshop, consider these best practices:
- Master Keyboard Shortcuts: As mentioned, shortcuts are your best friends for speed. Dedicate time to learning and using them.
- Work Non-Destructively: Utilize adjustment layers, masks, and smart objects whenever possible. This preserves your original image data, allowing for easy revisions and experimentation.
- Organize Your Layers: Name your layers clearly and group them logically. This is crucial for managing complex projects and makes it easier to select specific elements.
- Experiment with Tool Options: Don't be afraid to explore the options bar for each tool. Small adjustments can lead to significant differences in the outcome.
- Update Photoshop Regularly: Adobe continuously releases updates with new features and improvements, including enhancements to existing tools.
- Learn from Resources: Utilize Adobe's official tutorials, online courses, and community forums to deepen your understanding and discover new techniques.
- Practice Consistently: The more you use the tools, the more intuitive they become. Regular practice builds muscle memory and problem-solving skills.
- Backup Your Work: Regularly save and back up your Photoshop projects to prevent data loss.
By understanding the diverse capabilities of the Photoshop tools panel and adopting efficient workflows, you can unlock the full potential of this powerful software and elevate your creative endeavors.