Black and white photography possesses a timeless quality. When color is removed, the fundamental elements of a compelling image-emotion, light, shadow, texture, and form-are laid bare. However, as seasoned photographers know, creating a truly captivating monochrome image transcends a mere "desaturate" button. It is an intricate art of re-interpretation, a process that demands a deeper understanding of Lightroom's capabilities. This guide is crafted for the working photographer, delving into the nuances of black and white conversion and exploring the evolution from static presets to dynamic AI-driven workflows.
The "Preset Problem": Static Solutions for Dynamic Images
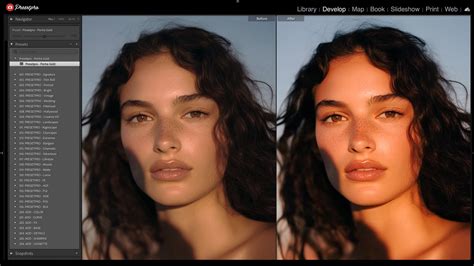
Let's clarify what a traditional Lightroom preset truly is: a saved configuration of slider positions. For the professional photographer, this presents a significant dilemma, and it's why many have moved beyond relying solely on them. The core issue lies in their inherent static nature. A preset has no context; it cannot discern whether your photograph is a portrait, a landscape, or a still life. It doesn't understand if it was captured under the harsh midday sun or during the soft glow of golden hour. Applying a generic preset to a photo of a couple in a sun-drenched field, for instance, can result in a disaster. This is the "Preset Problem": you often spend more time rectifying a poorly applied preset than you would have editing the image from scratch. This workflow limitation necessitates an evolution, a shift towards more dynamic editing tools.
The B&W Mixer: The Cornerstone of Monochrome Editing
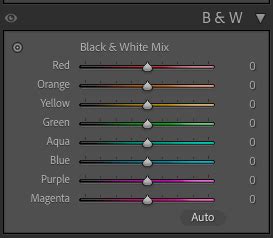
The Black and White Mixer panel within Lightroom stands as the most crucial tool for monochrome editing. Your camera captures the world in color, but when converting to black and white, two distinct colors might render as the exact same shade of gray. Consider a red flower against green leaves; without careful management, they could merge into an indistinguishable tone. Our task as editors is not to eliminate color but to translate it, deciding precisely how bright or dark that red flower and those green leaves should appear in the final image.
The B&W Mixer panel allows for selective adjustment of specific hues by altering their lightness or darkness. For example, if you wish to darken green grass to approach black, you can simply drag the green slider downwards. It's important to remember that this action will affect all green tones within your image. If your skin tones appear muddy in a black and white conversion and you desire to lighten them, a slight increase in the orange slider can be remarkably effective. This panel is frequently employed to achieve subtle yet impactful improvements in portraits, such as darkening backgrounds, deepening lip tones, or brightening skin and eyes. It's also invaluable for macro photography, enabling precise control over the luminosity of specific tones.
A powerful feature within the B&W Mixer is the Target Adjustment Tool (TAT). Identified by a small bullseye icon, clicking this tool allows you to directly interact with your image. Want to darken the sky? Click on the sky and drag downwards. Desire brighter skin tones? Click on the skin and drag upwards. This intuitive method provides granular control, ensuring that your monochrome conversions precisely match your artistic vision.
Beyond Desaturation: The Art of Tonal Translation
A truly great black and white image is not merely a desaturated color photograph. It's about re-interpreting the scene through the lens of light and shadow, often referred to as chiaroscuro. This is the heart of black and white photography. The fundamental challenge lies in translating the camera's color data into a compelling grayscale representation.
When you convert to black and white, colors that were distinct in life might become indistinguishable shades of gray. Your role as an editor is to make deliberate choices about how these original colors will be represented tonally. This isn't about removing color; it's about assigning luminance values to them.
Consider the impact of White Balance (WB) on black and white images. While it might seem counterintuitive, your white balance settings significantly influence the tonality of your monochrome conversions. Both temperature and tint play a crucial role. Experiment by opening a black and white photo in Lightroom and manipulating the temperature slider from one extreme to the other. You'll observe how the image's tonality shifts. This occurs because, in black and white conversions, various hues are assigned specific lightness values, and these values are directly affected by the underlying color temperature and tint.
You can approach white balance correction in two ways: either before converting to black and white, ensuring a neutral starting point, or after the conversion, adjusting temperature and tint until the image achieves the desired look. The key implication of this is consistency. If you're working on a series of images, ensuring uniform temperature and tint values across all of them is vital for a cohesive black and white edit.
Furthermore, temperature and tint can be adjusted not only globally but also locally using adjustment brushes, radial filters, or graduated filters. This offers a more nuanced control, allowing you to selectively brighten or darken specific hues in particular areas of your photograph, providing an effect that is often more subtle than using direct exposure adjustments.
The Tone Curve: Sculpting Contrast and Mood
While the B&W Mixer dictates the tonal relationships derived from original colors, the Tone Curve panel is where you sculpt the overall contrast and mood of your image. The classic "S-curve" is a fundamental technique for introducing contrast: pulling down the curve in the shadows and lifting it in the highlights. This creates a punchy, dynamic look.
For a more subdued, matte aesthetic, you can manipulate the Tone Curve by lifting the bottom-left point of the graph upwards. This action effectively removes true black from the image, rendering the darkest tones in a shade of gray. The further you raise this point, the more pronounced the matte effect becomes. This technique is particularly effective when working with dark or pure black backgrounds, as it prevents the image from feeling overly dense.
Conversely, a "crushed" look, characterized by deep blacks and bright whites, can be achieved by dragging the bottom-left point of the Tone Curve horizontally to the right, effectively raising the black point and ensuring that no pure black exists in the image.
Clarity and Texture are also vital tools for refining mid-tone contrast and fine details. Clarity specifically enhances mid-tone contrast, adding a sense of sharpness and definition. Texture, on the other hand, affects finer details, making it exceptionally useful for landscapes or gritty portraits. Be cautious with Clarity, as over-application can lead to an unnatural, "grungy" appearance. Texture, when used judiciously, can bring out the intricate details in surfaces, adding a tangible quality to your images.
Grain, found in the Effects panel, can impart a desirable film-like quality to digital photographs, lending them an organic and timeless feel. It can help to soften the sometimes sterile perfection of digital files, making them feel more tactile and reminiscent of traditional film.
This CHANGED My Editing... Learn Lightroom Curves In 20 Minutes
Building Your Own B&W Presets: Defining Your Style
Creating your own black and white presets is an excellent method for solidifying your unique photographic style and deepening your understanding of Lightroom's tools. The process begins with a RAW color photo.
- Basic Corrections: Start by making essential adjustments to exposure, white balance, and contrast.
- Convert to B&W: Apply the "Adobe Monochrome" profile or use the B&W Mixer to achieve your initial conversion.
- Artistic Work: This is where you refine the image's tonality and contrast.
- B&W Mixer: Adjust the eight color sliders to establish your desired tonal relationships between the original colors.
- Tone Curve: Fine-tune contrast. Decide whether you want a high-contrast S-curve, a gentle curve, or something else entirely.
- Color Grading (Split Toning): Introduce subtle color tints if desired, though for pure black and white, this step might be omitted or used very sparingly.
- Effects: Add Clarity, Texture, Grain, or a Vignette to enhance the mood and detail.
Once you are satisfied with your edits, you can save them as a preset. Navigate to the Presets panel and click the plus icon (+). When saving, it's crucial to uncheck boxes for settings like Exposure, White Balance, and Lens Corrections if you want your preset to be flexible and adaptable to different images. You want your preset to primarily encapsulate your B&W tonal style, not specific exposure or lens data. This creates a more robust and versatile preset. However, it's important to acknowledge that even these custom presets remain static. While superior to generic ones, they still lack the dynamic adaptability of AI-driven solutions.
The Evolution of Presets: AI as the New Standard
The modern approach to achieving consistent and sophisticated black and white edits lies in Artificial Intelligence (AI). While traditional Lightroom presets are static, akin to a fixed recipe, AI profiles function more like an intelligent chef. You teach the chef your specific flavor preferences, and it then applies that understanding dynamically to each new dish (or photograph).
Imagen, for instance, is a desktop application that integrates seamlessly with Lightroom Classic, Lightroom, Photoshop, and Bridge. It offers several powerful ways to leverage AI for black and white editing:
Personal AI Profile: This is the most powerful option for established professionals. You train an AI profile by feeding it a substantial collection of your own edited black and white photos (a minimum of 2,000 to 3,000 is recommended). Imagen analyzes the intricate details of your edits-your tone curves, B&W mixer settings, clarity, grain, and more. Once trained, this profile becomes your personal B&W editor. You can then send a new gallery of unedited RAW photos to Imagen, and it will analyze each image individually, applying your learned editing logic. It understands how you would adjust exposure for a dark scene or how you would use the B&W Mixer to darken a bright sky, ensuring remarkable consistency across your entire collection.

Talent AI Profile: For those who may not have a vast library of 2,000+ edited B&W photos, Talent AI Profiles offer an excellent alternative. These are AI profiles built by industry-leading photographers. When you apply a "Clean B&W" Talent Profile, you're not just applying a set of static settings; you're applying the photographer's unique editing logic and style, adapted dynamically to your specific image. This is a modern way to "buy presets" that offers superior results.
Lite Personal AI Profile: This option serves as a bridge between traditional presets and full AI profiles. You can initiate a Lite Personal AI Profile with a single traditional preset file (.xmp). As you use it, you can fine-tune it by uploading your final, manually edited photos. This allows the AI to learn and adapt based on your ongoing work, gradually building a more personalized editing style. It's important to note that Lite Personal AI Profiles are currently designed for color photos only and do not support black and white editing.
Common Black and White Editing Challenges and Solutions
Even with advanced tools, photographers can encounter specific challenges when editing black and white images. Understanding these common issues and their solutions is key to achieving polished results.
Problem: Lack of Separation Between Similar Tones (e.g., Sky and Clouds, Skin and Background):
- Fix: Utilize the B&W Mixer. For instance, to create separation between a sky and clouds, you might darken the Blues and lighten the Greens (or vice versa, depending on the original colors and desired effect). For skin tones against a background, adjust the Orange, Red, Yellow, and Aqua/Blue sliders in the B&W Mixer to create distinct luminance values.
Problem: Overly Harsh or "Grungy" Look:
- Fix: Often, this is a result of excessive Clarity or Texture adjustments. "Less is more" is a good mantra here. Try reducing Clarity or using negative Texture for softer, more flattering skin tones.
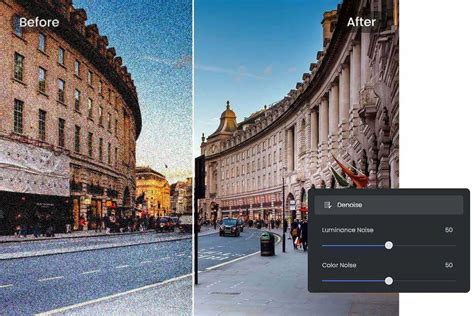
Problem: Excessive Noise (Grain):
- Cause: High ISO settings or pushing the Shadows slider too aggressively in post-processing can introduce noise.
- Fix: Lightroom's "Denoise" function in the Detail panel is highly effective. Alternatively, embrace the grain by adding a controlled amount using the Effects panel, which can lend a film-like aesthetic.
Problem: Muddy or Unflattering Skin Tones:
- Fix: Skin tones are primarily influenced by the Orange and Red sliders in the B&W Mixer. Adjusting these sliders can significantly improve the appearance of skin in monochrome.
Putting It All Together: Real-World Examples
Consider these scenarios where static presets often falter, and dynamic AI excels:
- Photo 1 (Good Lighting): A standard preset might produce an acceptable result, but it likely won't be optimized.
- Photo 2 (Flash Didn't Fire - Underexposed): A static preset, expecting normal exposure, will likely produce a "black mess." An AI tool, recognizing underexposure, can intelligently adjust the exposure and selectively brighten skin tones based on its training.
- Photo 3 (Dance Floor - Red/Blue Lights): The mixed lighting creates a complex color palette. A preset's blind B&W mix will look terrible. The red light might make skin too bright, while the blue background becomes too dark. An AI profile can analyze this specific lighting scenario and apply a tailored B&W mix to balance the scene.
- Photo 4 (Close-up of a Hand): A preset might apply excessive sharpening to fine details like skin texture, resulting in an unnatural look. An AI tool can apply more appropriate settings, perhaps even using negative Texture for softer skin, as trained.
When you upload these challenging images to a system like Imagen, the AI analyzes each photo individually. It recognizes the underexposure in Photo 2 and corrects it. It deciphers the complex lighting in Photo 3 and balances the tones accordingly. It applies the correct level of sharpening or softness to Photo 4. The result is a gallery where 95% of the images are near-perfect straight out of the AI processing. This dramatically reduces the need for manual tweaking, allowing for a final review and minor adjustments in Lightroom in a fraction of the time.
The Future of Monochrome Editing: Dynamic and Intelligent
Black and white photography is about seeing the world through a different lens, focusing on the interplay of light, shadow, and form. For decades, our tools for achieving this have been static. Traditional Lightroom presets, while a useful starting point, are fundamentally limited by their inability to adapt to the unique characteristics of each photograph. They are a ten-year-old tool in a rapidly evolving digital landscape.
An AI profile, on the other hand, is an intelligent, dynamic assistant. It learns from your work, adapts to every photograph, and consistently delivers results that align with your unique style. As a professional photographer, your time is your most valuable asset. Instead of spending countless hours tweaking sliders to fix static presets, invest in tools that empower your creativity and streamline your workflow. Whether you choose to build your own Personal AI Profile or utilize a Talent AI Profile, the future of black and white editing is dynamic, intelligent, and ultimately, more rewarding.
The process of creating a truly impactful black and white image involves more than just removing color; it's about understanding how light, shadow, and texture interact, and how to translate those elements into a compelling visual narrative. By mastering the tools within Lightroom, particularly the B&W Mixer and Tone Curve, and by embracing the advancements of AI-driven editing, photographers can elevate their monochrome work to new heights, creating images that are not only technically proficient but also deeply evocative and timeless.