Image files scattered across your computer? Stacks of memory cards cluttering your desk? You're ready to edit your photos, but the starting point feels like a mystery. For photographers, whether you're capturing family vacations or delivering thousands of images weekly, Adobe Lightroom Classic emerges as the premier solution for organizing, selecting, and transforming your photographs into stunning visual narratives with impeccable color and detail. This tutorial is specifically tailored for Lightroom Classic, guiding you through every essential step of the workflow, from embedding copyright information to refining your images for maximum impact.
Lightroom Classic has evolved into a robust powerhouse for photo editing and management. Even a memory card packed with thousands of photos presents no challenge. Regardless of your photographic specialty - weddings, events, landscapes, or headshots - Lightroom is designed to enhance your workflow, making it more efficient and your results more impressive.
The Lightroom Classic Ecosystem: Import, Organize, Edit
Lightroom Classic CC is the industry-standard software for professional photographers, offering unparalleled capabilities for organizing, editing, and exporting their work. This guide will meticulously walk you through every facet of the Lightroom workflow. We’ll begin with the fundamental process of importing your images, ensuring all necessary data, such as copyright information, is correctly applied. Subsequently, you'll learn how to efficiently select your favorite images from large batches, a crucial step in streamlining your post-production process. Finally, we delve into the detailed adjustments that elevate your photographs, bringing out the finest details and achieving perfect color rendition.
Even if you've never opened Lightroom before, this tutorial has you covered. We start with the absolute basics, ensuring you grasp the most powerful features. You will learn about every tool, option, and menu that Lightroom Classic offers. We will guide you through a complete Lightroom Classic workflow multiple times. Early in this tutorial, you will see the entire process laid out from import to export. Then, we will take a deep dive into each step, ensuring you emerge with mastery.
Demystifying the Lightroom Catalog: The Heart of Your Workflow
A fundamental concept in understanding Lightroom is the "catalog." Lightroom functions as cataloging software, meaning it doesn't directly alter your original image files. Instead, every edit, rating, keyword, or collection you create is meticulously recorded within a single Lightroom catalog file. This centralized database stores all the changes and adjustments made to every photograph you import. My own catalog file, for instance, contains edits for thousands of photos yet remains a modest size, demonstrating the efficiency of this system.
While the catalog can become complex when dealing with multiple catalogs, transferring them, or using them across different computers, for beginners focused on adding photos to a single catalog, the core understanding is straightforward. By default, photos on your computer or memory card are not part of your Lightroom catalog; they must be explicitly added. This process begins with the Import Dialogue.
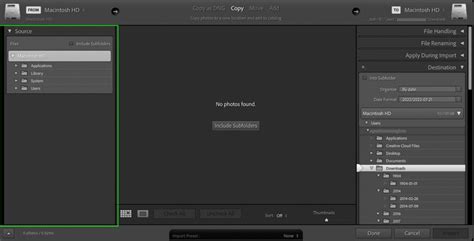
Importing Your Images: The Gateway to Organization
The process of adding your photographs into Lightroom begins with the Import Dialogue. This is where you decide how and where your images will be managed within your Lightroom catalog. Understanding the import options is crucial for establishing a robust organizational system from the outset. You'll learn about various import settings, including how to copy files from a memory card to your hard drive, how to add existing files to your catalog, and how to convert files to different formats during the import process. We will explore common file types and best practices for importing to ensure a smooth and efficient workflow.
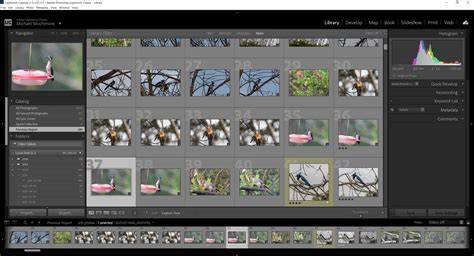
Organizing Your Digital Archive: Finding Your Photos with Ease
Organization might not be the most glamorous aspect of photography, but it is undeniably one of the most critical skills for any professional. Lightroom empowers you to create and maintain a personalized organizational system, ensuring you can effortlessly locate any image whenever you need it. We will demonstrate how to utilize Lightroom to create and manage folders on your computer, extending your organizational strategy beyond the software itself. This includes learning about the Library module, where you can navigate your file structure, create new folders, and move images between them.
Beyond basic folder structures, Lightroom offers a plethora of tools to refine your organization. You'll discover how to rate your photos using a star system, apply color labels for quick visual identification, and use keywords to tag your images with descriptive terms. Creating Smart Collections, which automatically populate based on predefined criteria, is another powerful technique that will be explored, allowing you to dynamically group images based on ratings, dates, or keywords.
Mastering the Develop Module: Unleashing Your Creative Vision
The Develop Module is where the true magic of post-processing happens. Here, you will gain an in-depth understanding of how to refine your images using Lightroom's extensive array of powerful tools. This section will cover the fundamental adjustments, including exposure, contrast, highlights, shadows, whites, and blacks, which form the bedrock of image correction. You'll learn how to fine-tune white balance to ensure accurate color rendition and how to adjust vibrance and saturation to enhance the color palette of your images.
Intuitively Understand Exposure in 12 Minutes (With Real Examples)
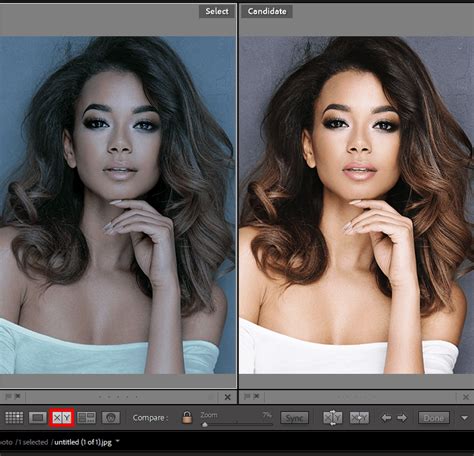
Precision Adjustments: Uncovering Hidden Details and Enhancing Color
Lightroom provides a suite of tools to make precise adjustments, allowing you to uncover details that the camera might have missed and to enhance the overall aesthetic of your photograph. We will explore sharpening and noise reduction techniques to improve image clarity and minimize unwanted grain. The HSL (Hue, Saturation, Luminance) panel will be examined in detail, enabling you to selectively target and adjust specific color ranges, a crucial skill for everything from correcting skin tones to making skies more dramatic.
Furthermore, you will learn about the power of local adjustments. Tools like the Graduated Filter, Radial Filter, and the Adjust Brush allow you to apply edits to specific areas of your image without affecting the rest. This precision is invaluable for tasks such as brightening a subject's face, darkening a distracting background, or adding a subtle vignette to draw attention to the center of the frame. The advanced Range Masking feature will also be covered, offering even more sophisticated control over where your local adjustments are applied, based on color or luminosity.
RAW vs. JPEG: Maximizing Your Image Quality
Understanding the difference between RAW and JPEG files is paramount for achieving the best possible image quality. We will break down the distinctions between these two formats, illustrating how to leverage the unique advantages of each. RAW files, being uncompressed and containing all the data captured by the camera's sensor, offer the greatest flexibility in post-processing. You'll learn how to harness the power of Adobe Camera RAW (ACR), integrated within Lightroom, to bring out incredible colors and details that might otherwise remain hidden. JPEG files, on the other hand, are compressed and processed in-camera, offering smaller file sizes but less editing latitude. We will guide you on how to get the most out of both formats.
Presets and Styles: Achieving Consistent Looks with Ease
Creating a distinctive visual style for your photography is often a key goal. Lightroom makes this achievable through the use of presets. You will learn how to create your own custom presets, saving your favorite adjustment combinations to be applied to other photos with a single click. This is an incredibly efficient way to maintain a consistent look across a series of images, whether for a wedding album or a themed collection. While Lightroom comes with several built-in presets, understanding how to craft your own allows for unparalleled creative control. We will also discuss how to import and utilize presets from other photographers, potentially gaining access to a vast library of styles.
Advanced Techniques: Pushing Your Editing Boundaries
For those looking to elevate their editing game beyond the basics, Lightroom Classic offers advanced tools and features. We will delve into techniques such as creating HDR (High Dynamic Range) images by merging multiple exposures, a process that significantly expands the tonal and color range of a photograph. You'll also learn how to create panoramic images by stitching together multiple shots, perfect for capturing expansive landscapes.
Lightroom's ability to create virtual copies of an image allows you to experiment with different edits on the same photo simultaneously, without altering the original file. This non-destructive workflow is a cornerstone of professional editing. We will also explore the Map Module, enabling you to add GPS tagging to your photos, a valuable feature for travel photographers and anyone who wants to document the locations of their shots. Furthermore, you'll discover how to create professional-looking books of your photos, ideal for wedding albums or portfolio presentations, and how to design engaging slideshows to showcase your work.
The Synergy of Lightroom and Photoshop: A Powerful Partnership
It's a common misconception to view Lightroom and Photoshop as competing programs. In reality, they are designed to complement each other, forming an incredibly powerful post-production workflow. Lightroom excels at organizing, culling, and making global and local adjustments, while Photoshop offers unparalleled precision for detailed retouching, compositing, and complex manipulations.
We will demonstrate how to seamlessly send an image from Lightroom to Photoshop for more intricate editing tasks and then bring it back into Lightroom for final export. This integrated approach ensures that you can tackle any photographic challenge, from subtle color correction to complex image compositing, with confidence and efficiency. Understanding when to use each program and how they work together is a hallmark of a seasoned professional.
Intuitively Understand Exposure in 12 Minutes (With Real Examples)
Exporting Your Masterpieces: Sharing Your Vision with the World
The final step in the Lightroom workflow is exporting your edited images. This process involves converting your master files into formats suitable for various purposes, whether for web display, printing, or client delivery. You will learn how to configure export settings to control file size, resolution, color space, and sharpening. We will cover how to create export presets to expedite this process for common output needs, saving you valuable time. Additionally, you'll learn how to add watermarks to your images to protect your copyright during export. The course also covers the nuances of processing black and white images, offering specific techniques to achieve compelling monochrome results.
Why Choose Lightroom Classic?
Lightroom Classic is more than just a photo editor; it's a comprehensive solution for photographers seeking to streamline their workflow, enhance their creative output, and manage their ever-growing digital libraries. Its non-destructive editing capabilities ensure that your original files are always preserved, offering peace of mind and the freedom to experiment. The intuitive organization tools make it possible to navigate even the largest collections with ease, saving precious time and reducing frustration.
Whether you're a hobbyist looking to improve your family photos or a professional aiming to impress clients and work more efficiently, Lightroom Classic provides the tools and techniques necessary to achieve your goals. By mastering its features, you can elevate your photography to the next level, producing professional-looking results and significantly speeding up your post-production process. The investment in learning Lightroom Classic is an investment in your photographic journey.
Understanding Lightroom Subscriptions
It's important to note that Adobe no longer offers Lightroom Classic as a standalone program. Instead, it is available through various Adobe Creative Cloud subscription plans. The most recommended plan for photographers is the 'Photography Plan (1TB)', which includes Lightroom Classic, Photoshop CC, and Lightroom CC for a recurring monthly fee. This bundled approach offers excellent value, providing access to the industry's leading photo editing and management software.
Conclusion: Your Journey to Lightroom Mastery Begins
Lightroom Classic is an indispensable tool for any photographer serious about their craft. From the initial import of your images to the final export of your edited masterpieces, this software provides a structured and efficient workflow. By understanding its core principles, mastering its tools, and leveraging its powerful integration with Photoshop, you can unlock your full creative potential and elevate your photography to new heights. This tutorial is designed to equip you with the foundational knowledge and advanced techniques to confidently navigate the world of Lightroom Classic, ensuring you can organize, edit, and share your photos with unparalleled ease and artistry.