When preparing documents for professional printing, understanding and correctly implementing the "bleed" is not just a recommendation; it's a fundamental necessity. A bleed is the area of your design that extends beyond the intended trim edge of the final printed piece. This crucial element ensures that when your document is cut to its final size, there are no unsightly white borders or gaps, even if the trimming process isn't perfectly exact. This tutorial will guide you through the essential steps of setting up and utilizing bleeds in Adobe InDesign, ensuring your printed materials achieve a polished, professional finish.
The Crucial Role of Bleed in Professional Printing
Printers, like all professionals, aim for precision, but the physical process of trimming paper can introduce minor variations. Even the most advanced machinery can experience slight shifts, typically within a 1-3 mm range. If your design's critical elements, such as colored backgrounds or images, stop precisely at the trim line, any minuscule misalignment during cutting can result in thin white borders appearing around the edges of your printed pages. This is where the bleed becomes indispensable.
By extending all artwork that touches or crosses the intended edge of the page into this bleed area, you provide a buffer. This buffer ensures that even if the trimming machine is off by a millimeter or two, the extra artwork within the bleed area is removed, leaving you with a clean, seamless edge. In essence, the bleed acts as a margin of error, safeguarding your design against the inevitable imperfections of the printing and trimming process.
The industry standard dictates that all artwork intended to go to the edge of the final product should extend at least 0.125 inches (approximately 3 mm) past where it will be trimmed. For example, if you are printing an 8.5 x 11-inch page, your artwork with bleed would need to measure 8.75 x 11.25 inches. This ensures that no matter how the trimming occurs within this specified margin, the intended visual element will still reach the edge.
Setting Up Bleed from the Outset: The New Document Window
The most effective and recommended approach to incorporating bleeds is to set them up right at the beginning of your InDesign project, within the "New Document" window. This proactive measure prevents the need for potentially complex adjustments later in the design process.
To begin, navigate to File > New > Document (or File > New > File depending on your InDesign version). In the "New Document" settings, you'll find a section titled "Bleed and Slug."
If your document units are not already set to millimeters, you can change them in the initial setup or type in values like ".125 in" into the bleed fields, and InDesign will automatically convert them.
For a standard bleed, you would typically set the Top, Bottom, Left, and Right bleed values to 3 mm (or 0.125 inches). This creates a uniform bleed area extending equally on all sides of your document.
Adjusting Bleed for Specific Document Types: Facing Pages and Binding
While a uniform bleed is common, there are instances where adjustments are necessary, particularly when working with documents featuring facing pages intended for binding, such as books or magazines. In such cases, the inside edge of the page (the edge that will be bound) does not require a bleed. This is because the binding process itself can sometimes obscure or interfere with bleed elements on the inside.
To handle this, you'll need to break the uniform link between the bleed settings. In the "New Document" window, after setting your initial bleed values (e.g., 3 mm for Top, Bottom, and Outside), you'll see a chain icon to the right of the bleed fields. Clicking this icon "unlinks" the values, allowing you to modify them individually. For documents with facing pages intended for binding, you would then set the "Inside" bleed value to 0 mm, while retaining the Top, Bottom, and Outside bleed.
It's crucial to be mindful of this adjustment. A common mistake, as highlighted in the provided information, is to mistakenly set a bleed on the inside edge of a facing-pages document. When exported as a PDF, this can lead to content from the inside bleed spilling onto the opposing page, creating an unintended visual effect. Therefore, for facing pages intended for binding, ensure your bleed is set only on the Top, Bottom, and Outside edges.
Extending Your Artwork into the Bleed Area
Once your document is set up with the correct bleed dimensions, the next critical step is to ensure that all elements intended to extend to the edge of the page actually reach and fill the bleed area. This includes colored backgrounds, images, and any other graphics that shouldn't have a white border after trimming.
When you set up your bleed in the "New Document" window, InDesign visually represents this bleed area with a thin red line outside the main page boundary. This red line indicates the extent of your bleed.
To adjust your artwork:
- Place or select your images/elements: If you haven't already, place your images using
File > Place. If they are already in your document, select them. - Enlarge elements to the bleed line: Select the image or element. You will see a bounding box around it. To extend it into the bleed, click and drag the corner handles of the bounding box. Make sure to drag them outwards until they reach and cover the red bleed line.
- Maintain Proportions: To avoid distorting your image, hold down the
Shiftkey while resizing. This ensures that the image's proportions are maintained. - Use the Control Panel: The Control Panel (usually located at the top of your InDesign workspace) is an incredibly helpful tool for verifying and adjusting elements. You can use it to check dimensions and ensure elements are positioned correctly, especially to confirm they extend into the bleed.
It's important to remember that this applies to all elements that will be trimmed. This includes placed images, colored frames, and even text that is intended to run off the edge.
Exporting Your Print-Ready PDF with Bleed Settings
The final stage in preparing your InDesign document for professional printing is exporting it as a high-quality PDF. This is where you ensure that the bleed settings you've meticulously configured are correctly applied to the output file.
- Initiate Export: Go to
File > Export. - Choose Format: In the "Export" dialog box, select "Adobe PDF (Print)" from the "Format" dropdown menu. Give your file a descriptive name and choose a location to save it. Then, click "Save."
- Configure PDF Settings: The "Export Adobe PDF" dialog box will appear. This is where you fine-tune the output.
- General Settings: For professional printing, it's generally recommended to choose a preset like "[Press Quality]". If your printer has provided a custom PDF profile, use that. If not, PDF/X-4 is a highly compliant and widely accepted profile.
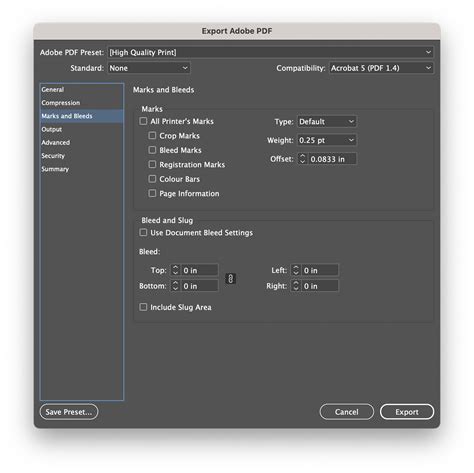
- Marks and Bleeds: On the left-hand side menu, navigate to the "Marks and Bleeds" section.
- Crop Marks: For smaller format jobs like business cards, enabling "Crop Marks" is advisable. These marks indicate where the paper should be cut. For larger formats, they can sometimes be unnecessary or even an annoyance to the printer.
- Bleed Marks: These are generally considered useless and can be an annoyance, so they are typically left unchecked.
- Color Bars: These can also be an annoyance for some printers and are usually left unchecked.
- Registration Marks: These can be useful for ensuring color separations align correctly.
- Page Information: This can also be helpful for printers to identify the job.
- Use Document Bleed Settings: This is the most crucial option in this section. Ensure this box is checked. This command tells InDesign to include the bleed values that you previously set up in your "Document Setup" or "New Document" window. If this is not checked, your bleed will be ignored, defeating the purpose of setting it up.
- Finalize Export: Once you have reviewed and set all the desired PDF export options, click the "Export" button.
Understanding the "Slug" Area
While not strictly part of the bleed, the "Slug" area is another important consideration when preparing files for professional printing. The slug is an area outside the trim edge and bleed area where you can place non-printing information. This might include instructions for the printer, contact details, job sign-off information, or even low-resolution versions of images that are part of the design but shouldn't be printed. It's a useful space for communication and organization.
In the "Export Adobe PDF" dialog box, under the "Marks and Bleeds" section, you will also find a "Bleed and Slug" subsection. Here, you can specify whether to "Use Document Bleed Settings" and also whether to include slug settings if you have defined them in your document.
The Importance of Consistency and Accuracy
The primary goal of setting up a bleed is to ensure a seamless, professional final product. Deviating from the recommended bleed settings or forgetting to extend artwork into the bleed area can lead to disappointing results. A common misconception might be that a bleed is optional or only for complex designs. However, for any design intended for professional printing, where edges are trimmed, a bleed is essential.
InDesign Tutorial - Setting bleed and slug guides for printing
Key Takeaways for Successful Bleed Setup:
- Set Bleed Early: Always establish your bleed settings in the "New Document" window.
- Understand Facing Pages: Adjust bleed settings for inside edges on documents with facing pages intended for binding.
- Extend All Edge Artwork: Ensure all elements touching the trim edge extend into the bleed area.
- Export Correctly: Always use "Export to PDF (Print)" and ensure "Use Document Bleed Settings" is checked in the "Marks and Bleeds" section.
- Consult Your Printer: If your printer provides custom PDF profiles or has specific bleed requirements, always adhere to their guidelines.
By diligently following these steps, you can confidently prepare your InDesign documents for professional printing, ensuring that your creative vision is realized without the frustration of unintended white borders or trim errors. This attention to detail is what differentiates amateur work from truly professional output, and mastering the bleed is a significant step in that direction.