Photoshop is an incredibly powerful software, offering a vast array of tools capable of achieving almost any imaginable visual effect. Among its most celebrated and frequently utilized features is the Liquify tool. This potent instrument allows users to manipulate images in ways that can evoke artistic styles, such as the surreal melting clocks reminiscent of Salvador Dali's work, or to perform subtle yet crucial retouches. For those eager to delve into its capabilities, this guide provides an in-depth exploration of the Liquify tool's location, functionalities, and advanced applications.
Locating and Accessing the Liquify Tool
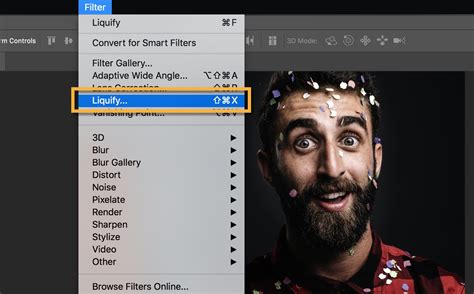
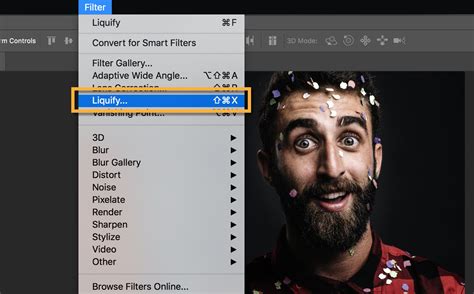
The Liquify tool is readily accessible within Adobe Photoshop. The primary method of access is through the main menu: navigate to Filter > Liquify. For those who prefer keyboard shortcuts, a more expeditious route is available via the shortcut Shift + CTRL + X (or Command + Shift + X on macOS). Upon selecting Liquify, a dedicated workspace, often referred to as the Liquify edit studio or Liquify filter dialog box, will appear. This environment is designed to streamline the image manipulation process, presenting a suite of tools and adjustment options on the right-hand panel.
Understanding the Liquify Workspace and Brush Dynamics
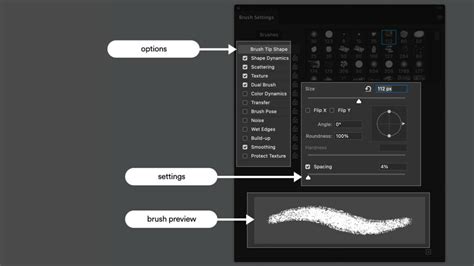
Within the Liquify edit studio, users will encounter various options that control the behavior of the tools. A crucial aspect of using the Liquify tool effectively lies in understanding its brush dynamics. When you apply a tool, the brush typically exhibits a feathered edge. This means the most pronounced effect occurs at the center of the brush stroke, with the influence gradually diminishing towards the edges. This feathering allows for smoother transitions and more natural-looking distortions.
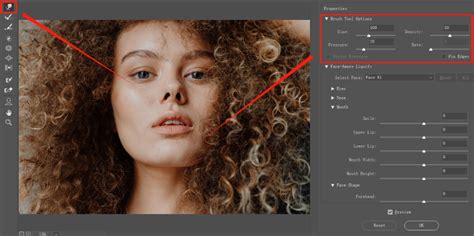
The pressure of your brush is a key parameter that dictates the speed and intensity of the distortions. A lower brush pressure, for instance, around 5, will result in slower, more controlled changes, which is ideal for intricate adjustments or when aiming for subtle modifications. Conversely, a pressure setting of 100 will cause the brush to act as swiftly as your hand movements, enabling rapid and significant alterations to the image.
Complementing brush pressure is the brush rate. This setting controls the speed at which distortion occurs while the mouse cursor remains stationary. A higher brush rate accelerates the effect, similar to how increased brush pressure impacts the distortion. This parameter is particularly useful when working with tools like the Twirl tool, allowing for more dynamic and fluid manipulations.
Core Liquify Tools and Their Applications
The Liquify tool offers a diverse set of functionalities, each designed for specific types of image manipulation. These tools are typically found on the left-hand side of the Liquify toolbar.
The Forward Warp Tool (W)
As the first icon on the Liquify toolbar, the Forward Warp Tool is fundamental for creating warped effects. Its primary function is to push pixels around, effectively distorting the image in a controlled manner. The size of the brush directly influences the extent of the warp; a larger brush will create a more pronounced, sweeping distortion. Users can adjust the brush size via the panel to the right of the image. To use it, simply click on the area of the image you wish to warp, hold down the mouse button, and drag. The shortcut for this tool is W.
The Reconstruct Tool
The Reconstruct Tool serves as an invaluable undo mechanism within the Liquify environment. If you've made unintended distortions or wish to revert specific changes, this tool allows you to do so. By default, it's set to reconstruct by reverting to the original state. You can select the Reconstruct tool and slide its value from 100 (full reconstruction) down to a desired level, gradually undoing the applied distortions.
The Twirl Tool
True to its name, the Twirl Tool rotates pixels, creating a spinning or swirling effect within the image. When you drag your brush across an area, it will appear to spin clockwise. To achieve a counterclockwise twirl, simply hold down the ALT key while dragging the brush. This tool can add dynamic movement or a surreal quality to an image.
The Pucker Tool (S)
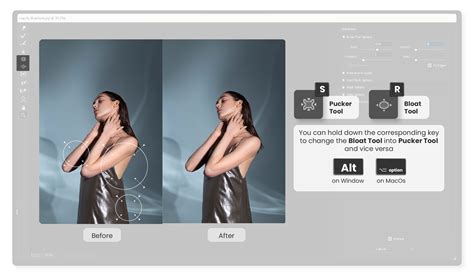
The Pucker Tool has the effect of compressing or shrinking areas of an image by pulling pixels inward towards a central point. It can be likened to deflating a part of the image. This is particularly effective for subtly slimming features on a person's face or altering the proportions of an object. For example, one might use it to make the bottom of a vase appear slimmer or to refine facial contours. The shortcut for the Pucker tool is S.
The Bloat Tool
Conversely, the Bloat Tool expands or inflates selected areas by pushing pixels away from a central point. This tool offers the opposite effect of the Pucker tool, making objects appear larger or more voluminous. It's useful for adding emphasis or creating exaggerated, unnatural forms.
The Push Tool
Similar to the Forward Warp tool, the Push Tool manipulates pixels, but with a more direct left or right movement. By default, it's set to push pixels to the left. Holding down the ALT key while using the Push Tool will reverse its direction, causing pixels to move to the right. This allows for precise directional distortion, enabling users to sculpt shapes by pushing areas in specific ways.
Advanced Liquify Techniques: Masking and Smart Objects
Beyond the core distortion tools, Photoshop's Liquify filter offers advanced features that enhance control and flexibility.
Freeze Mask and Thaw Mask Tools
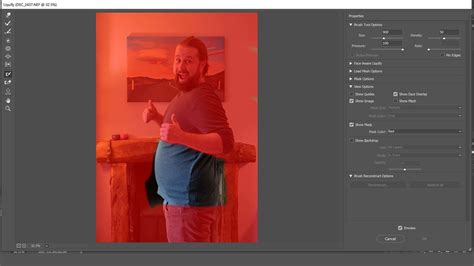
The Freeze Mask Tool is a crucial element for selective editing. It allows you to paint over areas of your image that you want to protect from any Liquify edits. When you use this tool, it applies a semi-transparent red overlay, visually indicating the frozen areas. This ensures that only the unmasked portions of the image will be affected by subsequent Liquify operations.
Conversely, the Thaw Mask Tool is used to unfreeze areas that have been previously masked. If you decide you want to edit a section that was protected, you can simply paint over it with the Thaw Mask tool to make it editable again.
The masking functionality offers several selection modes:
- Replace Selection: This mode replaces the current selection with a new one.
- Add to Selection: This mode adds to an existing selection.
- Subtract from Selection: This mode removes areas from an existing selection.
- Intersect with Selection: This mode creates a selection that is common to both the existing selection and the new selection.
- Invert Selection: This mode inverts the current selection.
These masking options provide granular control over which parts of the image are affected by Liquify, ensuring that delicate details or important elements remain untouched.
Working with Smart Objects
A highly recommended practice when using the Liquify filter is to convert your layer into a Smart Object before applying the filter. This is achieved by navigating to Filter > Convert for Smart Filters. The advantage of working with Smart Objects is that Liquify becomes a non-destructive editing process. This means you can revisit and re-edit your Liquify adjustments at any time without permanently altering the original image pixels. If you decide you've gone too far or want to refine your edits, you can simply double-click on the "Liquify" filter listed under the layer's Smart Filters to reopen the Liquify workspace.
Face-Aware Liquify
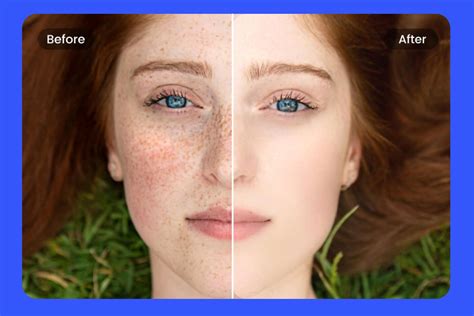
One of the most sophisticated features within the Liquify filter is the Face-Aware Liquify tool. This intelligent function automatically detects facial features such as eyes, mouth, nose, and jawline. Once detected, it provides intuitive sliders and handles that allow for precise and subtle adjustments to these characteristics. This is invaluable for portrait retouching, enabling users to refine facial symmetry, adjust eye size, alter lip shape, or modify jawlines with remarkable ease. When using this tool, it's crucial to exercise caution and restraint to maintain a natural appearance. For optimal performance, ensure your graphics processor is enabled in Photoshop's settings.
Practical Applications and Creative Uses
The Liquify tool's versatility extends across various photographic disciplines. In food photography, for instance, it can be a "secret weapon" for salvaging images where food has lost its visual appeal, a phenomenon often referred to as "dead food." A prime example is revitalizing a wilted cucumber, restoring its fresh and appealing form. This can be achieved in mere seconds, transforming a potentially discarded image into a polished final product.
Beyond retouching, Liquify is a powerful tool for artistic expression and photo manipulation. It can be used to:
- Smooth wrinkles: In clothing or skin, subtle use of the Forward Warp tool can eliminate unwanted creases.
- Add volume: Hair can be made to appear fuller or styled more dramatically.
- Create artistic effects: From subtle distortions to extreme warping, Liquify can achieve surreal and abstract imagery, akin to the work of Salvador Dali.
- Sculpt and reshape objects: Beyond faces, any object in an image can be reshaped to alter its proportions or create unique forms.
- Animal feature enhancement: Similar to facial features, animal features like ears or snouts can be subtly adjusted for aesthetic purposes.
Best Practices for Effective Liquify Use
To achieve the best results with the Liquify tool, consider these best practices:
- Practice Regularly: Consistent use is key to mastering the tool. Experiment with different settings and tools on various images.
- Vary Brush Size: Frequently adjust your brush size using the
[and]keys. Use smaller brushes for fine details and larger brushes for broader reshaping. - Make Small Adjustments: Avoid drastic changes in a single stroke. Multiple small adjustments often yield more natural and convincing results.
- Utilize Smart Objects: Always convert your layer to a Smart Object to ensure non-destructive editing and the ability to revisit your work.
- Focus on Enhancement: Aim to use Liquify to improve the photograph, such as fixing minor imperfections or enhancing the subject, rather than making drastic, unnatural alterations.
- Use the Mesh Overlay: The Liquify filter displays a mesh overlay that visually represents the distortion. This can help you track your edits and understand how pixels are being moved.
- Leverage Show Backdrop: The "Show Backdrop" option allows you to see the unedited version of your image alongside the distorted version, aiding in comparison and control.
- Resetting Changes: If you feel you've gone too far, the Reconstruct function can be used to gradually decrease the degree of changes. You can also use the standard Undo function (Control-Z or Command-Z) to step back through your edits.
By understanding the nuances of each tool, leveraging advanced features like masking and Smart Objects, and adhering to best practices, users can unlock the full potential of Photoshop's Liquify filter, transforming their images with precision and creativity.