Inkscape stands as a powerful and free graphic design software, empowering users to craft vector illustrations, logos, icons, and a myriad of other visual assets. However, to truly harness its capabilities and elevate your designs from good to exceptional, a deep understanding of its transform and align tools is paramount. These indispensable features allow for the precise adjustment and meticulous arrangement of objects, enabling you to resize, rotate, skew, flip, and align elements with unparalleled accuracy and efficiency.
The Foundation: Understanding Transform and Align in Inkscape
At their core, the Transform and Align tools in Inkscape are the workhorses for achieving professional-grade precision in your digital artwork. The Transform tool, accessible via the handy keyboard shortcut Ctrl+Shift+M, is your gateway to manipulating objects in terms of their size, position, rotation, and skew. This allows for consistent sizing and orientation across all elements within your design. Complementing this is the Align tool (Ctrl+Shift+A), which is specifically designed to arrange multiple objects with respect to each other or to the canvas itself. Whether you're centering elements, distributing objects evenly, or snapping items to specific guides, the Align tool is crucial for creating balanced, visually appealing layouts swiftly. These tools collectively streamline the process of object manipulation, making the creation of clean and professional designs significantly more manageable.
Transforming Objects: Scale, Move, Rotate, and Skew with Precision
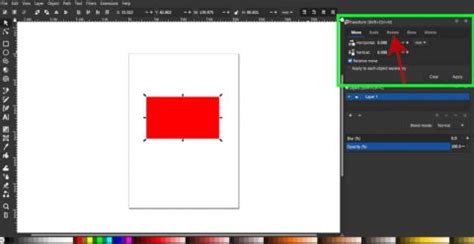
The Transform tool in Inkscape is a versatile instrument that empowers you to manipulate the size, position, rotation, and skew of objects with remarkable precision and efficiency. Within the Transform dialog box, you'll find distinct tabs dedicated to each type of transformation: Scale, Move, Rotate, and Skew.
When you wish to resize your objects, the Scale tab is your primary resource. Here, you can input desired percentage values or specify exact width and height dimensions. A crucial option available is the ability to apply the transformation either to each selected object individually or to the entire selection treated as a cohesive group. This granular control ensures that your scaling operations yield precisely the intended results, whether you're adjusting a single element or a complex arrangement.
The Move tab allows for exact adjustments to an object's position. You can input precise numerical values for horizontal and vertical displacement, ensuring that objects are positioned exactly where you intend them to be on the canvas.
For rotations, the Rotate tab is indispensable. You can specify an exact angle of rotation, ensuring perfect alignment or specific orientations. This is particularly useful when creating patterns, symmetrical designs, or when aligning elements at precise angles.
The Skew tab provides the ability to distort objects, applying shear transformations. This can be used for creating perspective effects or for more artistic distortions, adding depth and dynamism to your designs.
By selecting the desired tab and inputting the relevant parameters, you can easily apply these different transformations to one or more objects, either individually or as a group, offering a comprehensive suite of tools for object manipulation.
Flipping Objects: Creating Symmetry and Mirror Images
Beyond scaling, moving, rotating, and skewing, Inkscape also provides straightforward methods for flipping objects horizontally or vertically. This is a simple yet powerful technique that can dramatically transform your designs. By creating mirror images or symmetrical patterns, you can introduce depth, balance, and visual interest to your artwork.
You can achieve this using the Flip tool, typically found on the toolbar at the top of your canvas. By selecting one or more objects and then clicking on the "Flip horizontal" or "Flip vertical" button, you can instantly mirror your selections. For even quicker manipulation, Inkscape offers keyboard shortcuts: 'H' for horizontal flip and 'V' for vertical flip. This capability is invaluable for tasks such as creating symmetrical elements for logos, ensuring consistent character poses in animation, or quickly generating mirrored patterns.
Arranging Objects: The Power of the Align Tool
While the Transform tool focuses on individual object manipulation, the Align tool is dedicated to the precise arrangement of multiple objects relative to each other or to the canvas. This is where you ensure that your design elements coexist harmoniously, creating a visually pleasing and organized composition.
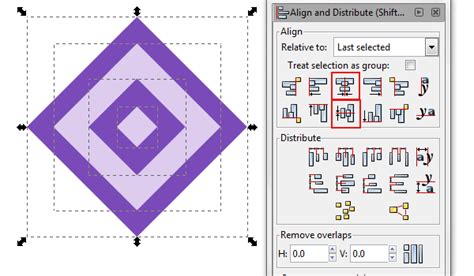
The Align dialog box, accessed via Ctrl+Shift+A, presents a variety of options for aligning and distributing selected objects. You can choose to align objects based on their edges (top, bottom, left, right), their centers (horizontal and vertical), or their baselines.
A critical aspect of the Align tool is the "Relative to" option. This dropdown menu allows you to define the reference point for your alignment. You can choose to align objects:
- To the Page: This aligns objects relative to the boundaries of your document.
- To the Selection: This aligns objects relative to the bounding box of all selected objects.
- To the First Selected Object: The alignment is performed with respect to the first object you selected.
- To the Last Selected Object: The alignment is performed with respect to the last object you selected.
- To the Biggest Object: Alignment is based on the dimensions of the largest object in the selection.
- To the Smallest Object: Alignment is based on the dimensions of the smallest object in the selection.
This flexibility ensures that you have complete control over how your objects are positioned, whether you're creating a tight, unified group or arranging elements across a larger canvas.
Distributing Objects: Achieving Even Spacing
Beyond simple alignment, the Align and Distribute dialog box also offers powerful options for distributing objects. This feature is crucial for creating consistent spacing between elements, preventing visual clutter, and ensuring a professional look. You can distribute objects based on their edges or centers, ensuring that the gaps between them are uniform.
The distribution options can be categorized into:
- Edge-to-edge distances: This ensures that the space between the edges of adjacent objects is equal.
- Center-to-center distances: This ensures that the space between the centers of adjacent objects is equal.
- Uniform gaps: This option aims to move objects just enough so that they don't overlap and have a consistent visual separation.
These distribution commands, when used in conjunction with the alignment options, allow for the creation of perfectly spaced layouts, whether you're arranging icons in a toolbar, items in a list, or elements in a complex infographic.
Advanced Techniques and Workflow Efficiency
Inkscape's transform and align tools offer more than just basic manipulation; they provide features designed to enhance workflow efficiency and ensure consistency across your projects.
Saving and Applying Presets
One of the most significant time-saving features is the ability to save and apply presets for your transformations and alignments. If you find yourself frequently using the same scaling factor, rotation angle, or alignment configuration, you can save these settings as a preset.
To save a preset, perform your desired transformation or alignment as usual. Then, within the respective dialog box (Transform or Align and Distribute), locate the plus icon, typically found in the bottom left corner. Clicking this icon allows you to name your preset. Once saved, you can quickly apply this preset to other objects with a single click, ensuring consistency and drastically reducing repetitive tasks. This is particularly useful in projects requiring numerous similar elements, such as icon sets or repeated design motifs.
Leveraging Handles for Intuitive Manipulation
While dialog boxes offer precise numerical control, Inkscape also provides an intuitive way to transform and align objects directly on the canvas using handles. When an object or group of objects is selected, small squares or circles appear around its bounding box. These handles allow you to drag, resize, rotate, or skew objects directly with your mouse.
Furthermore, modifier keys like Ctrl, Shift, and Alt can be used in conjunction with these handles to modify their behavior. For instance, holding Shift while resizing often constrains the proportions, maintaining the object's aspect ratio. Holding Ctrl might snap transformations to specific increments, aiding in precise alignment. These handles offer a visual and tactile interface for quick adjustments, complementing the precision offered by the dialog boxes.
Mastering Inkscape: Trace And Transform Your Images Like A Pro!
Addressing Complex Alignment Challenges: The Case of Snapping
While the Align and Distribute tools are powerful, users sometimes encounter challenges with aligning objects that need to fit together perfectly without gaps, especially when creating complex shapes from simpler components. A common scenario involves aligning multiple triangles to form a larger shape like a hexagon, where even minute misalignments become apparent when zoomed out.
The solution often lies in understanding and utilizing Inkscape's snapping features. Beyond the basic alignment and distribution, Inkscape offers a robust snapping system that can be configured to align nodes, edges, and even arbitrary points to various targets like grid lines, guides, or other object paths.
For precise alignment of shapes like triangles to form a larger structure, enabling "Snap nodes, paths, and corners" and "Snap to cusp nodes" within the snapping toolbar can be highly beneficial. This allows the vertices of one shape to precisely connect with the vertices of another.
Using Grids for Precise Placement
In situations where standard snapping doesn't provide the desired level of control, custom grids can be a game-changer. By accessing File -> Document Properties... and navigating to the Grids tab, you can create and configure various grid types, including Axonometric grids. By adjusting the grid to match the dimensions and angles required for your specific shapes, you can ensure that their corners and edges naturally snap to the grid vertices, facilitating perfect alignment. For example, if you're constructing a hexagon from triangles, setting up an appropriate grid can ensure that each triangle's vertices align precisely with the grid points, thus forming a seamless hexagon. After creation, if the overall orientation isn't correct, the selection tool or Object -> Transform... can be used to rotate the entire group.
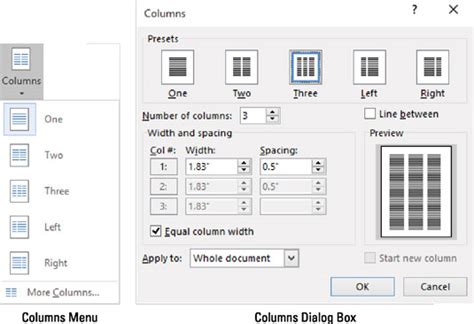
Workflow Efficiency: Rows and Columns for Array Creation
When you need to arrange multiple objects in a structured layout, such as a grid or a series of rows and columns, Inkscape provides specific tools to facilitate this. The "Rows and Columns" dialog box, accessible through certain extensions or workflows, allows you to automatically arrange selected objects into a defined grid.
This dialog box enables you to specify the number of rows and columns you require. Crucially, when you change the number of rows, the Column parameter often adjusts automatically to maintain a balanced distribution, and vice versa. This feature is incredibly useful for tasks like creating contact sheets, organizing elements into a tabular format, or generating patterned designs. For instance, if you have a set of icons and want to arrange them into a 2x3 grid, you can use this feature to achieve that layout quickly. The system then intelligently places the objects within the defined grid cells, based on their selection order and the chosen grid dimensions.
Beyond the Basics: The Art of Cuteness and Creative Application
The principles of alignment and transformation are not just for technical precision; they are fundamental to achieving specific aesthetic goals. For example, the concept of "cuteness" in character design often relies on 'child-like' proportions: round heads, large eyes, small noses, and smaller bodies. The Align and Distribute tool, often overlooked for its seeming simplicity, can be instrumental in achieving these proportions.
Consider the process of creating a cute animal illustration. You might start with a yellow circle for the head. To create a mane, you would duplicate this circle, color it a beige tone, and perhaps scale or position it appropriately. A triangle could form the nose. By duplicating and mirroring this triangle, you can create the mouth or other facial features. Creating ears often involves drawing a circle, then deforming its nodes to create a pointy shape, and then duplicating and mirroring it for symmetry. A larger circle can form the body, with deformed circles for legs and paws, duplicated to create a set of limbs. A tail can be constructed from a line and a deformed circle with a pointy edge. Throughout this process, the Align and Distribute tools are silently at work, ensuring that these elements are positioned harmoniously and contribute to the overall "cute" aesthetic.
Users familiar with other graphic design software like Adobe Illustrator or CorelDraw might question the need for explicit duplication and rotation when these functions are built-in. However, Inkscape's approach, while sometimes requiring more explicit steps, offers a deep level of control and understanding of the underlying vector operations.
Conclusion
Inkscape's Transform and Align tools are indispensable for anyone serious about creating precise and professional vector graphics. From the fundamental manipulation of individual objects with the Transform tool to the intricate arrangement of multiple elements with the Align and Distribute dialogs, these features provide the control necessary to bring any design vision to life. By mastering these tools, understanding their advanced features like presets and snapping, and applying them creatively, you can significantly enhance your workflow efficiency and the overall quality of your digital artwork.
This comprehensive understanding empowers you to not only arrange objects with technical accuracy but also to achieve specific aesthetic outcomes, making Inkscape a truly potent tool in the hands of a skilled designer.
This concludes our tutorial on Inkscape's Transform and Align tools. This is Arthi and Saurabh from IIT Bombay, signing off. The Spoken Tutorial project is a part of the Talk to a Teacher initiative, funded by the Ministry of Education, Government of India.