Blender, a powerful and versatile free and open-source cross-platform graphics application, has embraced the future of web imaging with the integration of WebP support since version 3.2. WebP, a modern image file format developed by Google, is designed to deliver superior compression for images on the web, offering both lossless and lossy compression options. This means WebP images can achieve significantly reduced file sizes compared to traditional formats like PNG and JPEG, all while maintaining comparable image quality. For web developers, this translates directly into faster loading times for their web content, a critical factor in user experience and search engine optimization.

Understanding WebP and Its Advantages
WebP was conceived by Google in 2010 with the ambitious goal of becoming the internet's fastest-loading image type. It ingeniously combines the best attributes of the three most prevalent image formats - JPG, PNG, and GIF - into a single, size-optimized file. This innovation is particularly relevant in today's digital landscape, where visual content is paramount, and load times can make or break user engagement.
Lossy vs. Lossless Compression
The core of WebP's efficiency lies in its dual compression capabilities.
- Lossy Image Compression: This method significantly shrinks file sizes by strategically reducing image quality. During this process, an algorithm permanently removes data from the image, which can lead to a decrease in clarity and fine details. JPG is the most widely recognized format that employs lossy compression.
- Lossless Image Compression: In contrast, lossless compression minimally reduces file size while meticulously preserving the original image quality. No image data is lost during this compression (with the exception of unnecessary camera metadata). PNG is the most well-known format utilizing lossless compression.
When and Why to Leverage WebP
WebP's unique features and speed benefits make it an ideal choice for various web applications.
- Enhanced Photo Compression: WebP's lossy compression can replace JPG photos with files that are more effectively optimized for size, thanks to its more advanced compression algorithms. Google's internal testing revealed that converting a PNG to a WebP format resulted in a file size reduction of approximately 45% with a negligible impact on image quality.
- Animated Images: WebP enables the creation of animations on websites that are considerably smaller than those typically produced with GIF files. This is a significant advantage for improving page load times without sacrificing dynamic content.
- Transparency with Lossy Compression: A standout feature of WebP is its unique ability to support transparent images even when using lossy compression. This is a capability not offered by JPGs, which do not support transparency at all, and it can be a game-changer for logos and graphics that require transparent backgrounds.
WebP Optimization: Boosting Site Speed
Optimizing image file sizes, especially by utilizing the WebP format, can dramatically improve a website's speed. WebP images offer several benefits, including smaller file sizes, robust transparency support, animation capabilities, and compliance with Google's best practices for web performance.
However, it's important to acknowledge potential drawbacks. In some instances, WebP images might exhibit blurriness with high-detail images. They are not always the absolute smallest file type available, and they may require additional code for compatibility across older browsers. Furthermore, software support for WebP, while growing, can still be more limited than for established formats like JPG and PNG.
Implementing WebP Export in Blender
Blender provides straightforward methods for exporting your rendered creations in the WebP format.
Method 1: Through Output Properties
- Locate Output Properties: In Blender's interface, you'll find the Output Properties panel, typically located in the right-hand pane. This panel controls crucial settings such as resolution, frame range, and the output file format.
- Access File Format Settings: Scroll down within the Output Properties until you reach the "Output" section.
- Select WebP: Click on the "File Format" drop-down menu and select "WebP."
- Save Your Render: Once these settings are configured, you can proceed with rendering your scene.
This method ensures that your rendered output will be saved in the WebP format according to your chosen settings.
Method 2: Via the Render Window Save As Function
Alternatively, after Blender has completed rendering your scene:
- Open the Render Window: Navigate to the Render window.
- Access Save As: In the menu bar at the top of the Render window, click on "Image" and then select "Save As."
- Choose WebP Format: In the "Save As" dialog box, you will find a "File Format" drop-down menu. Select "WebP" from this list.
It's important to note that this method is not persistent. If you render the same file again, you will need to re-select "WebP" as the file format. To make WebP export a permanent or default setting for your projects, using the Output Properties panel (Method 1) is recommended.
WebP in the Context of Web Development and Asset Optimization
The push for faster web experiences has made image optimization a cornerstone of modern web development. WebP plays a pivotal role in this endeavor.
WebP vs. Other Image Formats: A Practical Comparison
Google has previously provided comparisons of WebP file sizes against JPG and PNG. To further illustrate its capabilities, let's consider specific use cases:
- Graphic: JPG vs. WebP: For general graphics where full photographic detail isn't paramount, WebP often offers a significant reduction in file size compared to JPG with minimal perceptual quality loss.
- Detailed Photo: JPG vs. WebP: In scenarios involving highly detailed photographs with intricate textures and subtle color gradients, JPG might sometimes compress complex details and varied colors more clearly than WebP. This is due to the inherent differences in their compression algorithms. Finding the right balance between quality and file size is crucial.
- Illustration: PNG vs. WebP: For illustrations, especially those with sharp lines and solid colors, lossless WebP can provide file sizes comparable to or even smaller than PNG, while retaining perfect clarity.
- Transparent Logo: PNG vs. WebP: WebP excels here by offering transparency with lossy compression, resulting in smaller files than transparent PNGs. This is particularly beneficial for web logos and icons.
Testing and Tools for WebP Optimization
To gauge the effectiveness of WebP compression, tools like Sqoosh are invaluable. Sqoosh allows users to compress and convert images to various formats, including WebP, with adjustable quality settings. The goal is often to achieve file sizes under 100KB, a benchmark suggested by Google for optimal web performance.
For users of content management systems like WordPress, plugins are available that can automatically convert uploaded JPG and PNG images to WebP. These plugins often allow you to set your desired image quality and can intelligently decide which images to optimize based on their file size.
Browser Support and Fallback Strategies
While browser support for WebP is now near-universal, there might still be users with older browsers who cannot display WebP images. To ensure a seamless experience for all users, fallback codes are essential. These codes, typically implemented using HTML tag variations, provide browsers with alternative image sources. For a WebP image, it's best practice to include a JPG or PNG version as a fallback. Many WebP optimization plugins automatically handle these fallback codes.
WebP in 3D Asset Export (glTF/GLB)
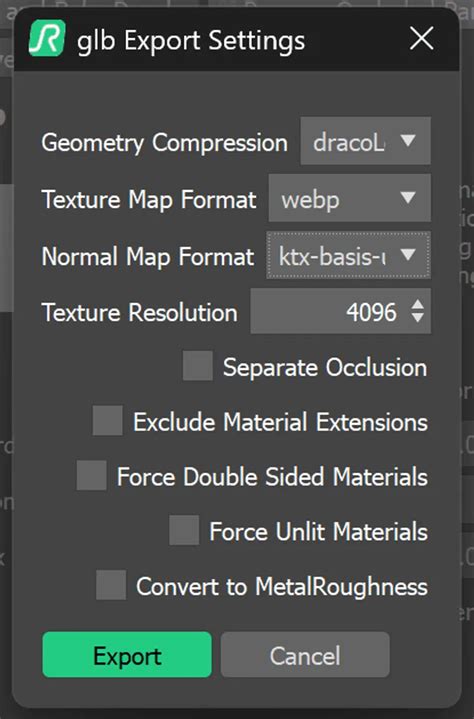
The growing interest in WebXR and three.js web projects highlights the importance of asset optimization. When exporting 3D models from Blender, especially for web deployment using formats like glTF/GLB, optimizing textures is crucial. Blender's glTF exporter allows you to select WebP as the image format for textures. This option often comes with settings to toggle lossless mode or select a quality level between 0 and 100%.
When preparing models for export, several best practices should be followed:
- Check Object Pivot: Ensure the object's pivot point is centered at 0,0,0.
- Apply Transformations: Apply scale, position, and rotation transformations (Ctrl+A in Blender).
- Include Dependencies: Make sure to include all necessary textures and animation tracks.
- Apply Properties to Mesh: Apply all mesh properties.
- Export Settings: When exporting to glTF/GLB, set "Include" to "Selected Objects" to export only what's necessary. Set "Transform" to "+Y Up."
- Material Settings: Under "Mesh -> Material," select "Images to WebP Format" and enable "Create WebP" under "Image Quality."
- Compression Settings: Tick "Compression" to enable further settings for texture optimization.
This meticulous approach ensures that your 3D assets are not only visually appealing but also efficiently delivered to web users, contributing to a faster and more responsive online experience.