Blurring faces in images serves a variety of crucial purposes, from safeguarding personal privacy to protecting minors in shared videos. Whether you aim to obscure an individual's identity for ethical reasons, comply with legal regulations, or simply enhance the artistic composition of a photograph by directing viewer focus, Photoshop offers robust tools to achieve this. This tutorial delves into several effective methods for blurring faces within Adobe Photoshop, ranging from its built-in blur tools and filters to the advanced capabilities of third-party plugins like Boris FX Optics.
Understanding the Need for Face Blurring
There are numerous scenarios where blurring a face in a photograph becomes necessary. Perhaps you've captured a group photo and wish to share it online, but some individuals are not comfortable with their image being publicly displayed. In such cases, you have two primary options: refrain from posting the photograph altogether or selectively blur the faces of those who have not consented.
Furthermore, depending on your geographical location, specific laws or regulations might mandate obtaining explicit permission from a person before sharing their photograph online. This can pose a challenge, particularly for street photographers who capture candid moments of strangers. By blurring the stranger's face, you can confidently share the photograph on platforms like Instagram without legal repercussions.
Even in the absence of strict legal frameworks, there are still compelling ethical reasons to blur someone's face to protect their identity. This principle extends to safeguarding your own identity, especially in an era where sophisticated facial recognition algorithms are prevalent and can be employed for both beneficial and detrimental purposes. Therefore, exercising caution when sharing images of strangers, friends, and family online is paramount. Blurring their faces can be a proactive step in ensuring their identities remain secure.
The act of blurring a face in a photograph, while seemingly technical, is surprisingly accessible with the right tools. Adobe Photoshop, a powerful and versatile software, provides multiple avenues to achieve this. This guide will walk you through these methods, offering detailed instructions suitable for beginners and experienced users alike, and also introduce a more streamlined and efficient approach.

Method 1: Utilizing Photoshop's Built-in Blur Tool
Photoshop indeed features a dedicated tool specifically designed for blurring. This tool can be applied to any object within your image to achieve a desired blur effect.
To begin, select the Blur Tool from the toolbar. In the Options bar located at the top of the screen, you can fine-tune the intensity of the blur. Additionally, you have the flexibility to choose a different blending mode, which can alter how the blur interacts with the existing pixels in your image.
A useful tip for precise control is adjusting the size of your brush stroke. You can do this by using the left and right bracket keys on your keyboard - [ and ] respectively. Once you have configured the brush size and blur strength to your satisfaction, simply paint over the face you wish to obscure. For a more pronounced blurring effect, you may need to paint over the same area multiple times.
While this method is straightforward, it's important to note a potential drawback: the Blur Tool often produces a relatively subtle blur. Even when the strength is set to 100% and the area is painted over numerous times, the face might still remain somewhat recognizable. This tool is best suited for situations where a slight softening of features is desired.
Method 2: Gaussian Blur with Selection Tools
For a more pronounced blur and greater control over its intensity compared to the dedicated Blur Tool, the Gaussian Blur filter, used in conjunction with selection tools, is a highly effective approach.
Start by importing the image you intend to edit into Photoshop. It is advisable to duplicate the layer you are working on. You can achieve this by clicking the "Create New Layer" icon in the Layers panel or by pressing Ctrl/Cmd + J. While not strictly essential for this method, working on a separate layer allows you to easily revert changes by simply deleting the duplicated layer if necessary.
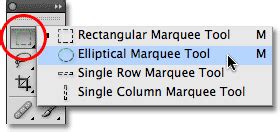
Next, access the Marquee Tool from the Toolbar (or press M). By default, this tool might be set to create rectangular selections. However, since you are targeting a face, it is generally more appropriate to use the Elliptical Marquee Tool. To switch to this, right-click on the Marquee Tool icon and select the "Elliptical Marquee Tool."
Draw a selection around the face you wish to blur. To create a perfect circle, hold down the Shift key while dragging. If you need to refine the boundaries of your selection, right-click within the selected area to bring up a context menu. Choose "Transform Selection." You can then drag the borders of the selection to resize it, as well as to reposition and tilt it to accurately encompass the face. Press Enter when you are satisfied with the selection.
With the face selected, navigate to the menu bar and select Filter > Blur > Gaussian Blur. This action will open the Gaussian Blur settings window. Here, you can adjust the intensity of the blur by manipulating the slider or by entering a specific radius value in pixels. The preview window will assist you in determining the optimal radius for your image. Click "OK" to apply the effect. To see the result without the active selection lines, press Ctrl + D (or Cmd + D on Mac) to deselect.
When you are ready to save your edited image, go to File > Export > Export As. Configure your desired export settings and click "Export."
A notable drawback of this method is that the blurred area will have a distinct, sharp edge. This can sometimes appear unprofessional, aesthetically displeasing, or distracting to the viewer. Furthermore, if your image contains multiple faces that require blurring, you will need to repeat this selection and blurring process for each individual face, which can be time-consuming.
Method 3: Advanced Blurring with Layer Masks and Brushes
To overcome the issue of sharp edges and to efficiently blur multiple faces, a more advanced technique involving layer masks and the Brush Tool offers a smoother, more seamless transition between the blurred and unblurred areas of your image.
Begin by opening your image in Photoshop and duplicating the background layer. Ensure the duplicated layer is selected in the Layers panel.
Go to Filter > Blur > Gaussian Blur. Adjust the blur intensity using the slider or by entering a pixel radius. Click "OK." At this stage, your entire image will appear blurred, which is the intended outcome.
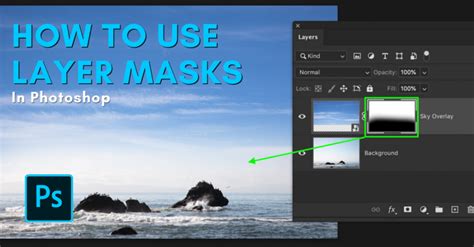
Now, to reveal the unblurred image while keeping the blur effect contained, you will create an inverted layer mask. Hold down the Alt key (Windows) or Option key (Mac) and click the "Add Layer Mask" icon at the bottom of the Layers panel. This action will create a black mask, effectively hiding the blur effect. Your image will revert to its original, unblurred state, and you will see a black rectangle next to your layer in the Layers panel, representing the mask.
Next, select the Brush Tool from the Toolbar. Crucially, ensure that your foreground color is set to white. This is because you will be painting on the black mask, and white paint will reveal the underlying blur. If black is your foreground color, swap them by pressing X or clicking the swap icon. Additionally, in the Options bar, set the hardness of your brush to 0% or a very low value. This is essential for creating a soft-edged brush, which will ensure a smooth transition between the blurred and unblurred areas.
With the black mask thumbnail selected in the Layers panel, begin painting over the faces you wish to blur. You can go over the same area multiple times to increase the intensity of the blur. Experimenting with the brush's opacity can also provide finer control over the blur strength for different faces. For instance, you could apply a stronger blur to one face with higher opacity and a subtler blur to another with lower opacity.
This method is particularly advantageous when dealing with multiple faces in a single image, as you avoid the repetitive task of creating individual selections for each face. The resulting blur is unobtrusive due to its soft edges, making for a more professional and aesthetically pleasing outcome.
The primary drawback of using the Brush Tool in this context is the difficulty in precisely creating perfect circular or oval blurred shapes and adjusting their tilt. However, for the purpose of obscuring faces, the organic nature of the brush stroke is often sufficient.
Method 4: Leveraging Third-Party Plugins for Enhanced Blurring
While Photoshop's native tools are powerful, specialized plugins can significantly streamline and enhance the face-blurring process. Boris FX Optics is one such example, offering a comprehensive suite of filters and AI-powered tools designed for professional photo editing.
Blurring Faces with Boris FX Optics
Boris FX Optics is a plugin compatible with Adobe Photoshop and Lightroom, and it also functions as a standalone application. It boasts hundreds of filters, particle effects, film emulations, and advanced AI masking capabilities that simplify the task of blurring faces. You can explore its features with a 14-day free trial.
Step 1: Set up the Image for OpticsImport your image into Photoshop. As with previous methods, duplicate the image layer and convert it to a Smart Object by right-clicking the layer and selecting "Convert to Smart Object." This ensures non-destructive editing.
Step 2: Apply the Optics Plug-inNavigate to Filter > Boris FX > Optics in Photoshop's menu. The Optics interface will launch, mirroring its standalone application's user experience. The image will be imported into the viewer.
Step 3: Mask the FaceOptics provides sophisticated masking tools to expedite the process. Click directly on the face you wish to blur. The Mask ML feature will intelligently generate a mask around the detected face. You can refine this mask by clicking on adjacent areas to include them or by right-clicking to exclude specific regions.
Press the M key to view the mask itself, and Shift + M to see a mask overlay. Once you are satisfied with the mask's precision, press Enter or click the Gear icon in the toolbar to generate the mask. Remember to press Enter again if you make any subsequent adjustments to ensure the mask is updated.
Step 4: Add Blur FilterWithin the Optics interface, filters are organized by category. Navigate to the Diffusion/Blurs tab and select the Blur filter. Alternatively, you can use the search magnifying glass icon to find "Blur" directly. Apply this filter to the layer where you have created the mask.
Step 5: Adjust Blur ParametersOn the right side of the screen, you will find the controls for the Blur filter. These parameters are intuitive, typically including settings for blur along the X and Y axes, and a combined parameter to control both simultaneously. Since you have a mask applied, the blur effect will only affect the masked area, i.e., the face.
If you need to modify the mask after applying the blur, simply click on the mask thumbnail within the Optics interface and adjust the edge size and position. Press Enter to apply these changes.
Step 6: Refine Blur Manually (Optional)For further fine-tuning or to add more blur to specific areas, you can utilize manual blurring techniques. You can add a new layer within Optics, apply a Paint filter, and then use the Blur tool with adjustable brush size and smoothness to paint over areas needing refinement. However, for the primary task of blurring faces, the masking and filter approach is generally more efficient, especially with multiple faces.
Step 7: Save ImageOnce you have completed all blurring adjustments, click the Apply button within the Optics user interface. This will return you to Photoshop with the applied effects. You can then export your image as usual.
How to Blur Faces in Photoshop - 60 Seconds - Photoshop 2023
Alternative Blurring Effects: The Mosaic Filter
Beyond Gaussian Blur, Photoshop offers other filters for obscuring faces. The Mosaic filter, which pixelates the selected area, is a popular alternative.
To use this effect, first hide the Gaussian Blur filter by clicking the eye icon next to its name in the Layers panel. Then, go to Filter > Pixelate > Mosaic. Adjust the Cell Size value in the dialog box to control the degree of pixelation. Enable the preview option to see how the pixels will appear before confirming with "OK." Remember that, like Gaussian Blur, this filter can be edited later if your layer is a Smart Object.
Exporting Your Blurred Image
After applying your chosen blurring method - whether it's Gaussian Blur, the Mosaic filter, or a plugin like Boris FX Optics - the final step is to export the image. Navigate to File > Export > Export As (or Save As), select your desired file format (e.g., JPEG, PNG), and adjust any necessary quality or size settings before saving. This ensures your image is ready for online sharing, with the privacy of the individuals within it effectively protected.
Conclusion: Choosing the Right Method for Your Needs
Blurring faces in Photoshop, while initially appearing complex, is an achievable task for users of all skill levels. The method you choose will depend on your specific requirements regarding speed, precision, and the desired aesthetic.
For quick, minor softening, the Blur Tool can suffice. For more controlled and intense blurs, Gaussian Blur with selection tools is effective, though it may result in sharp edges. The combination of Gaussian Blur with Layer Masks and Brushes offers a seamless transition and is ideal for blurring multiple faces efficiently. For professional-grade results and accelerated workflows, third-party plugins such as Boris FX Optics provide advanced AI-powered masking and a vast array of filters.
Regardless of the method employed, the ability to add blur to an image opens up creative possibilities. It can enhance artistic composition by directing focus, amplify the sense of motion, or create effects reminiscent of a shallow depth of field. By mastering these techniques, you can confidently protect privacy, adhere to regulations, and elevate your photographic creations.