The sudden disappearance of the Photoshop toolbox can be a jarring experience for any creative professional, halting workflow and causing significant frustration. This issue, often triggered by unexpected events like a sudden computer power cut during an active Photoshop session, can leave users staring at a menu bar devoid of their essential tools. Fortunately, several methods exist to retrieve the lost toolbox, ranging from simple workspace adjustments to more advanced preference resets. Understanding the underlying causes and available solutions is key to quickly returning to productive work.
Understanding the Disappearing Toolbox Phenomenon
The Photoshop toolbox, a crucial element of the user interface, houses all the essential tools for image manipulation, from selection and editing to type and navigation. Its disappearance can manifest in various ways. In some instances, the entire toolbar might vanish, leaving the user with only the menu bar and document window. In other cases, as observed in specific user experiences, the toolbar might become undocked and overlay the menu bar, obscuring important menu options. This can occur due to accidental user actions, software glitches, or even corrupted preference files.
A common scenario leading to this issue is an abrupt system shutdown or power interruption while Photoshop is running. Such an event can corrupt the application's preference files, which store crucial settings including the layout and visibility of UI elements like the toolbox. When Photoshop launches after such an event, it might fail to load these settings correctly, resulting in a missing or improperly displayed toolbox.
Initial Troubleshooting: Workspace and Visibility Checks
Before delving into more complex solutions, it's essential to perform a series of straightforward checks. Often, the toolbox is not truly gone but merely hidden or part of a different workspace configuration.
Checking Workspace Settings
Photoshop offers various workspace layouts optimized for different tasks. It's possible that the current workspace simply does not display the toolbar by default. To verify this, navigate to the Window menu on the top menu bar. Hover over Workspace. Here, you'll see a list of available workspaces. If you are in a workspace that doesn't include the toolbar, simply select a different one, such as "Essentials" or "Photoshop Defaults," which are known to display the toolbar.
Resetting the Current Workspace
If switching to a different workspace doesn't resolve the issue, the current workspace settings themselves might be corrupted or configured in a way that hides the toolbar. In this case, resetting the current workspace can often bring back the missing elements. Again, go to the Window menu, then Workspace, and select Reset [Your Current Workspace Name]. For instance, if you are using the "Essentials" workspace, you would choose "Reset Essentials." This action reverts all panel and toolbar positions within that specific workspace to their default state.
Manually Showing the Toolbar
Even if the workspace is correctly configured, the toolbar might have been manually hidden. Photoshop provides a direct command to bring it back into view. Navigate to the Window menu on the top menu bar. Look for an option explicitly labeled Tools. If this option is unchecked, simply clicking on it will display the toolbox. Ensure this option is selected.
Advanced Solutions: Preference File Reset and Keyboard Shortcuts
When the simpler methods fail, it's time to explore more advanced troubleshooting techniques that address potential corruption in Photoshop's preference files or utilize specific keyboard shortcuts designed for resetting UI elements.
Resetting Photoshop Preferences via Keyboard Shortcut
A sudden power cut can corrupt Photoshop's preference files, which store a wide range of user-defined settings, including toolbar configurations. A common and effective method to reset these preferences is by using a specific keyboard shortcut sequence during Photoshop's launch.
To initiate this process, close Photoshop completely. Then, double-click the Photoshop icon to launch the application. Immediately after double-clicking the icon, press and hold down the CTRL + ALT + SHIFT keys on your keyboard (on a Mac, this would be Command + Option + Shift). Continue holding these keys until you see a dialog box asking if you want to delete the Photoshop settings file. Confirm this prompt by clicking "Yes." Photoshop will then launch with its preferences reset to their default state. This action will restore the toolbox to its default appearance and position, along with resetting other application-wide settings.
How to reset photoshop to default settings
It is important to note that this shortcut resets all preferences to their factory defaults, so any custom settings you have made will be lost. However, for the specific issue of a missing or malfunctioning toolbox, this is often the most direct and successful solution.
Understanding the "Reset All Tools" Command
Photoshop also includes a built-in command specifically designed to reset tool settings, which can sometimes indirectly help with toolbar issues, particularly if individual tools within the toolbar are behaving erratically. This command has evolved over Photoshop versions.
In previous versions of Photoshop, the "Reset All Tools" command primarily reset the settings of individual tools within the Options Bar back to their defaults. This cleared away any previous, custom settings that were used for tools like the Brush Tool or Type Tool. However, this command did not reset the Toolbar itself back to its default layout.
In Photoshop CC and later versions, including Photoshop CC 2014 and subsequent releases, the "Reset All Tools" command was improved. While it still resets the individual tool settings in the Options Bar, its functionality related to the Toolbar is more nuanced. The improved command, first introduced in Photoshop CC 2014, is designed to help manage the default layout of tools within the Toolbar.
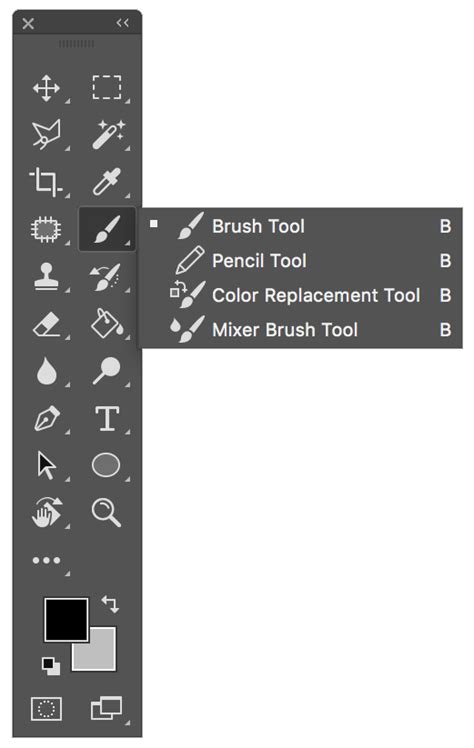
The Toolbar in Photoshop is where all the various tools are stored, from selection tools to editing tools, type tools, shape tools, navigation tools, and more. Due to the sheer number of tools available, not all can be displayed simultaneously. Photoshop uses a system of nested tools, where multiple tools share the same spot in the Toolbar, accessible by clicking and holding or right-clicking on the visible tool. For example, the Rectangular Marquee Tool is often the default visible tool, but by clicking and holding, you can access the Elliptical Marquee Tool, Single Row Marquee Tool, and Single Column Marquee Tool.
Photoshop always displays the last tool that was selected in a given spot. This means that if you frequently use the Elliptical Marquee Tool, it will remain visible in the Toolbar even after you've closed and reopened Photoshop, rather than the default Rectangular Marquee Tool. This can lead to a Toolbar that appears cluttered with non-default tools, especially if you're following tutorials that refer to default tool appearances.
The improved "Reset All Tools" command in Photoshop CC helps to restore the Toolbar to its default layout. To utilize this improved command, you first need to ensure that a default tool is visible in the spot you intend to reset. For instance, the Move Tool (keyboard shortcut 'V') is typically the default tool at the top of the Toolbar. Select this default tool.
Once a default tool is selected, look at the Options Bar at the top of the screen. On the far left of the Options Bar, you'll find the "Tool Presets" option, which displays the icon of the currently selected tool. To reset your Toolbar back to its default layout, right-click (Windows) or Control-click (Mac) on the Tool Presets icon. This action should reset the Toolbar to its original layout, with all default tools visible. This feature, though powerful, was not widely publicized, leading many users to remain unaware of its capabilities.
Customizing the Toolbar for Enhanced Workflow
Beyond simply restoring the toolbox, Photoshop CC versions (starting from CC 2015) offer extensive customization options for the Toolbar. This allows users to create personalized layouts that best suit their individual workflows, further enhancing efficiency and reducing the likelihood of tool-related interface issues.
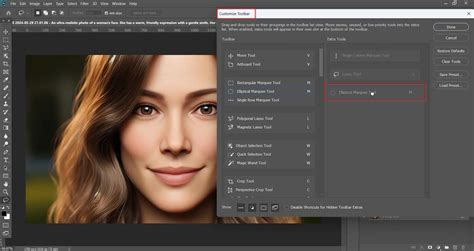
You can add, remove, and rearrange tools within the Toolbar. This can be done by going to Edit Toolbar from the bottom of the Toolbar itself or through the Window > Toolbar menu. This feature empowers users to hide infrequently used tools, group frequently used tools together, and generally streamline their creative process. By tailoring the Toolbar to specific needs, users can ensure that the tools they rely on most are readily accessible, minimizing the need for extensive searching or resetting.
By understanding these various methods, from simple visibility checks to advanced preference resets and customization, users can effectively tackle the frustrating issue of a missing Photoshop toolbox and ensure a smooth and uninterrupted creative workflow.