Substance Painter is a powerful tool for 3D texturing, and understanding its various projection methods is key to achieving realistic and detailed surfaces. Among these, the Warp projection stands out for its ability to deform textures in a 3D space, offering a dynamic and intuitive way to apply and manipulate surface details. This guide delves into the intricacies of the Warp projection in Substance Painter, from its fundamental concepts to advanced techniques for creating intricate patterns and materials.
Understanding the Warp Projection: Deforming Textures in 3D
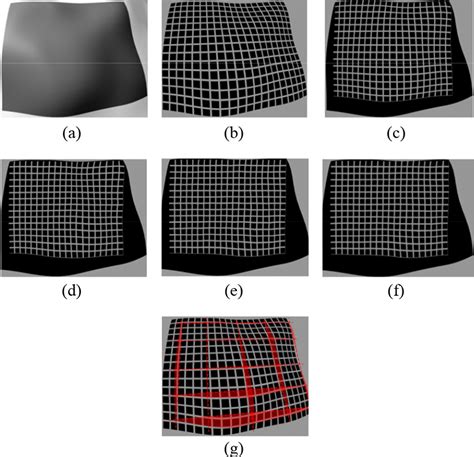
The Warp projection is a 3D projection method that allows for the deformation of a texture by directly editing points on a grid. This grid acts as a malleable mesh, enabling artists to stretch, bend, and twist a texture to conform precisely to the contours of a 3D model's surface. This is particularly useful when dealing with complex shapes or when a standard planar or spherical projection simply won't suffice.
To quickly set up a layer with the Warp projection, you can simply drag and drop a resource from the Assets window onto the mesh. This action automatically creates a new fill layer with the Warp projection applied, providing a convenient starting point for further customization.

Key Controls and Parameters
When working with the Warp projection, several parameters allow for fine-tuning how the texture behaves and appears:
Filtering: This setting controls how the texture is filtered, impacting its appearance when repeated multiple times. For high scaling values, using a filtering method other than the default may yield better results.
- Nearest: This option provides no filtering, which can be beneficial if the default Bilinear filtering results in a blurry appearance that compromises fine details.
Tiling: This parameter dictates how the texture repeats within the projection.
- None: When set to "None," the texture does not repeat.
Visibility: This option defines whether the projected texture should be visible outside of the projection area.
Depth: This setting controls how far the projection extends along its Z-axis. A high value in this setting can significantly impact performance, so it's advisable to use it judiciously.
Fade: The projection can be faded based on distance, allowing for controlled falloffs.
Origin: This parameter determines from where the texture will be projected onto the 3D model.
Automatic Adjustment: This feature enables the automatic adjustment of a texture's size according to the mesh's dimensions and its embedded physical size. It utilizes width and length (X and Y measurements) to calculate the correct physical size. Embedded physical sizes are expressed in centimeters. This ensures that the texture maintains its correct proportions, even if the mesh file was created using different units of measurement.
Position of the Origin: This specifies the exact location of the projection's origin in 3D space. The units used are based on the bounding box of the entire scene.
Manipulator Visibility: When enabled, the manipulator becomes visible and controllable in the viewport, allowing for direct editing of the projection's transformation or the grid points.
Transformation and Grid Editing
The Warp projection offers robust tools for transforming and refining the projected texture:
- Transform Warp: This allows for the editing of the projection's overall transformation, including translation, rotation, and scaling.
- Row and Columns: These settings specify the number of divisions within the warp grid, allowing for greater control over the deformation.
- Space: This defines the coordinate space in which transformations are performed.
- Restore Global Transformation: This function resets the position, rotation, and scale of the projection back to their initial values.
- Stepping: With the Translation manipulator, you can move the projection along selected axes at specific intervals (stepping). Similarly, the Rotation manipulator allows for rotating the projection around an axis in stepped increments, and the Scale manipulator enables resizing in steps by holding a shortcut while manipulating an axis handle.
The Warp projection is visually represented by a plane and a grid of points. A keyboard shortcut is available to quickly switch between "Transform warp" and "Edit vertices" modes. Clicking and dragging in the viewport allows for rectangular selections of grid points.
The Warp projection grid itself is a Bézier patch, meaning each point possesses its own set of tangents. These tangents control the curvature of the lines that connect the points, offering a high degree of artistic control over the deformation. The grid can be further divided by rows and columns through the Warp settings menu, providing more granular control over complex distortions.
Creating Custom Textures with Substance Designer
While Substance Painter excels at applying and manipulating textures, Substance Designer is the go-to program for generating them from scratch. Substance Designer operates on a node-based system, where functional "blocks" called nodes are combined to create complex textures and material presets.
The Node-Based Workflow
Substance Designer's node system includes various types of nodes:
- Generator Nodes: These generate foundational elements like shapes, patterns, or noise.
- Atomic Nodes: These process or modify generated data.
- Function Nodes: These perform specific operations or calculations.
By connecting these nodes, artists build up intricate textures step by step, maintaining full control over every detail and allowing for extensive customization.
A Practical Example: Generating a Circle-Based Grate Pattern
Let's walk through the process of creating a simple circle-based grate pattern in Substance Designer, which can then be used as a texture map in Substance Painter.
Create a New Substance Graph:
- Open Substance Designer.
- Create a new Substance Graph (File => New => Substance graph…) using the empty template. Leave all other options as default.
Interface Overview:
- Explorer Window: Lists your project, packages, and graphics.
- Library: Contains all the nodes you'll need.
- Graph Window: The central workspace where nodes are added and connected.
- Preview Windows (3D and 2D): Show a real-time preview of your work.
- Properties Window: Displays and allows modification of selected node properties.
Adding Nodes:
- Nodes can be added by dragging them from the Library to the Graph window, using toolbar icons for commonly used nodes, or by pressing the spacebar in the Graph window to bring up a search box.
Creating the Basic Shape:
- Add a Shape node from the "Patterns" section under "Texture Generators."
- Select the Shape node and in the "Instance Parameters" section of the Properties window, change the pattern to Disc.
- Lower the Scale to approximately 0.50. Collapse the "Attributes" section to save space. You should now see a white disc in the 2D preview.
Creating a Hollow Circle:
- Duplicate the existing Shape node (Ctrl-D or right-click menu).
- Place the duplicated node below the first one.
- In its Properties, lower the Scale by approximately 0.1 (e.g., to 0.40 if the first was 0.50). This creates a slightly smaller disc.
Using the Blend Node:
- Add a Blend node (found in "Atomic node" category or on the toolbar).
- Connect the output of the first Shape node (the larger disc) to the Background input of the Blend node.
- Connect the output of the second Shape node (the smaller disc) to the Foreground input of the Blend node.
- Double-click the Blend node to select it and change the Blending mode to Subtract. This operation will remove the smaller disc from the larger one, resulting in a hollow circle.
Refining the Circle:
- If the circle's appearance isn't satisfactory, select the second Shape node and adjust its scale to fine-tune the thickness of the circle's outline. This demonstrates the dynamic nature of the node-based workflow.
This process, while seemingly involved for a simple circle, highlights the power of procedural generation. By mastering these fundamental node combinations, you can build increasingly complex patterns and textures.
The Importance of Texturing in 3D Workflows
Texturing is a fundamental step in any 3D pipeline, breathing life and realism into otherwise plain models. It involves applying images and materials to a 3D model's surface, defining how it interacts with light and how it appears to the viewer.
From 2D Images to 3D Substance
By default, most 3D models are rendered in a flat gray color. To make them visually interesting and believable, 2D images, known as textures, are mapped onto their surfaces. This process, combined with setting material properties, is crucial for achieving realistic results.
- Physical Based Rendering (PBR): PBR materials are a popular and effective method for quick and realistic texturing. They utilize a set of parameters that artists can adjust to accurately mimic real-world surface properties. The development of PBR materials was significantly aided by advancements in computer hardware, particularly the increased availability of RAM, which allowed for more complex algorithmic computations.
UV Unwrapping: The Bridge Between 2D and 3D
Before textures can be applied, 3D models typically need to be UV unwrapped. This process involves strategically "cutting" seams in the 3D mesh to lay out its 2D polygons flat, creating a 2D representation (UV map) onto which textures can be applied. The accuracy of UV unwrapping is critical, as poorly managed seams can lead to visible artifacts and discontinuities in the final texture.
Materials and Light Interaction
The true power of texturing lies in how materials are defined to interact with light. Whether you're rendering human skin, fur, fabric, or metal, each surface has unique properties that dictate how light reflects, refracts, or absorbs. Realistic materials require subtle differences in their parameters to appear convincing. Furthermore, effective lighting in a 3D scene is essential not only for visibility but also for accurately showcasing the materials and textures. The parameters artists set are all about how light interacts with surfaces, so poor lighting will drastically affect the overall appearance of the model.
The Complete Guide to UV Unwrapping for the 3D Artist - Where & Why Marking Seams
Adobe Substance 3D Ecosystem
Adobe offers a suite of powerful applications designed to streamline the 3D creation process, allowing artists to focus more on creativity by automating many technical aspects.
Key Applications in the Substance 3D Suite:
Adobe Substance 3D Modeler: This application utilizes a voxel-based approach, enabling artists to sculpt models as if working with clay, without the immediate concern for polygons or UV unwrapping. This can significantly simplify the initial stages of asset creation, especially for organic forms.
Adobe Substance 3D Painter: A robust 3D texturing tool, Painter allows artists to paint directly onto 3D models in real-time. It reduces the burden of managing individual texture maps and UV maps. Artists can apply and create custom materials with immediate visual feedback.
Adobe Substance 3D Sampler: This application leverages AI and automation to create seamless PBR materials from real-world photos and images. It's an excellent tool for quickly capturing and digitizing physical materials for use in 3D projects.
Adobe Substance 3D Designer: As discussed earlier, Designer is the primary tool for creating procedural textures and materials from scratch using a node-based workflow.
Adobe Substance 3D Assets: This ever-growing library provides subscribers with access to a vast collection of pre-made assets, including materials, models, and more, offering a valuable resource for accelerating the creative process.
Advanced Texturing Techniques: Weathering and Damage
Creating realistic weathered and damaged surfaces is a common goal in 3D texturing, and Substance Designer and Painter are well-equipped for this.
Procedural Weathering in Substance Designer
Procedural workflows in Substance Designer are particularly advantageous for creating weathering effects. This is because they allow for easy iteration and modification. Artists can start with a uniform color and then procedurally mask or blend in details like rust, dirt, or scratches.
- Generating Patterns: This often involves blending various noise generators and grunge maps. The inherent randomness of noise generators can effectively mimic the irregular patterns found in natural weathering.
- Base Layer Creation: For materials like wood, creating a realistic base requires blending multiple grunge maps and vertical noises to replicate the intricate details of wood grain.
- Height Maps for Detail: Height maps are crucial for simulating surface imperfections and creating effects like tiling or subtle surface variations. For example, a height map can be used to generate a realistic tile effect.
Applying Layers of Detail in Substance Painter
When texturing complex objects like a damaged bicycle, Substance Painter allows for a layered approach:
- Material Breakdown: Divide the model into logical components (e.g., frame, tires, handlebars) to manage texturing efficiently.
- Layering Textures: Apply different materials and textures to each component. For a damaged bike, this might involve a mix of old paint, rust, rubber, and plastic.
- Detailing Specific Areas: Focus on areas that would naturally show signs of wear and tear, such as the bottom of the frame where rust might accumulate, or the grips which would exhibit wear from handling.
- Reference is Key: Utilizing reference images of real-world objects is invaluable for accurately replicating the nuances of damage and weathering.
The process of texturing a damaged bicycle might involve:
- Base Frame: A combination of old, chipped paint and rust, particularly on the lower sections.
- Metal Frame: Layers of rust, combined with underlying paint that shows signs of abrasion.
- Grips: Texturing the rubber grips to show wear, dirt, and potential tears.
- Chain: Modeling and texturing the chain, which can be a challenging but rewarding part of the process, especially concerning UDIMs (a method for handling texture resolution across multiple UV tiles).
- Non-Linear Deformations: Employing non-linear deformation tools to achieve a believable "damaged" aesthetic, such as a bent frame.
Integrating CG Elements into Live-Action Footage
A significant application of texturing and 3D work is the integration of computer-generated (CG) elements into live-action footage. This process, often referred to as VFX (Visual Effects), requires meticulous attention to detail to ensure seamless blending.
Matchmoving and Camera Tracking
- Matchmoving: This is the process of reconstructing the camera's movement in a 3D environment based on live-action footage. This allows CG elements to be placed and animated within the scene as if they were physically present.
- Camera Tracking: Software like 3DEqualizer is used to analyze footage and extract camera parameters. This involves identifying tracking points (distinctive shapes like circles or crosses placed on set) or patterns within the footage. The accuracy of tracking is crucial and can be influenced by factors like lens distortion and focal length.
- Geometry Reconstruction: Based on the camera tracking data, the entire 3D geometry of the environment can be reconstructed, ensuring that CG elements align perfectly with the real-world scene.
Considerations for Footage Selection
When choosing footage for matchmoving and integration, several factors are important:
- Tracking Points: Footage with clear, distinct tracking markers or patterns makes the tracking process easier and more accurate.
- Lighting and Ambiance: The lighting and overall mood of the footage can influence the choice of CG element and how it integrates. Footage with good lighting and a compelling ambiance can provide an ideal environment for placing CG objects.
- Complexity of the Scene: Scenes with moving objects like trees or clouds can present challenges for tracking.
- Footage Quality: Low-quality footage can make it difficult to find sufficient tracking points, leading to inaccurate results and requiring significant effort to achieve acceptable deviation parameters.
The goal is to achieve a result where the CG element is indistinguishable from the real-world elements, from its interaction with light to its placement within the scene. For instance, integrating a damaged bicycle into an alleyway scene requires careful consideration of the existing lighting, materials, and the overall narrative of the shot.
Conclusion: The Art and Science of Substance Texturing
The Warp projection in Substance Painter, combined with the procedural power of Substance Designer and the integrated workflow of the Adobe Substance 3D suite, offers artists unparalleled control over the creation of realistic and visually compelling 3D assets. From intricate texture generation to seamless integration into live-action footage, these tools empower artists to bring their visions to life with a level of detail and fidelity previously unattainable. Mastering these techniques is not just about learning software; it's about understanding the interplay of light, material properties, and artistic intent to craft believable digital worlds.