Procreate's Brush Library is the gateway to a universe of creative expression, offering artists an expansive collection of tools to bring their visions to life. With hundreds of meticulously crafted brushes organized into themed sets, and the unparalleled power of the Brush Studio for customization, Procreate empowers users to achieve virtually any artistic effect imaginable. This article delves into the intricacies of the Procreate brush system, from navigating the library and managing your brushes to understanding the profound customization options available within the Brush Studio, and exploring the diverse range of pre-built brush sets designed to cater to every artistic need.
Navigating the Procreate Brush Library
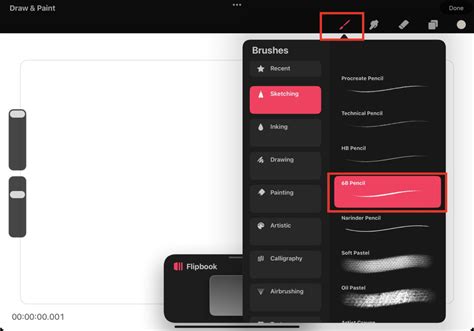
The Procreate Brush Library is designed for intuitive navigation and efficient access to your creative arsenal. Upon opening the brush menu, you'll be presented with a list of Brush Sets on the left-hand side. Tapping a specific Set will reveal its contained brushes on the right. Each brush is displayed with its name and a visual preview of the stroke it produces, allowing for quick identification and selection.

Recent brushes are conveniently located at the top of the Brush Library sets. These can be accessed by tapping Paint, Smudge, or Erase, and then selecting "Recent." For those who wish to maintain easy access to frequently used brushes, Procreate offers a pinning feature. By swiping left on a brush within your Recent set and tapping "Pin," you can ensure it remains permanently at the top of the list, easily identifiable by a star symbol in the top right-hand corner. To remove a pinned brush or delete any brush from your Recent set, simply swipe left and tap "Clear."
Procreate's organizational capabilities extend beyond simple lists. You can create your own custom Brush Sets by tapping the "+" button, which appears as a blue highlighted button when you drag down the list of Brush Sets. Naming your new set is straightforward using the iOS Keyboard. Furthermore, the system allows for flexible management of brushes and sets through drag-and-drop functionality. Tapping and holding a brush or Brush Set will allow it to "lift up" and darken, indicating it's ready to be moved. To move multiple items, pick up the first one and then tap additional items with another finger to create a stack, indicated by a number next to the "+" icon. This stack can then be dragged to a new position.
A significant advancement in Procreate's brush management is its integration with the iPad's Files app. Brush libraries are now stored within the Files app, either in "On My iPad → Procreate → Brushes" or "iCloud Drive → Procreate Brushes," depending on your chosen storage location. This means brushes, brush sets, and brush libraries are treated as files and folders. Consequently, certain characters may not be usable in names due to operating system restrictions. Changes made to brushes within Procreate are reflected in the Files app, and vice versa, creating a seamless synchronization.
Exploring Procreate's Built-in Brush Sets
Procreate boasts 18 versatile, hand-crafted brush sets that form the core of its Brush Library. These sets are designed to provide a wide range of useful tools, from the practical to the experimental, catering to various artistic styles and needs. Some brushes are designed for realism, while others explore fantastical possibilities.
- Sketching: Designed for practical drawing, planning, sketching, and quick studies.
- Rendering: This set offers a range of rendering brushes for artistic drawing.
- Inking: Ideal for cleaning up artwork and drawing in ink-centric styles like sumi-e.
- Painting: These brushes encompass a range of realistic and digital painting effects.
- Wet Media: This selection of brushes covers mediums from acrylic to stucco to oil.
- Texture: Texture is the focus of this fascinating brush set, offering effects from watery to clumpy.
- Lettering: These brushes all have Streamline enabled, allowing letterers to create smooth and even calligraphic forms.
- Dry Brushes: A staple of classic digital art, these brushes lay down large areas of texture fast.
- Artistic: This playful set demonstrates the unique capabilities of Procreate’s versatile Brush Studio, including brushes that change color, create smoky effects, and generate chaotic shapes.
- Material: A variety of Material brushes featuring metallics and roughness, created for 3D Painting.
- Special Effects: This mind-blowing brush takes full advantage of the power of digital art, designed to add realistic grunge textures to your art.
- Organic: The Organic brush set offers all things natural, including scatter brushes for adding grass, leaves, and bark textures, as well as brushes that mimic handmade mediums.
- Watercolour: This set offers several realistic watercolor brushes.
- General: The set for clean and simple, mostly rounded brushes.
- Comics: Your go-to for comic or manga-style brushes with inks, halftones, and more.
- Technical: Clean and purpose-built to allow for projects with a more technical lean.
- Gouache: This set offers realistic gouache brushes.
- Oils: This set provides brushes that mimic the behavior and appearance of oil paints.
Experimenting with these diverse brush sets is key to unlocking their full potential and discovering new avenues for creative expression.
How to Import Procreate Brushes and Brush Sets (with FREE Download)
Customizing Brushes: The Power of Brush Studio
The Brush Studio is where the true magic of Procreate's brush system unfolds, offering total control over every aspect of a brush's behavior and appearance. There are two primary ways to access it: by tapping the "+" button at the top right of the Brush Library to create a new brush, or by double-tapping an existing brush to edit it.
Within the Brush Studio, you can alter shape, grain, behavior, color, responsiveness, opacity, taper, and a multitude of other settings, leading to limitless combinations. The Brush Studio is organized into 14 adjustable attributes, each offering a deep level of control:
- Properties: Adjusts the maximum and minimum size of your brush, crucial for scaling effects and detail work.
- Stroke Path: Controls how the brush shape is stamped along a path. Key settings include Spacing (the distance between stamps), Jitter (randomizing spacing and lateral shift), and Count (stamping multiple times per point).
- Shape: Defines the brush tip. You can import custom images as Shape Sources or modify existing ones. The color of the shape source determines its opacity: 100% black is transparent, and 100% white is solid.
- Grain: This is the texture that sits inside the brush shape, acting like a paint roller. You can import custom images as Grain Sources or use the Grain Editor to create your own tiling textures. Grain can be set to move with the stroke for a streaky effect or remain static for a crisp texture.
- Rendering: Determines how the brush stroke is rendered to the canvas, offering options from light glazes to intense blending, mimicking physical paint behaviors.
- Wet Mix: Mimics the behavior of wet media, allowing for pigment dilution, color mixing, and paint pulling effects. Settings like Dilution, Charge, and Pull are crucial here.
- Color Dynamics: Unlocks the full power of digital art by allowing brushes to change color, saturation, brightness, and more based on pressure, tilt, or even a secondary color.
- Dynamics: Adjusts how brush attributes like size, opacity, and flow respond to factors like speed, pressure, tilt, and barrel roll.
- Apple Pencil: Fine-tunes the interaction with the Apple Pencil, including pressure curves, tilt response, and barrel roll for Apple Pencil Pro.
- Taper: Controls the reduction in brush size or opacity at the start and end of a stroke, replicating natural drawing tool behavior. This can be adjusted for Pressure (Apple Pencil) and Touch (finger).
- Stabilization: Smooths out strokes, reducing wobbles and shakes. StreamLine is particularly important for inking and calligraphy, ensuring smooth and even lines. Motion Filtering offers advanced algorithms for even smoother strokes.
- Texturizer: Adjusts the strength and contrast of the texture established over the base color of the brush.
- General: Settings that affect the overall behavior and rendering of the brush.
- About This Brush: Provides information about the brush and allows for resetting it to its default settings.
The advanced brush settings panel, accessible by tapping the numerical value of a slider, provides even greater precision. Here, you can input exact numerical values, use Scribble with Apple Pencil, and assign settings to Pressure, Tilt, and Barrel Roll independently for nuanced control. The Drawing Pad within the Brush Studio acts as a live preview window, allowing you to test your brush changes in real-time.
Importing and Managing Custom Brushes
Procreate supports importing brushes in various formats, including Procreate's own .brush and .brushset files, as well as Adobe® Photoshop® .abr brushes. Importing can be done directly from the Files app by tapping the "Import" button within the brush library, or by dragging and dropping files into Procreate.
How to Import Procreate Brushes and Brush Sets (with FREE Download)
When you import a single brush, a folder named "Imported" is automatically created to house it. Importing a .brushset file will place the entire set at the top of your current brush library. You can also import brushes via AirDrop or by saving them to your iCloud Drive.
Managing your brushes and brush sets is crucial for an efficient workflow. You can rename custom Brush Sets by tapping on them twice to bring up the Options menu. Deleting custom Brush Sets is also possible through the same menu. Sharing individual brushes or custom sets is straightforward: swipe left on a brush thumbnail or tap twice on a set and select "Share."
For backup purposes, it's highly recommended to save your brushes and brush sets to an iPad-compatible external hard drive or a dedicated cloud service. If you accidentally delete a brush, set, or library, you can often recover it from the "Recently Deleted" folder within the Files app.
The ability to duplicate brushes is an invaluable safety net. By swiping left on a brush and tapping "Duplicate," you create a copy that can be safely modified without affecting the original. This is particularly useful when experimenting with the extensive settings available in the Brush Studio. Similarly, you can duplicate an entire Brush Set, which then becomes a custom set that can be renamed, deleted, or shared.
Procreate's commitment to continuous improvement is evident in its brush system. With the ongoing development of the Brush Studio and the introduction of new features, the possibilities for creating and editing brushes are virtually endless. By understanding and leveraging the comprehensive features of the Procreate Brush Library and Brush Studio, artists can amplify their creativity and unlock new dimensions in their digital art.