Photoshop brushes are powerful tools that can significantly enhance your digital art and design workflow. Whether you're a seasoned professional or a beginner exploring the creative possibilities of Photoshop, understanding how to effectively use and even create your own brushes can unlock new levels of artistic expression. This tutorial delves into the practical application of brushes, with a particular focus on the vast resources available from communities like Brusheezy, and explores techniques for incorporating them into your projects to achieve stunning results.
Understanding Photoshop Brushes: The Foundation
At their core, Photoshop brushes are digital tools that simulate the act of painting or drawing. They are essentially pre-defined shapes or patterns that are applied to your canvas when you click or drag with the Brush Tool. These aren't just simple dots; brushes can be intricate textures, complex patterns, or even custom-designed elements. They are incredibly versatile, finding applications in a wide array of creative endeavors.
Brushes are excellent for making cards, creating storyboard templates, adding textures to designs, developing clipping masks, designing logos, and much more. The sheer variety of available brushes means you can achieve vastly different looks and feels, from delicate watercolor washes to gritty, distressed textures. For those new to the digital art scene, the concept of "what in the world are Photoshop brushes?" might seem a bit daunting at first. However, with a little guidance, their utility becomes clear and their application intuitive.
Acquiring and Installing Photoshop Brushes
The digital landscape is rich with resources for obtaining Photoshop brushes. Communities like Brusheezy and DeviantArt offer a treasure trove of free brushes, catering to every imaginable artistic style. Websites like Pixels & Ice Cream, as mentioned by Xavier Durand-Hollis Jr. (aka Axraider70), are also excellent sources, providing a great selection of completely free brushes alongside some amazing premium options.
To begin using brushes, you first need to install them. Typically, brushes come in a .abr file format. Once you've downloaded a brush set, you'll usually need to extract it from a zipped file. After extraction, locate the .abr file.
To load these brushes into Photoshop or Photoshop Elements:
- Open Photoshop or Photoshop Elements.
- Navigate to
Edit>Preset Manager. - In the Preset Manager, select
Brushesfrom the dropdown menu. - Click on the
Loadbutton. - Browse to the location where you saved your
.abrfile and select it. - Click
Load.
Your newly installed brushes will typically appear at the bottom of your brushes pane, allowing you to easily select them. The number displayed beneath a brush often indicates its largest size in pixels, providing a useful reference point. Once loaded, click Done to exit the Preset Manager.
Utilizing Brushes in Your Projects: A Step-by-Step Approach
With your brushes installed, you're ready to start incorporating them into your creative projects. The process is straightforward and can be adapted to various design needs.
Selecting and Applying Brushes
- Open your document: Begin by opening a new document or an existing image in Photoshop.
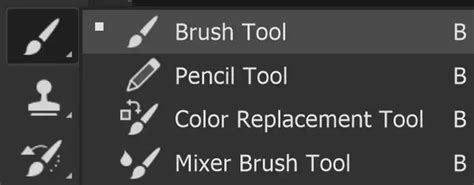
- Select the Brush Tool: Press the
Bkey on your keyboard or select the Brush Tool from the toolbar, usually located on the left-hand side of the screen. - Choose your brush: At the top of the screen, in the Options Bar, you'll find a dropdown menu for brush selection. Navigate to the brush set you've just loaded (e.g., the Laurie Ornament Brushes) and select the specific brush you wish to use.
- Set your foreground color: The color of the brush stroke will be determined by your current foreground color. Click on the foreground color swatch to select your desired hue.
- Adjust brush size: You can adjust the size of your brush using the slider in the Options Bar or by using the keyboard shortcuts: press the
[key to make the brush smaller or the]key to make it larger on the fly.
Best Practices for Brush Application
A crucial step before applying any brush is to add a new blank layer. This is a fundamental practice that offers immense flexibility. By stamping your brush onto a new layer, you can easily move, resize, or even delete the brush stroke without affecting other elements of your design.
Once you've "stamped" your brush onto the canvas:
- Move and transform: To reposition or resize the brush stroke, select the Move Tool by pressing
V. Then, you can drag the brush to your desired location. For more precise transformations like scaling or rotating, use the Free Transform command. In Photoshop Elements, ensure "Constrain Proportions" is selected to avoid distorting the brush. In Photoshop, you can hold down theShiftkey while transforming to maintain proportions. - Duplicating and Flipped Elements: To create symmetrical designs or expand upon a single brush stroke, you can duplicate the layer containing your brush. Press
Ctrl-J(Windows) orCmd-J(Mac) to copy the layer. Then, use Free Transform (Ctrl-TorCmd-T) on the new layer to flip it horizontally or vertically. You can then drag this transformed brush layer next to or around the original to build more complex elements, such as borders or decorative motifs.
Exploring Advanced Brush Settings and Customization
While pre-made brush sets are incredibly useful, Photoshop also empowers you to create your own custom brushes or extensively modify existing ones to achieve highly specific effects. This is where the true power of brush customization lies.
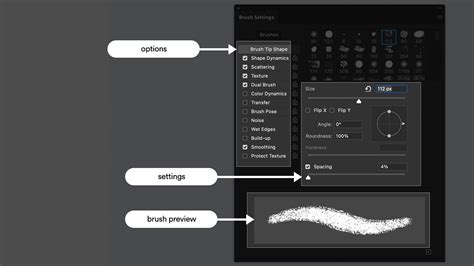
The Brush Settings Panel
The Window > Brush Settings panel is your command center for brush customization. Within this panel, you'll find a vast array of options that allow you to sculpt the behavior of your brush:
- Brush Tip Shape: This is where you select the fundamental shape of your brush tip. You can choose from a wide range of default shapes, including round, square, and even import custom shapes. You can also adjust the
SizeandSpacingof these tips. Increasing spacing can create dashed lines or patterns, while decreasing it leads to smoother strokes.
Shape Dynamics: This setting controls how the brush shape changes as you paint. Options like
Size Jitter,Angle Jitter, andRoundness Jitterallow for more organic and varied brush strokes, mimicking the natural inconsistencies of traditional media.Controloptions can link these dynamics to factors like pen pressure (if using a graphics tablet), fade, or the direction of your stroke.Scattering: The Scattering settings allow you to spread out your brush marks randomly along the stroke path. This can be useful for creating effects like confetti, dust, or a more chaotic, energetic feel. You can control the
Scatteramount and theCountof brush marks applied.Texture: Applying a texture to your brush strokes can add a layer of realism and tactile quality. You can select from a library of textures or import your own, and then control the
ScaleandDepthof the texture's influence on your brush.Dual Brush: This advanced setting allows you to combine two different brush tips, creating complex and unique brush effects. You can blend the two tips and control their interaction, leading to highly customized results.
Color Dynamics: This setting allows for variation in the color of your brush strokes. You can set
Foreground/Background Jitterto gradually shift between your foreground and background colors, or useHue Jitter,Saturation Jitter, andBrightness Jitterto introduce random color variations within a defined range.Transfer: This panel, often linked to
Opacity JitterandFlow Jitter, allows for variations in the opacity and flow of your brush strokes. This is particularly useful when simulating watercolor or airbrush effects, where the paint builds up gradually.Other settings: The Brush Settings panel also includes options for
Noise,Wet Edges,Build-up, andSmoothing, each offering further control over the appearance and behavior of your brush strokes.
Creating Your Own Custom Brushes
The ability to create custom brushes is a game-changer for digital artists. If pre-made brushes don't quite meet your needs, you can easily transform any image or shape into a brush:
- Prepare your image/shape: Open or create the image or shape you want to turn into a brush. This could be anything from a photographic texture to a hand-drawn doodle.
- Select the area: Use selection tools (like the Marquee Tool or Lasso Tool) to select the specific part of the image you want to convert into a brush.
- Define the brush: With the desired area selected, go to
Edit>Define Brush Preset. Give your new brush a descriptive name. - Save and use: Your custom brush will now appear in your Brush Presets list, ready to be used just like any other brush. You can further refine its behavior using the Brush Settings panel.
Advanced Techniques and Creative Applications
The true artistry with Photoshop brushes lies in how they are combined and manipulated. Xavier Durand-Hollis Jr. is renowned for his advanced techniques, and while a full exploration of his methods would require a dedicated session, the core principles involve thoughtful layering, transformation, and understanding brush dynamics.
The Power of Layering and Transformation
As demonstrated in the tutorial, duplicating brush layers and transforming them (scaling, rotating, flipping) is a powerful way to build intricate designs, patterns, and borders. By strategically arranging these transformed elements, you can create complex compositions from simple brush stamps. This iterative process of stamping, transforming, and arranging is key to developing sophisticated visual elements.
Using Brushes for Specific Effects
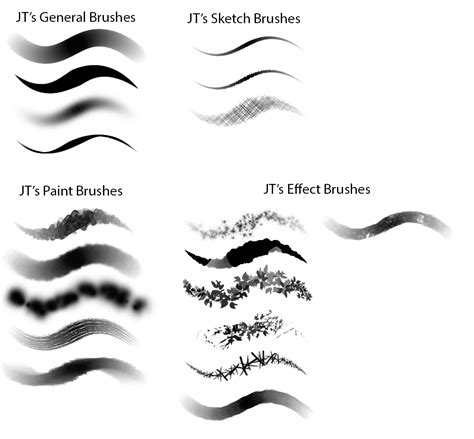
- Textures: Brushes with built-in textures or those with aggressive scattering and noise settings can be used to add grit, grunge, or organic feel to your designs.
- Borders and Frames: As highlighted, using ornamental brushes and duplicating/flipping them can create beautiful and unique borders for images or layouts. Websites like IttyBitty offer inspiration for such decorative elements.
- Clipping Masks: Brushes can be used to create intricate shapes that serve as clipping masks for other layers, revealing content only within the brush-defined areas.
- Logo Design: Custom brushes can be instrumental in creating unique brush strokes or textures for branding elements.
- Storyboarding and Templates: Brushes can quickly add visual flair or standardized elements to storyboards or design templates.
10 Advanced Photoshop Tricks Used By TOP JAPANESE ILLUSTRATORS | Rolua Study
Avoiding Repetition and Maximizing Impact
While the temptation to overuse a favorite brush is strong, remember that use brushes sparingly. Overreliance on a single brush type can make your work appear repetitive and uninteresting. Variety is key to engaging visuals.
Furthermore, choose the right brush for the job. Not all brushes are created equal, and understanding the intended purpose and characteristics of each brush will lead to more effective and professional-looking results. Experimentation is crucial.
The Art of Practice
Like any skill, mastering the use of Photoshop brushes takes practice. Don't be discouraged if your initial attempts aren't perfect. Spend time experimenting with different brush types, exploring the settings in the Brush Settings panel, and trying out various application techniques. The more you practice, the more intuitive the process will become, and the more effectively you'll be able to translate your creative vision into digital reality.
The incredible versatility and power of Photoshop brushes are undeniable. They are indispensable tools for artists and designers looking to achieve a wide range of effects and styles. By understanding how to acquire, install, use, and customize brushes, you can significantly elevate your digital art and design projects, adding unique touches and achieving professional-grade results. Embrace the exploration, experiment with different techniques, and most importantly, have fun playing with your brushes!