Photoshop's clipping mask feature is a remarkably versatile and powerful tool that offers precise control over layer visibility. While often compared to layer masks due to their ability to achieve similar visual outcomes, clipping masks function and are applied in a distinct manner. A thorough understanding of clipping masks can significantly enhance your proficiency in Photoshop, enabling you to tackle a wide array of tasks with greater efficiency and creativity. From applying targeted adjustments to specific layers to altering the shape of an image in unique ways, clipping masks are an indispensable technique for both novice and experienced users.
The Fundamentals of Clipping Masks
At its core, a clipping mask in Photoshop is a mechanism that allows one layer to dictate the visibility of the layers positioned directly above it. This creates a dynamic relationship where the content and transparency of a "base layer" precisely define where the "clipped layers" will be seen. To initiate the creation of a clipping mask, a minimum of two layers must be present within your Photoshop document. The bottommost layer, often referred to as the base layer, serves as the defining boundary for the visibility of all layers grouped above it.
For instance, imagine a scenario where your base layer contains a specific shape, the layer immediately above it holds a photograph, and the topmost layer features text. When a clipping mask is applied, only the areas of the photograph and text layers that correspond to the visible portions of the base layer's shape will be displayed. Any part of the photograph or text that falls outside the boundaries of the base layer's content will be rendered invisible. This principle of "content defining visibility" is fundamental to grasping how clipping masks operate.
Understanding the Difference: Clipping Masks vs. Layer Masks
While both clipping masks and layer masks are instrumental in controlling layer visibility, their underlying mechanisms and typical applications differ. A layer mask operates directly on a single layer, allowing you to paint with black, white, and shades of gray to selectively hide or reveal parts of that layer. Black conceals, white reveals, and gray creates varying degrees of transparency. This method is ideal for blending and creating soft transitions.
Conversely, a clipping mask establishes a relationship between multiple layers. The transparency and content of the bottom layer (the mask) determine the visibility of all layers directly above it. This is particularly useful when you want an image or effect to conform precisely to a specific shape, text, or another element. The key distinction lies in their scope: layer masks are applied to individual layers, while clipping masks create a group where the bottom layer acts as a stencil for all layers above it.
Clipping Mask vs Layer Mask. Same? Different? [Photoshop Tutorial]
Creating a Clipping Mask: A Step-by-Step Guide
The process of creating a clipping mask in Photoshop is straightforward and can be accomplished with a few simple steps.
Layer Arrangement: The first crucial step is to ensure that the layer you intend to clip (the "clipped layer") is positioned directly above the layer that will serve as the mask (the "base layer"). The base layer can be a shape, text, or any other graphical element.
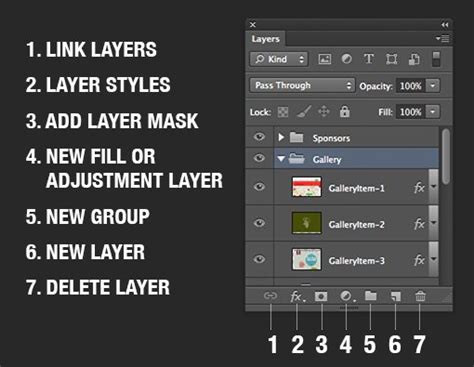
Applying the Clipping Mask: With the clipped layer selected in the Layers panel, navigate to the Layer menu at the top of the screen and choose Create Clipping Mask. Alternatively, you can use a convenient keyboard shortcut: hold down the Alt key (Windows) or Option key (Mac) and hover your cursor between the two layers in the Layers panel. Your cursor will change to a small downward-pointing arrow with a box. Clicking at this point will create the clipping mask.
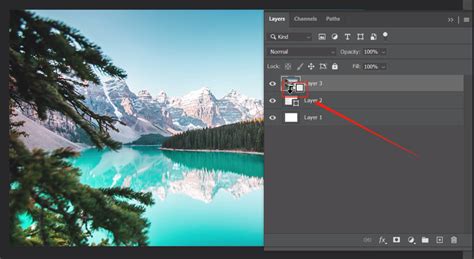
Visual Confirmation: Once the clipping mask is created, you will notice that the clipped layer in the Layers panel is indented and displays a small downward-pointing arrow, indicating its connection to the layer below. The content of the clipped layer will now only be visible within the boundaries of the base layer's content.
Editing and Refining Clipping Masks
The flexibility of clipping masks extends to their editability, allowing for seamless adjustments to both the masked content and the mask itself.
Repositioning the Clipped Layer: To alter the position of the clipped content, simply select the clipped layer in the Layers panel and use the Move Tool (V). As you drag the layer, the visible portion will change according to its new position relative to the base layer's shape.
Editing the Base Layer (The Mask): To modify the shape that defines the clipping mask, select the base layer. You can then use Photoshop's array of tools - such as the Shape tools, Pen Tool, or selection tools - to reshape, resize, or alter its content. Any changes made to the base layer will instantly update the visibility of the clipped layer(s).
Editing the Clipped Layer's Content: If you need to edit the actual image or graphic within the clipped layer, you can double-click on its layer thumbnail. This will often open the layer in a separate window or as a Smart Object, allowing you to make direct modifications. Alternatively, with the clipped layer selected, you can use transformation tools (Ctrl+T or Cmd+T) to resize or reposition the content within the confines of the mask.
Adding More Layers to a Clipping Mask: You can easily add additional layers to an existing clipping mask. Simply place the new layer directly above the current clipped layer. Then, hold down the Alt (Windows) or Option (Mac) key and click between the new layer and the layer immediately below it to create a new clipping mask connection. All layers clipped to the same base layer will share the same masking boundaries.
Advanced Clipping Mask Techniques and Applications
Beyond basic image placement, clipping masks offer a gateway to more sophisticated creative effects.
Text as a Clipping Mask
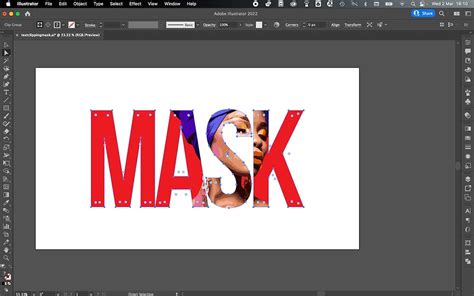
One of the most popular applications of clipping masks is filling text with images or patterns.
- Create Text: Use the Horizontal Type Tool to create your desired text.
- Place Image: Import the image or pattern you wish to use and position it on a layer directly above the text layer.
- Create Clipping Mask: Select the image layer and create a clipping mask (Layer > Create Clipping Mask or Alt/Option-click between layers).
The image will now appear exclusively within the boundaries of your text, creating striking typographic effects.
Using Shapes and Brushes as Masks
Clipping masks are not limited to text. You can use any shape, vector path, or even custom brushes as your base layer.
- Vector Shapes: Draw a shape using Photoshop's Shape tools or import vector artwork. Place your image layer above it and create a clipping mask. This is excellent for fitting images into precise graphical elements.
- Hand-Painted Brush Strokes: Artists often create custom brush strokes designed to act as masks. These can be imported as PNG or SVG files. Placing such a brush stroke layer at the bottom and clipping an image to it can yield artistic and organic results.
Clipping Masks with Adjustment Layers
A powerful technique involves using clipping masks to apply adjustment layers to specific elements without affecting other parts of the composition.
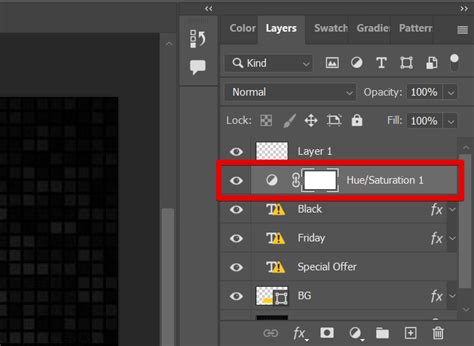
- Create Base and Clipped Layers: Set up your base layer (e.g., a photograph) and a layer you want to adjust above it.
- Add Adjustment Layer: Create an adjustment layer (e.g., Hue/Saturation, Curves, Color Balance) above the layer you wish to modify.
- Clip Adjustment Layer: Clip the adjustment layer to the layer below it.
Now, any adjustments made within the adjustment layer will only impact the layer immediately beneath it, confined by its content or shape. This is invaluable for targeted color correction, tonal adjustments, or creative color grading.
Blending Modes and Clipping Masks
Combining clipping masks with layer blending modes can lead to exceptionally creative outcomes. By applying blending modes to the clipped layer, you can alter how it interacts with the base layer and any layers beneath that. Experimenting with modes like Multiply, Screen, Overlay, or Soft Light can produce unique textural and color effects.
Vector Masks and Clipping Masks
When working with vector shapes or text that need to maintain scalability without losing quality, using vector masks in conjunction with clipping masks is highly beneficial. Vector masks, being resolution-independent, ensure that your clipping mask remains sharp and crisp regardless of zoom level or print size.
Troubleshooting Common Clipping Mask Issues
While generally straightforward, users might occasionally encounter issues with clipping masks.
- Unwanted Transparency: If the clipped layer appears completely transparent or partially hidden when you expect it to be visible, ensure that the base layer has actual content. A completely empty or transparent base layer will result in the clipped layer being hidden. Add content (a shape, color fill, or pixel data) to the base layer.
- Incorrect Layer Order: Always verify that the layer you want to clip is directly above the base layer. If the order is incorrect, the clipping mask will not function as intended.
- No Visible Change: Double-check that the clipping mask has been correctly created. Look for the downward-pointing arrow in the Layers panel. If it's absent, reapply the clipping mask.
- Editing Limitations: Remember that the base layer defines the mask. If you are trying to edit the shape of the mask, you must select and modify the base layer itself, not the clipped layer.
Applications Beyond Basic Image Editing
The utility of clipping masks extends far beyond simple image manipulation. They are fundamental tools in various design disciplines:
- Web Design: Clipping masks can be used to create unique layouts and graphical elements for websites, ensuring images conform to specific design frameworks.
- Social Media Graphics: For platforms like Instagram, creating visually appealing posts often involves fitting images into text or custom shapes, a task perfectly suited for clipping masks.
- Digital Art and Illustration: Artists leverage clipping masks to add textures, patterns, or complex details to their digital paintings and illustrations, maintaining non-destructive workflows.
- Photo Compositing: In complex photo manipulations, clipping masks help integrate elements seamlessly by confining them within specific boundaries.
By mastering Photoshop's clipping mask functionality, you unlock a powerful method for controlling layer visibility, enhancing your creative workflow, and achieving professional-grade results across a multitude of design projects.