Photopea, a powerful and accessible online photo editor, offers a vast array of built-in fonts to enhance your creative projects. However, the true flexibility of graphic design lies in the ability to use any typeface that suits your vision. Fortunately, Photopea makes it remarkably straightforward to incorporate your own custom fonts, whether they are TTF or OTF files downloaded from the internet or sourced from your personal collection. This guide will walk you through the process of uploading and utilizing these fonts, ensuring your designs are as unique as your ideas.

Understanding Photopea's Font Management
Photopea is equipped with a substantial database of royalty-free fonts, readily available for immediate use. This curated collection ensures that designers have a diverse range of typographic options at their fingertips. For fonts that are not part of this default library, Photopea provides a user-friendly mechanism for importing them. The core principle is that you can open custom font files (TTF or OTF) in Photopea using the same intuitive methods you would employ for any other file type - either through the "File - Open" menu or by simply dragging and dropping the font file directly into the Photopea interface.
The underlying technology that enables Photopea's font handling involves a font database. This database is generated from a collection of font files. The property "list" within this system contains the actual font files, while "FLG" represents flags indicating supported Unicode subsets. For instance, a binary value of 15 (0001111) signifies that the font supports Latin 1 and Latin Extended character sets. The order in which fonts appear in a visual representation, such as fonts.png, directly corresponds to their order within the main font database file, often referred to as FNTS. If there are, for example, 35 font files in FNTS, they will be listed in that specific sequence.
To facilitate the creation of this font database, Photopea provides utility programs. These are typically HTML files containing JavaScript that can load font files and subsequently generate the necessary database components (FNTS and fonts.png).
The Font Loading Process: A Step-by-Step Approach
Adding a new font to your Photopea project is an easy process, designed to be accessible even for beginners. The steps are as follows:
- Initiate a Project: Begin by creating a new project in Photopea or opening an existing one.
- Access the Type Tool: Locate the Type Tool on the left-hand toolbar. Its icon typically resembles a capital 'T'.
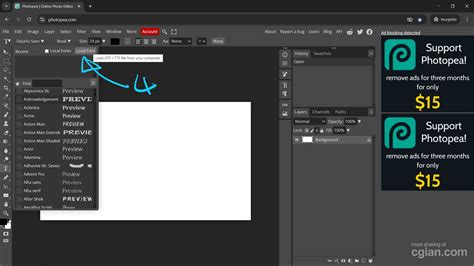
- Open the Font Dropdown: Once the Type Tool is selected, navigate to the top option bar. You will find a dropdown menu specifically for fonts. Click on this to reveal the available font list.
- Load Your Custom Font: Within the font dropdown menu, you will see an option labeled "Load Font." Clicking this will prompt you to select a font file from your local storage.
- Select and Upload: Browse your computer's file system to find the desired TTF or OTF font file. Select it and click "Open."
Photopea will then process the font file, and it will become available for use within your current project.
Alternative Method: Drag and Drop
For an even quicker way to upload fonts, Photopea supports a drag-and-drop functionality:
- Open Photopea: Ensure Photopea is open in your web browser.
- Locate Font File: Find the TTF or OTF font file on your computer.
- Drag and Drop: Simply drag the font file from your file explorer and drop it directly onto the Photopea canvas or the Photopea tab in your browser. Photopea will automatically recognize the file and load the font.
This method is particularly convenient when you have multiple fonts to import or simply prefer a more direct approach.
Understanding Text Types in Photopea
Photopea's text tool is highly versatile, offering different ways to incorporate text into your designs. Understanding these distinctions is crucial for effective layout and typography.
Point Text
Point text is the most straightforward form of text entry. You simply click anywhere within your document and begin typing. The text will flow from that single point. Aligning a point text layer is computed relative to this initial point of origin. This type of text is ideal for headlines, short labels, or any instance where text doesn't need to form a block.
Paragraph Text
To create paragraph text, you use the Type Tool to draw a rectangle on your canvas. Any text you then type will be confined within this bounding box, wrapping automatically to fit the defined area. When working with a paragraph text layer, you have the ability to adjust the size of the text box. This is achieved by moving the corners of the box with the text tool selected. Doing so will reflow the text within the box, altering how it fits. This is distinct from resizing the text itself, which would change the font size.
Advanced Text Formatting and Manipulation
Photopea provides a range of options for controlling and refining your text.
Vertical Text
If your design requires text to flow vertically, Photopea offers a Vertical Type Tool. You can access this by clicking the Type Tool icon again and selecting "Vertical Type Tool" from the options, or by using the keyboard shortcut Shift+T. The vertical text tool functions similarly to the standard horizontal text tool but arranges characters from top to bottom. This is particularly useful for specific design elements or when working with certain languages.
Text on a Curve
Creating text that follows a specific path adds a dynamic element to designs. To achieve this, you first need to create a path or a curve. Once you have your curve, select the Type Tool and click directly on the outline of the path. The text will then begin to flow along the contour you've created. If you have a closed path and click inside it, the text will be confined within that boundary, conforming to the shape of the path.
Editing Text Layers
To modify existing text, you must first select the text layer in the Layers panel. Alternatively, you can directly select the text by clicking on it with the Text Tool. Once selected, you can make your edits. Photopea provides confirmation buttons to apply or cancel your changes.
Alignment and Spacing
When working with text, alignment is crucial for visual harmony. Photopea offers tools for aligning text layers with other objects or with the document itself. To align text with another object, select both the text layer and the object layer you wish to align it to. Then, activate the Move Tool (pointer button in the toolbox or shortcut 'V'). The alignment options will appear in the top option bar, allowing you to align centers, edges, or distribute objects.
Furthermore, Photopea supports the fine-tuning of text spacing, including kerning (the space between specific pairs of letters) and leading (the space between lines of text). These adjustments can be made within the Character and Paragraph Style panels, which become accessible when a type layer is selected.
Column Text Alignment in Photopea
Handling Bidirectional Text and Punctuation
For designers working with languages that feature bidirectional text (like Arabic or Hebrew) or complex punctuation, Photopea offers support. The software is designed to handle the intricacies of these writing systems, ensuring that text is rendered correctly. This includes proper character ordering and punctuation placement, which can be a common challenge in some design applications.
Photopea's text tool is not merely a way to add words to a canvas; it is a robust feature that supports a wide range of typographical needs. From simple point text to complex text-on-a-path scenarios, and from basic font loading to advanced character and paragraph styling, Photopea empowers users to achieve professional-grade results. By understanding and utilizing these capabilities, you can significantly enhance the visual appeal and communicative power of your designs.
The process of uploading fonts is relatively easy, and once a font is loaded, it can be used in any design within that Photopea session. The text tool in Photopea is very functional and scalable, as it will be used in all the designs you will create. Happy sharing, and we hope this guide helps you unlock the full typographic potential of Photopea for all your creative endeavors. More Photopea tutorials are available to further explore its extensive features.