Converting color images to grayscale in Adobe Photoshop is a fundamental skill for photographers, designers, and digital artists. Whether for cost-effective printing, artistic emphasis on form and texture, or specific workflow requirements, understanding how to effectively transform a vibrant image into a compelling black and white composition is crucial. Photoshop offers a variety of methods, ranging from straightforward mode changes to nuanced adjustment layer techniques, each providing different levels of control and preservation of original data.
Understanding Color Modes: RGB vs. Grayscale
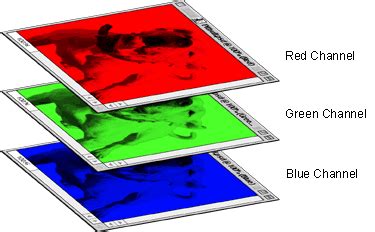
By default, digital photos in Photoshop operate within the RGB (Red, Green, Blue) color mode. This mode is designed to reproduce the vast spectrum of colors visible to the human eye by combining different intensities of red, green, and blue light. Every conceivable color is a unique blend of these three primary light colors. For instance, pure white is achieved with a full combination of red, green, and blue, while pure black represents the complete absence of these components. Photoshop utilizes separate Red, Green, and Blue channels to construct these colors.
In contrast, the Grayscale color mode simplifies this by eliminating color information entirely. It can only represent an image using black, white, and the myriad shades of gray that lie between them. When an image is converted to Grayscale mode, Photoshop essentially discards all color data, leaving only luminance (brightness) values. This conversion can significantly reduce file size and is often a prerequisite for certain printing processes, such as qualifying for black & white pricing on plotter printers like the Epson T5270D. Failure to convert to grayscale when required can lead to unexpected color pricing.
The Simplest Path: Image > Mode > Grayscale
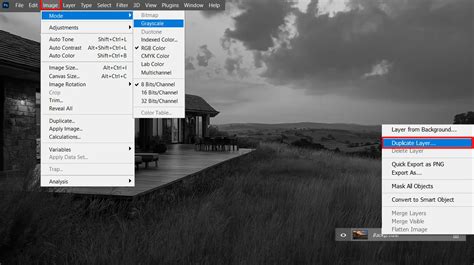
The most direct method to convert an image to grayscale in Photoshop is by navigating through the menu system. Open your desired image, then go to Image > Mode > Grayscale.
Upon selecting Grayscale, Photoshop will present a dialog box warning that this action will discard all color information. Clicking "Discard" will complete the conversion. The image will now consist solely of shades of gray. This method is exceptionally fast and results in a significantly smaller file size. However, it's important to note that this is a destructive process; the original color information is permanently lost unless you have saved a backup. Furthermore, this basic conversion offers no control over how colors are translated into shades of gray, which can sometimes lead to undesirable results where adjacent colors appear as the same shade, flattening the image's tonal range and contrast.
Preserving Color Information: Adjustment Layers for Grayscale Conversion
For artists and editors who need to retain the original RGB data or require greater control over the grayscale conversion, using Adjustment Layers is the preferred approach. These non-destructive methods allow for fine-tuning the grayscale appearance without permanently altering the underlying pixels.
The "Black & White" Adjustment Layer
One of the most effective and versatile methods is to add a "Black & White" adjustment layer.
- Add the Adjustment Layer: From the Layers panel, click the "New Adjustment Layer" icon (a half-filled circle) at the bottom and select "Black & White."
- Placement: Ensure this adjustment layer is positioned at the top of your layer stack.
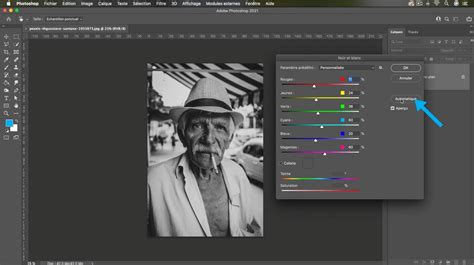
- Control: The Black & White adjustment layer provides sliders for each primary color (Red, Yellow, Green, Cyan, Blue, Magenta). By adjusting these sliders, you can control how the original colors of the image are translated into shades of gray. For example, increasing the "Red" slider will lighten areas that were originally red in the color image, while decreasing it will darken them. This offers precise control over the luminance and contrast of the grayscale output.
The "Hue/Saturation" Adjustment Layer
Another method, though generally considered less accurate for professional grayscale work, involves the "Hue/Saturation" adjustment layer.
- Add the Adjustment Layer: Add a "Hue/Saturation" adjustment layer from the "New Adjustment Layer" menu.
- Placement: Position it at the top of your layer stack.
- Desaturate: Drag the "Saturation" slider all the way to the left (-100). This effectively removes all color, converting the image to grayscale.
While this method is quick, it offers minimal control over the tonal translation of colors into grays. The "Black & White" adjustment layer is far superior for achieving nuanced and visually appealing grayscale results.
The "Color Fill" Adjustment Layer
A less common but functional method involves using a "Color Fill" adjustment layer.
- Add the Adjustment Layer: Add a "Color Fill" adjustment layer.
- Set Color: Choose black as the fill color.
- Change Blend Mode: Change the blend mode of this layer to "Color."
- Placement: Ensure this layer is at the top of your layer stack.
This technique converts the image to grayscale by applying the color blend mode, effectively mapping luminance values. However, like the Hue/Saturation method, it offers less granular control compared to the dedicated Black & White adjustment.
Advanced Grayscale Control: Channel Mixer and Proof Setup
For even more sophisticated control, Photoshop offers advanced tools that leverage the underlying color channels.
Channel Mixer for Grayscale Conversion
The Channel Mixer adjustment layer provides a powerful way to precisely control how color information is converted into grayscale.
- Add Layer: Add a "Channel Mixer" adjustment layer.
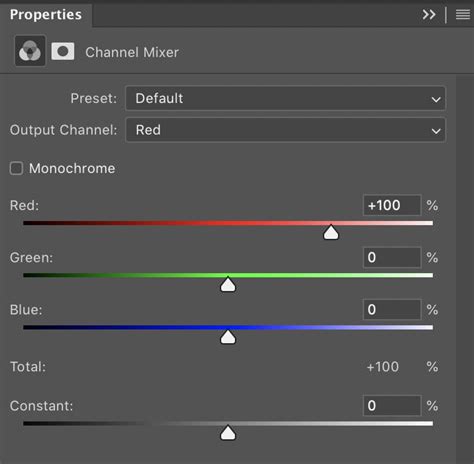
- Monochrome: Check the "Monochrome" box. This immediately converts the image to grayscale.
- Adjust RGB Sliders: You can then manipulate the Red, Green, and Blue sliders. These sliders determine the contribution of each color channel to the final grayscale image. By adjusting these values, you can selectively lighten or darken areas based on their original color composition.
- Constant Slider: The "Constant" slider acts as an overall brightness adjustment.
This method is particularly useful for replicating the look of traditional black and white film, where different film stocks and filters would influence how colors translated to grayscale.
Proof Setup for Accurate Grayscale Viewing
When aiming for specific output conditions, especially for printing, setting up a proof profile is essential. This allows you to simulate how your image will appear on a particular output device or under specific lighting conditions.
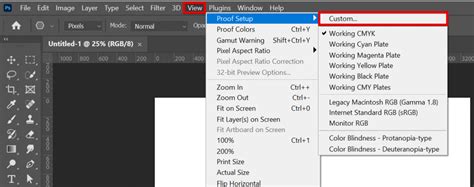
- Custom Proof Setup: Navigate to
View > Proof Setup > Custom.... - Select Profile: Choose a relevant grayscale profile. Photoshop includes several, and your operating system might provide more, representing different output conditions (e.g., specific printers, paper types, or lighting).
- Dot Gain: For print simulation, you might adjust the "Dot Gain" setting. A common setting, as observed in some tutorials, is 20%.
Utilizing the Info Panel
To precisely check the grayscale values of pixels under your cursor, the Info panel is invaluable.
- Open Info Panel: Go to
Window > Info. - Set Sampler Readout: In the Info panel, you can set one of the sampler readouts to "Proof Color." This will display the pixel values after they have been converted according to your active "Proof Setup." This is crucial for verifying that your grayscale values are as intended for your target output.
Working with Grayscale Images: Beyond Conversion
Once an image is in grayscale, a range of tools can be used to enhance its impact. Adjustment layers like Levels and Curves are fundamental for controlling the overall tonal range, contrast, and brightness. Levels allow you to adjust the black point, white point, and midtones, while Curves offer even more granular control over the entire tonal spectrum.
Curves vs. Levels: What's the Difference? | Photoshop
The Color Picker tool remains useful for selecting specific shades of gray, and understanding the brightness values (0 for black, 255 for white in an 8-bit image) is key to precise manipulation.
Considerations for Grayscale Conversion
- Working from a Duplicate: Always work from a duplicate file or save a backup before performing destructive conversions. This ensures you can always return to the original color image.
- Save Layers: If using adjustment layers, ensure you save your Photoshop file with layers intact. This allows for future edits to the grayscale conversion.
- Flattening: While flattening a file before a direct Grayscale mode conversion minimizes file size, it also discards layer information and color data permanently.
- Black & White vs. Grayscale: It's important to distinguish between a true black and white image (only pure black and pure white pixels) and a grayscale image (which includes shades of gray). Most conversions result in grayscale.
- Keyboard Shortcut: A quick way to desaturate an image to grayscale is by using the shortcut
Ctrl+Shift+U(Windows) orCommand+Shift+U(Mac). However, this is a destructive command similar to the Image > Mode > Grayscale conversion, offering no control.
Why Convert to Grayscale?
The reasons for converting images to grayscale are varied:
- Cost and Environmental Benefits: Grayscale printing uses less ink, making it more economical and environmentally friendly.
- Artistic Emphasis: Removing color can draw the viewer's attention to the subject's form, texture, tone, and composition, creating a more dramatic or focused aesthetic.
- Workflow Requirements: As mentioned, specific printing or submission guidelines may mandate grayscale images.
- Value Checking: For artists working in color, temporarily converting to grayscale (often by switching between sRGB and grayscale views) can help assess the tonal values and contrast of their work without the distraction of color.
By understanding the different methods available in Photoshop, from the simple mode conversion to the sophisticated control offered by adjustment layers and channel mixing, users can effectively translate their color images into compelling black and white compositions tailored to their specific needs.