In the dynamic world of digital design, the ability to isolate subjects from their backgrounds is a powerful technique. Whether you're creating professional presentations, eye-catching social media graphics, or polished product mockups, a clean, transparent background can dramatically enhance the impact and versatility of your visuals. Canva, a widely accessible and user-friendly design platform, offers a robust and intuitive Background Remover tool that empowers users of all skill levels to achieve this effect with remarkable ease. This guide will delve into the various methods and nuances of using Canva's Background Remover, transforming your images and videos into design assets ready for any purpose.

Understanding the Power of Background Removal
Images are potent communication tools, capable of conveying complex information and emotions in an instant. The effectiveness of a visual, however, is often dictated by its composition and focus. A cluttered or distracting background can detract from the primary subject, diluting its impact and confusing the viewer. This is where background removal becomes indispensable.
By eliminating extraneous elements, you create a clear focal point, drawing the audience's attention precisely where you intend it. This technique is particularly valuable when preparing images for specific contexts. For instance, a professional headshot for a corporate resume benefits from a clean, transparent background to maintain a formal aesthetic, devoid of personal distractions. Conversely, for a creative field, a more personalized background might be retained or replaced with a vibrant element to express personality. The ability to manipulate your own images to suit diverse project needs is a crucial design skill, and Canva's Background Remover makes this accessible.
Effortless Background Removal in the Canva Editor
Canva's primary editor serves as the central hub for most design tasks, including background removal. This method is straightforward and ideal for immediate edits within a design project.
Removing Photo Backgrounds Directly from the Editor
- Select Your Image: Begin by selecting the photo you wish to edit within your Canva design.
- Access BG Remover: Locate the toolbar that appears above the editor. Click on the "BG Remover" option.
- Processing: Canva's AI will then process the image, automatically detecting and removing the background.
- Apply Changes: Once the processing is complete, the background will be removed. Click "Apply" to save the changes to your image within the design.
Leveraging Canva AI for Background Removal
For a more guided, prompt-based approach, Canva AI offers another avenue for background removal, particularly beneficial for those who prefer a conversational interface. This feature is exclusively available on paid plans.
- Navigate to Canva AI: From the Canva homepage, find the "Search and AI" bar and select "Canva AI."
- Attach Your Photo: Upload your photo by selecting "Upload" to choose a file from your device or "Import" to select from connected cloud storage.
- Enter Your Prompt: In the chat interface, type a clear instruction such as "Remove background" or "Delete the background."
- Send Your Request: Press Enter (Windows) or Return (Mac) on your keyboard, or click the arrow icon in the chat to submit your prompt.
- Review the Results: Canva AI will respond with the processed image. You then have several options:
- Use in Editor: Select the "Use Canva editor" button to open the image in the main editor for further refinements.
- Download: Click the download icon to save the processed photo to your device.
- Manage Result: Use the menu icon for options like copying, rating, or reporting the result.
It's important to note that while Canva AI excels at photo background removal, it does not yet support video background removal. For videos, you'll need to utilize the editor's dedicated video background removal feature.
Using "Ask Canva" for Quick Edits
While working within the editor, you can also tag "Ask Canva" to perform background removal on a selected image. This offers a quick, in-context way to initiate the process without leaving your current design.
Refining Your Edits with Erase and Restore Brushes
While Canva's automatic background removal is remarkably effective, there are instances where fine-tuning is necessary. The Erase and Restore brushes provide granular control over the final output, allowing you to perfect your image.
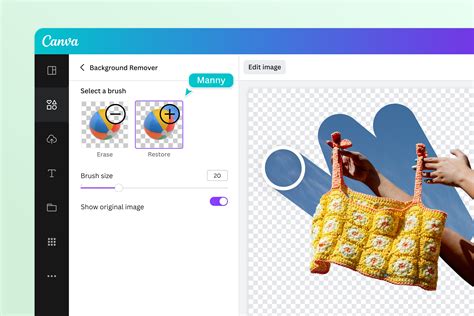
Mastering the Erase and Restore Brushes
These advanced tools are available on the Canva website and desktop application, offering precise control for intricate edits.
- Initiate Background Removal: First, select your image and click "BG Remover" in the editor.
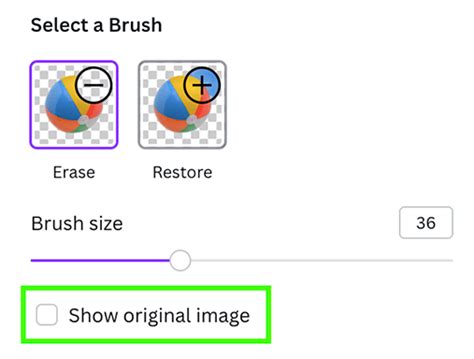
- Select Brush Type: After the initial background removal, choose either the "Erase" or "Restore" brush.
- Adjust Brush Size: Utilize the "Brush size" slider to increase or decrease the diameter of your brush for detailed work.
- Apply Brush Strokes: Drag the brush over the specific areas of the photo you wish to remove or bring back.
- Preview Original: To compare your edits with the original image, select "Show original image."
- Undo/Redo: Mistakes are easily corrected with the "Undo" and "Redo" icons, allowing you to revert or reapply brush strokes.
- Zoom for Precision: For optimal results, zoom into the image and navigate around it to ensure accuracy.
Important Considerations for Brush Tools: When using the Erase and Restore brushes, standard zoom and undo/redo functionalities for general canvas operations may be temporarily disabled. Always click "Done" on the toolbar and then "Apply" on the side panel to save your brushwork.
Removing Video Backgrounds: Expanding Your Creative Horizons
The ability to remove backgrounds extends beyond static images to dynamic video content. This feature opens up a world of possibilities for creating professional-looking videos with clean, impactful visuals.
Removing Video Backgrounds in the Canva Editor
- Select Your Video: Choose the video clip you want to edit within your Canva design.
- Access BG Remover: On the toolbar above the editor, click "BG Remover."
- Processing: Canva will process the video, automatically removing the background.
- Apply Changes: Once complete, the background will be removed.
Current Limitations for Video Background Removal:
- Length Constraint: At present, this feature is limited to videos with an original length of less than 10 minutes. If you have trimmed a video in Canva, you will need to download and re-upload it for the Background Remover to function correctly.
- Mobile Uploads: For mobile users, videos must be uploaded via the "Uploads" tab, not directly from the Camera Roll or Gallery.
Advanced Techniques and Workflow Considerations
Canva's Background Remover is designed for versatility, supporting various file formats and offering options for different user needs.
Working with Images: Format, Size, and Resolution
- Supported Formats: Canva's Background Remover works with uploaded images in JPG, PNG, HEIC, or HEIF formats. You can also utilize stock photos directly from Canva's extensive library.
- File Size Limit: Currently, the Background Remover tool is optimized for photos under 9MB in size.
- Resolution Handling: Images with a resolution exceeding 10MP will be automatically downscaled to 10MP after the background removal process. This ensures efficient processing and maintains reasonable file sizes.
- Vector Images: It's important to note that the Background Remover functionality is not available for vector images.
Utilizing Background Remover from the Projects Tab
For an organized workflow, you can also access the Background Remover directly from your "Projects" tab.
- Navigate to Projects: Go to your "Projects" tab.
- Select Images Tab: Within "Projects," click on the "Images" tab.
- Access More Options: Hover over the desired photo, select "More," and then choose "Edit image."
- Find Magic Studio: Under the "Magic Studio" section, select "BG Remover."
While you can initiate background removal from the Projects tab, the Erase and Restore brushes for fine-tuning are not accessible from this location. You would need to open the image in the main editor to use these advanced tools.
Background Removal in Canva Sheets
Canva Sheets offers a streamlined way to clean up images embedded within your spreadsheets.
- Select Images: Choose the cells containing the images you want to edit.
- Access Actions: Click on "Actions" in the floating toolbar.
- Choose Background Remover: Select "Background Remover" to automatically process and remove the backgrounds.
- Apply Changes: Click "Apply" to save the modifications. The "Background Remover" option will be visible in the toolbar whenever one or more image cells are selected.
How To Change Product Background in Canva
Troubleshooting and Best Practices
While Canva's tools are generally robust, occasional issues may arise. Understanding common troubleshooting steps and best practices can ensure a smooth design experience.
Addressing Loading or Functionality Issues
- Internet Connection: If the Background Remover isn't loading or functioning as expected, first check your internet connection. A stable connection is crucial for AI-powered features.
- Switching Editors: In rare cases, you might encounter issues with the newer editor. You can switch to the older editor by selecting "Edit" from the floating toolbar, clicking the "Effects" tab, and then navigating to the banner link at the bottom.
Downloading Designs with Transparent Backgrounds
To effectively use your background-removed images in other projects, downloading them with a transparent background is key.
- Prepare Your Design: Ensure your design's background is either set to white or has been deleted. If you're working with an image that had a background, make sure that background has been removed using the BG Remover tool.
- Share Options: Go to "Share" in the editor's menu bar.
- Select Download: Choose the "Download" option.
- File Type: From the "File type" dropdown, select "PNG." This format supports transparency.
- Page Selection: If your design has multiple pages, select the specific pages you wish to download.
- Transparent Background: Crucially, tick the "Transparent background" option.
- Finalize Download: Click "Download." Your design will be saved to your designated download folder or device gallery.
Common Download Issues: If your design doesn't download with a transparent background, verify that you have indeed deleted any background colors or images, or set the background color to white. Also, ensure you have selected "PNG" as the file type and that you are on a compatible Canva plan (Pro, Teams, Business, Education, or Nonprofits).
Revamping Your Visuals: Beyond Simple Removal
Canva's Background Remover is more than just a utility; it's a creative catalyst. It empowers you to transform ordinary images into versatile assets.
Transforming Images for Any Purpose
The tool is adept at isolating a wide range of subjects, including people, animals, and objects. This capability is invaluable for:
- E-commerce: Creating professional product shots for online stores, allowing your products to stand out without distracting backgrounds.
- Collages: Seamlessly integrating multiple images into a cohesive collage without background clashes.
- Presentations and Reports: Adding clean, focused visuals to enhance clarity and professionalism.
- Social Media: Designing engaging graphics that grab attention and convey messages effectively.
Logo Background Removal: Professional Branding Made Easy
For businesses and individuals alike, a transparent logo is a cornerstone of strong branding. Manually removing a logo background can be a tedious and technically demanding task. Canva's "logo background remover" streamlines this process into a single click.
- Upload Your Logo: Upload your logo file to Canva.
- Apply BG Remover: In the editor, select your logo and click "BG Remover."
- Instant Transparency: The tool instantly creates a clean cutout of your logo.
- Save and Use: Download your transparent logo as a PNG file, ready for use across all your marketing materials, websites, and digital platforms.
This one-time free use allows you to experience the efficiency of the tool, with Canva Pro offering unlimited usage for ongoing branding needs.
Collaborative Design and Editing
Canva's collaborative features extend to background removal. You can easily share your design projects with team members, allowing for real-time collaboration on edits, including background refinements. This ensures that everyone is working with the most polished and impactful visuals.
Conclusion: Unleash Your Creative Freedom
Canva's Background Remover is a testament to the platform's commitment to making professional design accessible to everyone. Whether you're a seasoned designer or a complete beginner, this powerful tool simplifies the complex task of background removal, saving you time and enhancing the quality of your visual content. From quick edits in the editor to precise refinements with brush tools, and extending to the dynamic world of video, Canva empowers you to transform your images and videos, unlocking a new level of creative freedom and professional polish for all your design endeavors.
tags: #canva #logo #background #remover