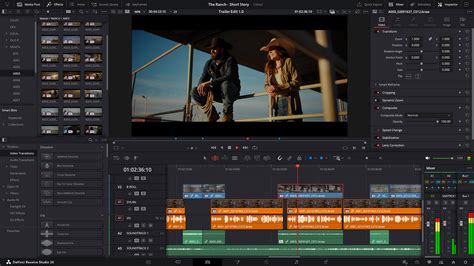
Freeze frames are a powerful and versatile tool in video editing, allowing creators to emphasize a specific moment, create dramatic pauses, or highlight crucial details within a sequence. Whether capturing the apex of an athletic feat or adding a touch of avant-garde flair to a narrative, the ability to freeze a single frame and extend its duration is invaluable. DaVinci Resolve, a professional-grade editing software, offers several intuitive methods to achieve this effect directly within your timeline, eliminating the need for external plugins or complex layered compositions. This guide will explore these techniques in detail, from the simplest approach to more advanced options, ensuring you can confidently integrate freeze frames into any project.
Understanding the Freeze Frame Effect
At its core, a freeze frame is precisely what its name suggests: a single frame from your video footage that is held static for a predetermined duration. This static image is then seamlessly inserted into your timeline, appearing as if the action has momentarily stopped. The effect can be used for a variety of purposes:
- Emphasis: To draw the viewer's attention to a particular detail, expression, or action.
- Pacing: To create a deliberate pause in the narrative flow, allowing a moment to sink in.
- Visual Impact: To create a striking visual statement, especially in dynamic or action-oriented content.
- Analysis: In sports or instructional videos, to break down a complex movement.
While the concept is straightforward, achieving a clean and professional-looking freeze frame can sometimes present challenges, particularly when dealing with interlaced footage.
The Challenge of Interlaced Footage and Freeze Frames
A common issue encountered when creating freeze frames, especially for those new to the process, is the appearance of distortion or blurriness in the frozen image, even after rendering. This phenomenon is often linked to the nature of interlaced video.
Interlaced video displays an image by drawing alternate lines (fields) of the picture in rapid succession. If there is movement within the frame, each field captures a slightly different moment in time. When you create a freeze frame from interlaced material without proper handling, the frozen image might contain elements from both fields, leading to a "shaky" or blurred appearance in areas with motion. This is because the static frame is essentially an amalgamation of two slightly offset images.
For progressive footage (like true 24p), this issue is less prevalent because the entire frame is captured at once. However, even with progressive formats, certain camera settings or post-production processes (like pulldown for broadcast standards) can introduce interlacing artifacts.
The best way to assess such issues is by viewing your video output on a dedicated video monitor, which typically handles interlacing more accurately than a standard computer display. If you shot in true progressive formats, interlacing problems are less likely. However, if your footage is interlaced, de-interlacing the source material before creating the freeze frame is often recommended. Third-party de-interlacer plugins, such as those from Joe's, BCC, or Fields Kit, can offer superior results by intelligently reconstructing a progressive image from the interlaced fields.
When dealing with footage that is a transfer of film, the original progressive nature of film is usually preserved. However, if the transfer process or subsequent editing introduces interlacing, the same considerations apply. The question of whether to make a freeze frame from a master clip, subclip, or directly on the timeline can influence the outcome, with master clips often providing the cleanest source. Ultimately, the way television screens operate with interlaced fields contributes to why video footage often appears most correct when viewed on them.
Creating Freeze Frames in DaVinci Resolve: Method 1 - Change Clip Speed
This is arguably the most straightforward method for creating a freeze frame in DaVinci Resolve, especially for users familiar with clip speed adjustments. It involves isolating a single frame and then extending its duration.
Step 1: Isolate the Desired FrameNavigate to your timeline and position the playhead precisely on the frame you wish to freeze.
Step 2: Utilize the Blade ToolSelect the Blade Edit Mode from your toolbar (or press the 'B' key). Make a cut on the clip precisely where your playhead is positioned. This effectively isolates the single frame you want to work with.
Step 3: Refine the Isolated FrameFor clarity, you can move the playhead one frame forward using the right arrow key and make another cut. This creates a distinct clip that is exactly one frame long.
Step 4: Access "Change Clip Speed"Right-click on this single-frame clip. From the drop-down menu, select "Change Clip Speed."
Step 5: Apply the Freeze FrameIn the "Change Clip Speed" settings window that appears, locate and check the box labeled "Freeze Frame."
Step 6: Set the DurationYou can then specify the desired duration for your freeze frame in the "Duration" field. Enter the length you require, and click "Change" to apply the effect. Your single frame will now be extended to the specified duration, seamlessly integrated into your timeline.
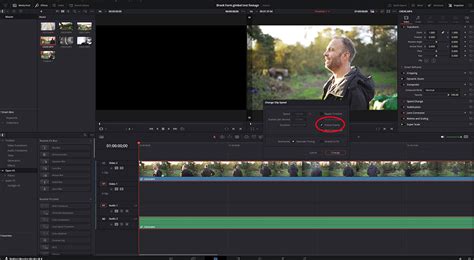
This method is efficient and clearly marks the freeze frame on your timeline with a clock icon, making it easy to identify and manage.
Creating Freeze Frames in DaVinci Resolve: Method 2 - Using Retime Controls
The Retime Controls offer a more dynamic and less destructive approach to creating freeze frames, providing greater flexibility, especially if you're already manipulating clip speeds within the same section.
Step 1: Activate Retime ControlsSelect the clip on your timeline that contains the frame you want to freeze. Press the keyboard shortcut Ctrl + R (or Command + R on Mac) to activate the Retime Controls for that clip.
Step 2: Position the PlayheadMove your playhead to the exact frame where you want the freeze to begin.
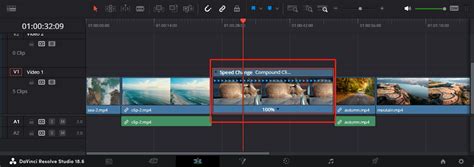
Step 3: Access the Retime MenuYou will notice blue triangles at the top of the clip, indicating normal playback speed. At the bottom of the clip, there's a percentage value and an inverted triangle. Click on this inverted triangle to open the Retime Controls menu.
Step 4: Select "Freeze Frame"From the Retime Controls menu, choose the "Freeze Frame" option.
Step 5: Adjust the DurationUpon selecting "Freeze Frame," the blue triangles above your clip will transform into red lines, signifying the frozen segment. The percentage value at the bottom will change to 0%. You can then adjust the duration of this freeze by clicking and dragging the orange keyframe marker at the end of the freeze segment.
Important Consideration: While powerful, this method can sometimes be less intuitive for managing freeze frames, especially if you're not actively using other retiming effects on the same clip. When Retime Controls are closed (Ctrl + R again), the visual indicators on the timeline for the frozen section might be less obvious compared to the clock icon generated by the "Change Clip Speed" method. It's often recommended to use this method when you're already engaged in more complex speed manipulations within a clip.
Creating Freeze Frames in DaVinci Resolve: Method 3 - Grab Still (Color Workspace)
This method is the most involved but offers significant advantages if you intend to further manipulate the freeze frame image outside of DaVinci Resolve, such as adding graphics or performing photo manipulations in programs like Photoshop. It also allows for precise control over the duration by treating the still as a separate element.
Step 1: Position the PlayheadMove your playhead to the precise frame you wish to capture as a still image.
Step 2: Navigate to the Color WorkspaceClick on the "Color" workspace icon, typically located at the bottom of the DaVinci Resolve interface.
Step 3: Open the GalleryIn the Color workspace, look for the "Gallery" option, usually found in the top right-hand corner. Click on it to open the Gallery window.
Step 4: Grab the StillRight-click (or Ctrl + click) within the preview window of the Gallery. A context menu will appear. Select "Grab Still" from this menu. The selected frame will now be saved as a still image within the "Gallery" bin.
Step 5: Return to the Edit Page and Prepare the TimelineNavigate back to the "Edit" page. Now, you'll need to prepare your timeline to insert this still. Use the Blade tool ('B' key) to cut your original clip at the point where you captured the still.
Step 6: Insert the StillLocate the still you just saved in the Gallery bin. Drag and drop this still image onto your timeline, placing it precisely where the cut was made. You can extend the duration of this still image as needed by simply dragging its edges on the timeline.
Step 7: Reconnect the TimelineTo create a seamless transition, reposition the second half of your split clip to follow immediately after the inserted freeze frame still. This effectively replaces the original segment with your held frame for the desired duration.
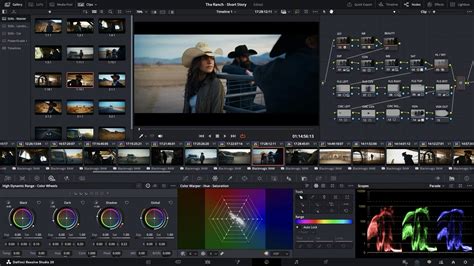
This method provides immense flexibility, allowing you to export the still for external editing and then re-import it, offering a high degree of creative control.
Integrating Freeze Frames with Advanced Techniques
Once you've mastered the basic methods of creating freeze frames, you can explore more advanced applications:
- Adding Graphics and Text: With the "Grab Still" method, you can export the captured frame, import it into Photoshop or a similar program, add text overlays, logos, or other graphic elements, and then re-import the modified image back into DaVinci Resolve. This is ideal for creating title cards or highlighting specific information.
- Motion Tracking: You can apply motion tracking to a freeze frame. For instance, if you freeze a shot of a character's face, you could motion track that face and then add a graphic that sticks to it.
- Color Grading Freeze Frames: Freeze frames can be color graded independently. This allows you to create a distinct look for your frozen moment, perhaps desaturating it for a dramatic effect or enhancing certain colors.
- Combining with Other Effects: A freeze frame can be the starting point for other effects. For example, you could freeze a frame and then apply a glitch effect or a zoom to further emphasize the moment.
DaVinci Resolve Templates and Beyond
For those looking to streamline their workflow and add sophisticated visual elements, DaVinci Resolve templates can be a game-changer. These pre-made templates can often incorporate freeze frame effects with adjustable parameters, allowing for rapid integration into your projects. Many online libraries offer a vast collection of these templates, along with royalty-free stock footage, music, and sound effects, all designed to enhance your video editing capabilities.
Beyond freeze frames, DaVinci Resolve offers a comprehensive suite of tools for advanced editing, color grading, visual effects, and audio post-production. Exploring tutorials on topics like green screen keying, advanced color grading techniques, and subtitle creation will further unlock the software's potential.
How to Freeze Frame in DaVinci Resolve (Tutorial)
Mastering the freeze frame in DaVinci Resolve is an essential skill for any editor, particularly those working with dynamic content. By understanding the different methods available and considering the nuances of footage types, you can effectively use this powerful effect to enhance storytelling and create visually compelling edits.