Boring outfit? Fashion budget tapped out? Perhaps you’ve worn that same shirt in one too many Instagram photos, or maybe it clashes with what everyone else is wearing, or you just don’t like the outfit you picked out that day. Whether you need to fix a fashion faux-pas or just want to have some fun with photo editing, this tutorial will show you how to change the color of your clothes in Photoshop. This guide is designed to be accessible to a wide audience, from beginners to seasoned professionals, offering a detailed exploration of techniques for altering garment colors.
The Foundation: Accurate Selections for Color Modification
The core of any successful color change in Photoshop lies in making precise selections. Like many other Photoshop techniques, the color change workflow starts with a selection. There are a ton of ways to make selections in Photoshop - some are quick and easy, and others require a little more time and attention. Keep in mind that selections and Layer Masks are things that evolve and change throughout an edit.
Standard Selection and Masking Techniques
A common and effective method involves using Photoshop's selection tools to isolate the garment. Start by using your favorite selection tool to select your shirt or other piece of clothing. Once you have an active selection, you can easily turn it into a Layer Mask. Simply click the mask icon in the Layers panel. It’s always a best practice to keep a copy of your original photo somewhere, in case you need to redo any steps later or want the picture for another purpose. By clicking the eyeball beside your background layer, you should notice that the only thing you can see now is the selected garment, indicating a successful mask creation.
This mask is shown in the Layers panel as a black and white square to the right of the layer. Anything you draw on it in black will disappear, and anything you draw on it in white will be visible. To edit the mask more closely, go in with a small, medium-soft brush and draw black on the parts you don’t want until the only thing you can still see in Photoshop is the soon-to-be-recolored garment.
For a quick, initial selection, open the Select menu and choose the Subject option. With this particular image, Select Subject does a nice job of accurately identifying the subject and selecting them. Now that we have an active selection, it’s easy to turn it into a Layer Mask.
Refining Selections
If the initial selection isn’t perfect, refinement is key. You might want to use the Quick Selection Tool to select the subject’s face and hair, or other areas of the subject’s skin and hair. This process helps to meticulously separate the clothing from the rest of the image, ensuring that subsequent color adjustments are confined to the intended areas.
Advanced Selection Methods
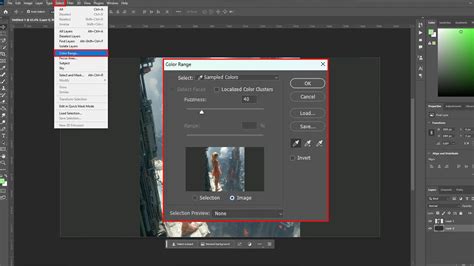
For unique color challenges, alternative selection methods can be highly effective. If your garment is a vibrant color that isn’t found anywhere else in the image, you might want to use the Color Range selector instead. Go to Select > Color Range and use the Eyedropper tool to select the garment color. Then use the slider to intensify or soften the specificity of the Color Range selector until only your garment is visible.
To select the jacket, we are going to use the color selection tool. Go to “Select” and then “Colour Range”. From there a box will open up. Underneath the “Save” button, there are three small boxes. Select the one with a “+”. This will make sure we are selecting only the colours of the jacket. Then drag your mouse over the colours you want to be selected. If you accidentally select something that you didn’t mean to, you can change the eyedropper tool using the “-” and “+”. You might find that this captures other colours, such as skin tones. That’s no problem, make your selection and then use the Lasso tool to refine your selection.
If you find that this method has not picked up all of the garment, select the Magic Wand tool in the toolbox and Shift + Click any areas that have not been selected. By holding down the Shift key, you add to the selection and don’t lose what has already been selected.
The Art of Color Transformation: Hue and Saturation Adjustments
Once the garment is accurately selected, the primary tool for altering its color is the Hue/Saturation Adjustment Layer. Whenever you have an active selection while creating a new Adjustment Layer, Photoshop automatically loads that selection as the Layer Mask of the Adjustment Layer.
Basic Color Change
With the selection active, simply create a new Hue/Saturation Adjustment Layer above the image in the Layers Panel. To change the color of the clothing, double-click on the Hue/Saturation Adjustment Layer to open the dialog. Make sure to check the Colorize button on the bottom of the pop-up and drag the Hue, Saturation, and Lightness sliders until you find your desired color. If you want to make a garment brighter or darker instead of changing the color, you don’t have to click Colorize.
In many cases, a single Hue/Saturation Adjustment Layer will do the trick. For instance, to make a jumper white, you might decrease the Saturation and increase the Lightness. Your image is now done.
Advanced Color Adjustments and Refinements
Occasionally, an additional Curves Adjustment Layer can help bring back detail in the highlights and shadows, which is most useful when changing the color to black or white. Since it’s handy to have a Curves Adjustment available, let’s set the project up so that we can use both. We’re going to need the same Layer Mask for both the Hue/Saturation Adjustment Layer and for the Curves Adjustment Layer. The easiest way to do this, and stay organized, is to put the Hue/Saturation Adjustment Layer into a Group by selecting it and then hitting CTRL or CMD + G. Then click and drag the Layer Mask we created up to the Group. Now everything we place into this Group will be defined by the Layer Mask of the Group.
While changing the color, you may notice other areas you might have missed while creating the selection and Layer Mask. Our initial color change turned the clothing from lavender to green, which was pretty easy. That’s where the Curves Adjustment Layer can help. Drag the Saturation slider all the way to the left. Then, drag the Lightness slider in the Hue/Saturation Adjustment Layer dialog to near black. Then, double-click on the Curves Adjustment Layer dialog. Make the darks a little bit darker, and the highlights a little bit brighter. You can follow the same steps if you want to change the color to white.
Photoshop Tutorial Thumbnail: AI Tutorial Thumbnail Face Editing Mr Beast Style Step by Step
Beyond Solid Colors: Applying Patterns to Garments
Photoshop allows you to create your own patterns or use existing ones and apply them to an image as a fill layer. This is particularly useful for changing the texture of a garment, not just its color.
Implementing Pattern Fills
Before applying a pattern fill, we need to select only the parts of the image that we want to apply it to. In this case, a blue suit is fairly easy to select using methods described earlier. The Pattern Fill dialog box appears, and in the Layers Palette, you’ll see a new pattern layer mask above your current layer.
To apply a different pattern, click on the small triangle beside the pattern swatch in the Pattern Fill dialog box. Then click on the small triangle in the upper right corner of the drop-down box. At the bottom of the menu that appears, you will see lots of patterns available in groups such as Artist Surfaces, Nature Patterns, and Rock Patterns. Choose Artist Surfaces.
Choose a pattern that you like from the thumbnails, and set the scale to 150%. You’ll see the pattern applied instantly to the suit. With your new Fill layer still selected, click and hold on Normal in the blending mode drop-down menu on the Layers panel, and choose Multiply. By choosing Multiply, the white part of the pattern is knocked out, and we just see that Gauze effect.
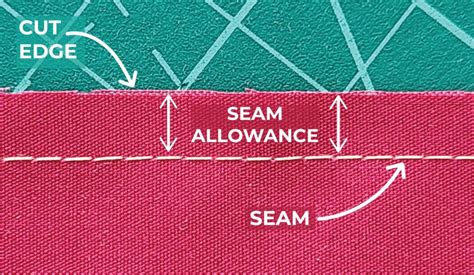
Seamless Integration and Realism
To ensure the pattern fill matches the folds and contours of the clothing, you need to use the Displacement Map. This tool in Photoshop uses the grayscale information in an image to distort the content of another image. It’s perfect for making the pattern follow the folds and contours of the clothing. First, create a displacement map of the clothing area. Then, apply this map when adding the pattern fill. This will make the pattern bend and warp along with the clothing, giving a realistic look.
You can experiment with other blending modes to see how they affect the final rendering of the pattern. The best thing about this method is how easy it is to change the pattern. Simply double-click on the Pattern Fill thumbnail (the one on the left side of the layer) to quickly choose and apply other patterns.
To make the pattern fill blend seamlessly with the clothing, use the Blend Modes in Photoshop. After applying the pattern fill, change the blend mode of the layer to Overlay or Soft Light. This will make the pattern blend with the underlying colors and textures of the clothing, giving a natural look.
If the pattern fill looks too sharp or too soft on the clothing, you can adjust its sharpness using the High Pass filter. Duplicate the pattern fill layer, then apply the High Pass filter to it. Adjust the radius to control the sharpness. Then, change the blend mode of this layer to Overlay. This will sharpen the pattern fill without affecting the rest of the image.
To make the pattern fill look more realistic on the clothing, adjust its opacity and blend mode. Lowering the opacity will make the pattern less prominent, while changing the blend mode will affect how the pattern interacts with the colors and textures of the clothing. Experiment with different settings to achieve the most realistic look.
If the pattern fill doesn’t cover the entire clothing item, you can duplicate the pattern layer and move it to cover the uncovered areas. Alternatively, you can increase the scale of the pattern fill when applying it to ensure it covers the entire clothing item.
Customization and Advanced Control
Photoshop offers extensive options for customizing your color and pattern changes, ensuring professional and compelling results.
Custom Patterns and Masking
Yes, you can use a custom pattern fill instead of the default patterns in Photoshop. To do this, open the pattern image in Photoshop. Then, go to Edit > Define Pattern. Give your pattern a name and click OK. Now, you can use this custom pattern when filling the clothing.
To remove the pattern fill from certain areas of the clothing, use a layer mask. After applying the pattern fill, add a layer mask to the layer. Then, paint with black on the mask over the areas where you want to remove the pattern. This will hide the pattern in those areas, revealing the original clothing underneath.
Applying to Multiple Items and Saving
Yes, you can apply the pattern fill to multiple clothing items at once. To do this, make a selection of all the clothing items using any selection tool. Then, apply the pattern fill to this selection. The pattern will be applied to all the clothing items within the selection.
Yes, you can save the pattern fill for future use. After defining the pattern, it will be saved in the Pattern Picker. You can access it anytime by going to Edit > Fill and choosing Pattern from the Contents dropdown. Your saved patterns will be available in the Custom Pattern dropdown.
Color Correction for Shirts and Fringing Removal
Given the original image's filter effect, the shirt might clash with our color adjustments. To reconcile this, add a saturation layer above the shirt selection and dial down the saturation to zero. This correction won't affect the shirt color due to the layer's position.
To eliminate fringing (color bleeding, particularly around edges), add a new blank layer above the hue saturation and set its blend mode to “Colour”. With the brush tool, sample a color near the edge (using option or alt) and paint around the fringes until the original hue is completely masked.
Yes, you can change the color of the pattern fill after applying it. To do this, create a new adjustment layer above the pattern fill layer. Choose the Hue/Saturation adjustment layer. This will allow you to change the hue, saturation, and lightness of the pattern fill, giving you complete control over its color.
Conclusion: Unleashing Creative Potential
Photoshop's capability to change clothing colors unlocks vast creative potential, enabling you to tailor your photos to various scenarios. These techniques promise professional, compelling results, whether for product photography, fashion editorials, or simply enhancing personal images. Mastering these methods will elevate your photo editing skills, allowing for seamless and professional alterations that can revolutionize your visual content.