Achieving the perfect skin tone in your photographs can be the difference between a good image and a truly professional one. Whether you're aiming for a sun-kissed glow, correcting an unnatural red cast, or striving for seamless consistency across multiple shots, Photoshop offers a powerful suite of tools to help you refine and enhance skin tones. This tutorial delves into various techniques, from basic adjustments to more advanced color matching, empowering you to elevate your portrait photography.
Initializing Your Workflow: Selecting Skin Tones
Before any color correction can take place, the first crucial step is to isolate the skin areas within your image. This ensures that your adjustments are precisely targeted, preventing unintended alterations to backgrounds or other elements. Photoshop provides several effective methods for achieving this.
Utilizing the Color Range Tool
A highly efficient method for selecting skin tones is through Photoshop's "Color Range" feature. This tool allows you to sample colors directly from your image and create a selection based on those samples.
- Navigate to the "Select" menu at the top of your Photoshop interface.
- Choose "Color Range…" from the dropdown menu.
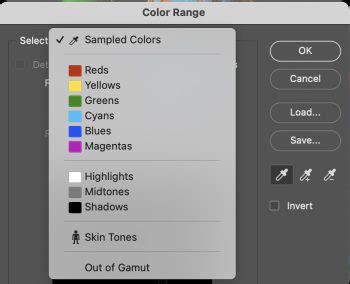
- Within the Color Range dialog box, you'll find a dropdown menu labeled "Select." Click on this and choose the "Skin Tones" option.
- Photoshop will attempt to automatically identify and select the skin areas. You can refine this selection further.
- A "Detect Faces" checkbox is available. Ticking this can sometimes help Photoshop more accurately isolate facial skin. Experiment with this option to see if it improves the selection for your specific image.
- The "Fuzziness" slider is another critical control. Adjusting this slider will increase or decrease the tolerance of the selection, allowing you to include or exclude similar shades of color. The goal here is to achieve a comprehensive selection of the skin without encompassing too much of the background or other non-skin elements.
- For a clearer preview of your selection, utilize the "Selection Preview" option at the bottom of the Color Range dialog box. Changing this to "Grayscale" is particularly helpful, as it displays your selection as a white overlay on a grayscale version of your image, making it easier to discern the details of what is being selected.
- Once you are satisfied with the selection, click "OK."
Alternative Selection Method: Quick Selection Tool
Another robust tool for making selections is the "Quick Selection tool." This tool works by intelligently identifying areas of similar color and texture as you paint over them.
- Select the "Quick Selection tool" from the toolbar.
- Click and drag over the skin areas you wish to select. Photoshop will automatically expand the selection to include similar tones and textures.
- To deselect areas that have been inadvertently included, hold down the "Alt" key (on Windows) or "Option" key (on Mac) while clicking and dragging over those extraneous areas, such as hair, eyebrows, or eyes.
- To further refine the edge of your selection, particularly in areas where skin color transitions into hair or clothing, utilize the "Smart Radius" option within the "Refine Edge" dialog. Set the "Radius" to approximately 5 pixels, and then paint along the hairline or other complex edges. This helps to blend the selection more naturally.
Adjusting Skin Color: From Redness to Warmth
With your skin selection in place, you can now proceed to make precise color adjustments. Photoshop offers several adjustment layers that are ideal for this purpose.
Using the Color Balance Adjustment
The "Color Balance" adjustment layer is a versatile tool for correcting color casts and subtly altering the mood of your image.
- With your skin selection active, go to the "Adjustments Panel." If the panel is not visible, you can access it via "Window > Adjustments."
- Click on the "Color Balance" icon to create a new Color Balance adjustment layer. This layer will automatically be masked to your active selection, meaning its effects will only apply to the skin tones.
- In the Color Balance properties panel, you can choose to adjust the "Highlights," "Midtones," or "Shadows" independently. It's generally recommended to start with the "Midtones" as they have the most significant impact on the overall skin tone.
- Within each tonal range, you'll find sliders for Cyan/Red, Magenta/Green, and Yellow/Blue. To reduce redness, you would shift the Cyan/Red slider towards Cyan. To warm up the skin tone, you might move the Yellow/Blue slider towards Yellow. Experiment with these sliders to achieve the desired look.
- To toggle the visibility of your adjustments and compare them with the original image, click the eye icon next to the Color Balance layer in the Layers panel. This allows you to see the impact of your changes in real-time.
Addressing Redness with Levels or Curves
An overly red cast in skin tones is a common issue, particularly with smartphone cameras. Both "Levels" and "Curves" adjustment layers can effectively combat this.
Using Levels Adjustment
- Follow the initial steps for selecting skin tones using "Select > Color Range" or the "Quick Selection tool."
- Create a new "Levels Adjustment Layer" from the Adjustments Panel.
- In the Levels properties panel, you'll see a histogram representing the tonal distribution of your image. You can adjust the "Input Levels" sliders (black, gray, and white points) to alter the brightness and contrast.
- To specifically target and reduce red tones, you can select the "Red" channel from the dropdown menu (initially set to "RGB"). Then, adjust the sliders to decrease the red values. Alternatively, you can drag the curve points to darken the highlights, for example, by setting the first point's input to 180 and output to 165.
Using Curves Adjustment
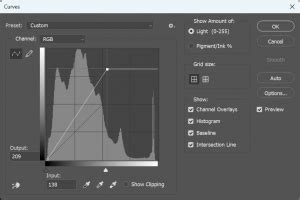
The "Curves" adjustment layer offers even finer control over tonal and color adjustments.
- Create a new "Curves Adjustment Layer."
- From the dropdown menu within the Curves panel, select the "Red" channel.
- To reduce red, you will typically want to lower the curve. Click and drag the curve downwards in the midtone area. The goal is to decrease the red values in the skin tones.
- You can also use the "On-image adjustment tool" within the Curves panel. Click the pointing finger icon at the top left of the Curves panel. Then, hold "Ctrl+Shift" (Windows) or "Command+Shift" (Mac) and click directly on a red area of the skin in your image. Dragging up or down will adjust the red channel for that specific tonal range.
- A "QUICK TIP" suggests that the "Curves" adjustment performs a similar function to "Levels." It's beneficial to try both and see which method yields the best results for your image. For a deeper understanding of when to use each, consult resources on "Levels or Curves adjustments on your images."
Refining Your Adjustments with Layer Masks
When your initial selection using "Color Range" includes parts of the background or other elements you don't want to affect, layer masks become indispensable. They allow for precise control over where an adjustment is applied.
- After applying an adjustment layer (like Color Balance or Levels), a layer mask is automatically generated based on your selection. This mask is typically white in the selected areas and black elsewhere.
- To refine the mask, select the Brush tool. Set your foreground color to black.
- Paint on the layer mask to conceal the adjustment in areas where it's not desired. Painting with black on the mask will hide the effect of the adjustment layer. Conversely, painting with white will reveal it.
- To better visualize your mask, hold down "Option" (Mac) or "Alt" (PC) and click on the layer mask thumbnail in the Layers panel. This will display the mask itself, allowing you to see exactly which areas are affected.
- Once you've painted away the unwanted areas, switch back to viewing your normal image by clicking the layer mask thumbnail again while holding "Option" or "Alt."
- You will now see that the color balance changes are exclusively applied to the areas you left white on the mask, successfully adjusting the skin tones of the person's face, arms, and shoulders.
Photoshop Layer Masks Explained in 7 Minutes!
Advanced Techniques: Matching Skin Tones Across Images
Replicating a specific skin tone across multiple photographs is a more advanced endeavor but can be achieved with careful application of Photoshop's tools. This is particularly useful for maintaining consistency in fashion shoots or portrait series.
Sampling and Matching Color Values
- Bring Images Together: Open both the "project image" (the one you want to edit) and the "sample image" (the one with the desired skin tone) in Photoshop. Use the "Move tool" to drag the tab of the sample image onto the tab of the project image. This stacks them in the same document.
- Sample Color from Sample Image: Select the "Eyedropper tool." For more accurate sampling, adjust the "Sample Size" in the top menu to "5 by 5 Average." This ensures you're sampling an average color from a small area rather than a single pixel. Click on the desired skin tone in the sample image to load that color into your foreground swatch.
- Create a Color Swatch: Create a new layer in your project image. Select the "Brush tool." With the desired color from the sample image loaded, paint a swatch of this color onto the new layer.
- Sample Skin Tone in Project Image: With the Brush tool still active, you can temporarily switch to the Eyedropper tool by holding down "Alt" (Windows) or "Option" (Mac). Click directly on the skin tone of the subject in your project image. This loads the project image's skin tone into your foreground swatch.
- Utilize the Color Sampler Tool: An alternative to the Eyedropper tool for tracking color values is the "Color Sampler tool," which is nested under the Eyedropper tool. Click on the desired skin tone swatch in the sample image, and then click on the skin tone in the project image. These sampled points will be displayed in the "Info panel," showing you the RGB color information for each.
- Match RGB Values with Curves:
- Create a new "Curves Adjustment Layer" in your project image.
- Enable the "On-image adjustment tool" in the Curves panel (the pointing finger icon).
- Hold "Ctrl+Shift" (Windows) or "Command+Shift" (Mac). Click directly on the skin tone swatch in your project image.
- In the Curves panel, select the "Red" channel. In the "Info box," you'll see the RGB values from your sampled points. Match the "Output" value for the Red channel in the Curves panel to the "Red" value of the sample image's skin tone.
- Press "Enter" or "Return." Repeat this process for the "Green" and "Blue" channels, matching the output values to the corresponding RGB values of the sample image's skin tone.
- Apply Masking for Precision: Ensure your edits affect only the skin tones. If you haven't already, create a layer mask for the Curves adjustment layer. Fill the mask with black (using "Ctrl+Backspace" on Windows or "Command+Delete" on Mac if black is your background color). Then, use a soft-edged brush (with "Hardness" set to zero) to paint white over the skin areas where you want the color correction to apply.
- Clean Up: Once you have achieved the desired skin tone match, you can delete the layers containing the sample swatches and the sample image itself.
Selective Color Adjustments
The "Selective Color" adjustment layer offers granular control over specific color ranges within your image.
- Create a "Selective Color Adjustment Layer."
- From the dropdown menu, select "Reds." Adjust the sliders (Cyan, Magenta, Yellow, Black) to fine-tune the red tones in the skin. Remember that Cyan is the opposite of Red.
- If your image has darker skin tones, you may also need to adjust the "Yellows" and potentially the "Blues" to achieve a natural look.
- The sliders work by adjusting the amount of Cyan, Magenta, Yellow, and Black within the selected color range. For instance, increasing Yellow in the "Reds" range will make the skin appear warmer.
Beyond Basic Adjustments: Camera Raw Filter and Colorize
Photoshop's "Camera Raw Filter" provides a comprehensive suite of tools for global and local adjustments, including advanced color grading and skin tone correction. It can be accessed via "Filter > Camera Raw Filter." Within this filter, you'll find sliders for exposure, contrast, highlights, shadows, whites, blacks, and a dedicated "Color Mixer" or "HSL" (Hue/Saturation/Luminance) panel where you can precisely target and adjust individual color ranges, including skin tones.
For a more automated approach, Photoshop also offers a "Colorize" option, which can be found within various adjustment layers or filters. This tool attempts to automatically add color to a black and white photo or to recolor existing areas, which can sometimes be a starting point for achieving a desired skin tone, especially when combined with manual refinements.
Practice and Exploration
Working with skin tones in Photoshop is a skill that improves with practice. Experiment with different adjustment layers, selection techniques, and masking strategies. Don't hesitate to explore nature settings for portrait photography, as natural light often provides a more flattering and accurate rendering of skin tones. By consistently applying these techniques and understanding the interplay of color and light, you can transform your portrait photography and achieve consistently professional-looking results.
Remember, the goal is to enhance, not to create an artificial appearance. Subtle adjustments often yield the most convincing and aesthetically pleasing outcomes. The journey to becoming a Photoshop expert involves continuous learning and application, and mastering skin tone retouching is a significant step in that direction.