Inkscape is a powerful, free, and open-source vector graphics editor that stands as a cornerstone for creating and manipulating vector images, primarily in the Scalable Vector Graphics (SVG) format. For designers, illustrators, and anyone working with digital graphics, mastering Inkscape can significantly enhance workflow and creative output. While the visual interface offers intuitive controls, a deep understanding and utilization of keyboard shortcuts can transform a user's productivity, allowing for rapid execution of commands and seamless navigation through complex projects. This comprehensive guide serves as an "Inkscape cheat sheet," detailing essential key combinations that unlock the full potential of this versatile software.
Navigating the Inkscape Workspace: Essential Tools and Views
Efficiently switching between tools and managing your canvas are fundamental to a smooth design process. Inkscape provides a rich set of keyboard shortcuts to expedite these common actions. The primary tools, such as the Selector tool, Node tool, and Zoom tool, can be accessed with single keystrokes or simple modifier combinations, minimizing the need to reach for the mouse.
The Selector tool, the workhorse for moving, scaling, and rotating objects, is typically invoked with F1 or S. For temporary selection and manipulation without committing to a tool, the Spacebar offers a quick toggle. When fine-tuning paths and shapes, the Node tool (F2 or N) becomes indispensable for direct manipulation of vector points. Zooming in and out for detailed work or an overview of the entire composition is efficiently handled by F3 or Z for the Zoom tool. Further specialized tools include the Measure tool (M), the Rectangle tool (F4 or R), the 3D Box tool (Shift+F4 or X), the Ellipse/Arc tool (F5 or E), the Star tool (Shift+F9 or *), and the Spiral tool (F9 or I).
For freehand drawing and more artistic strokes, the Pencil (Freehand) tool is accessed via F6 or P. For precise vector paths using Bezier curves, the Pen (Bezier) tool is available with Shift+F6 or B. The unique Calligraphic tool, which allows for brush-like strokes with variable width and angle, is activated by Ctrl+F6 or C. Text manipulation is streamlined with the Text tool (F8 or T).
Beyond these core drawing instruments, Inkscape offers tools for filling and coloring. The Spray tool (Shift+F3 or A) can be used to create clusters of objects, while the Eraser tool (Shift+E) allows for precise removal of parts of objects. The Paint bucket tool (Shift+F7 or U) is essential for filling enclosed areas with color, and the Gradient tool (Ctrl+F1 or G) enables the creation of smooth color transitions. For color sampling from existing artwork, the Dropper tool (F7 or D) is invaluable. The Connector tool (Ctrl+F2 or O) is particularly useful for creating diagrams and flowcharts, allowing for lines that automatically adjust to the movement of connected objects.
Managing Dialogs and Preferences: Streamlining Your Workflow
Inkscape's power is further amplified by its numerous dialogs, which provide detailed control over various aspects of your artwork. Accessing these dialogs quickly can save considerable time and effort. Many of these are grouped under the Ctrl+Shift (or Cmd+Shift on macOS) modifier, making them easy to remember.
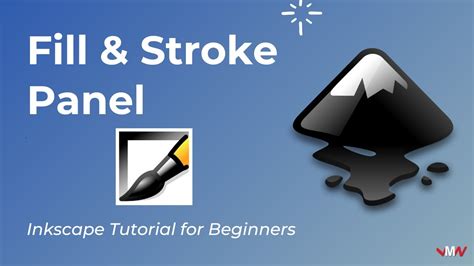
Key dialogs include Fill and Stroke (Ctrl+Shift+F or Shift+Cmd+F), which controls the color, pattern, and stroke properties of selected objects. The Swatches dialog (Ctrl+Shift+W or Shift+Cmd+W) offers a quick way to manage and apply colors. For typography, the Text and Font dialog (Ctrl+Shift+T or Shift+Cmd+T) provides extensive options for font selection, size, and styling.
The Transform dialog (Ctrl+Shift+M or Shift+Cmd+M) is crucial for precise geometric manipulation, offering controls for moving, scaling, rotating, and skewing objects. Managing the hierarchical structure of your artwork is facilitated by the Layers dialog (Ctrl+Shift+L or Shift+Cmd+L), allowing you to organize elements into different layers for better control and visibility. The Align and Distribute dialog (Ctrl+Shift+A or Shift+Cmd+A) is indispensable for precisely positioning and spacing multiple objects relative to each other.
For detailed attribute management, the Object Properties dialog (Ctrl+Shift+O or Shift+Cmd+O) provides access to a wide range of object-specific settings. The Undo History dialog (Ctrl+Shift+H or Shift+Cmd+H) allows for non-linear undo operations, offering flexibility in correcting mistakes. For advanced users, the XML Editor (Ctrl+Shift+X or Shift+Cmd+X) provides direct access to the underlying SVG code, enabling intricate modifications.
Application-wide settings are managed through Document Preferences (Ctrl+Shift+D or Shift+Cmd+D) and Inkscape Preferences (Ctrl+Shift+P or Shift+Cmd+P), which allow customization of the user interface, tools, and default behaviors. Other essential dialogs include Export to PNG (Ctrl+Shift+E or Shift+Cmd+E), Find (Ctrl+F or Cmd+F), and Trace Bitmap (Alt+Shift+B or Alt+Shift+B) for converting raster images to vector paths. The Path Effects dialog (Ctrl+Shift+7 or Shift+Cmd+7) offers a powerful way to non-destructively modify paths. Spell checking can be initiated with Ctrl+Alt+K or Alt+Cmd+K.
Toggling all dialogs on and off can be achieved with F12. Returning focus to the canvas from any dialog is as simple as pressing Esc. Navigating within dialogs is also keyboard-friendly: Tab jumps to the next widget, Shift+Tab to the previous, Enter sets a new value or activates a button, and Spacebar or Enter can activate the current button or list item. In multi-tab dialogs, Ctrl+PageUp and Ctrl+PageDown (or Cmd+PageUp/Cmd+PageDown on macOS) switch between tabs. Opening a search field within a dialog list is done with Ctrl+F (or Cmd+F).
Inkscape 1.0 - Make Dockable Dialogs in tabbing (switcher) style
Interacting with the XML Editor: Advanced Control
The XML Editor in Inkscape, accessible via Ctrl+Shift+X (or Cmd+Shift+X), is a powerful tool for users who need to manipulate the underlying structure of their SVG documents. Navigating and modifying the XML tree can be significantly expedited with specific keyboard shortcuts.
To expand all children and sub-children of a selected element, use **. Expanding only the direct children of the currently selected element is done with the + key. To collapse the currently selected element, use the - key. Navigating within the list of elements is straightforward: Home or End selects the topmost or lowermost visible element, respectively. The Up and Down arrow keys select the previous or next visible element, while PageUp and PageDown select elements on the previous or next page of the list. To set an attribute's value, Ctrl+Enter (or Cmd+Enter) is used. For jumping to the first editable field within the editor, Alt+X is the shortcut.
Controlling the Canvas: Zooming, Panning, and Snapping
The canvas is your primary workspace, and efficient navigation is paramount. Inkscape offers a comprehensive suite of shortcuts for zooming, panning, and controlling snapping behavior.
Zooming in and out can be done with the + and - keys respectively. The Alt+Z shortcut activates the zoom field for direct numerical input. Specific zoom levels are conveniently mapped: 1 for 1:1 zoom, 2 for 1:2 zoom, 3 for zoom to selection, 4 for zoom to drawing, and 5 for zoom to page. Ctrl+E (or Cmd+E) or 6 zooms to the page width. `` cycles to the previous zoom level, and Shift+' cycles to the next. Panning the canvas is achieved by holding Ctrl (or Cmd) and using the arrow keys (Ctrl+Up, Ctrl+Down, Ctrl+Left, Ctrl+Right).

Controlling visual aids and alignment is crucial for precision. Shift+\ toggles guides and snapping to guides. Shift+3 toggles grids and snapping to grids. % toggles snapping on and off entirely. For adjusting the page size to fit your content, Ctrl+Shift+R (or Shift+Cmd+R) resizes the page to the current selection or to the drawing if nothing is selected.
File Operations: Managing Your Projects
Standard file operations are streamlined with familiar keyboard shortcuts, ensuring quick saving, opening, and exporting.
Creating a new document is initiated with Ctrl+N (or Cmd+N). To open an existing SVG document, use Ctrl+O (or Cmd+O). Exporting your work to a PNG image is done via Ctrl+Shift+E (or Shift+Cmd+E). Importing other bitmap or SVG files is handled by Ctrl+I (or Cmd+I). Printing your document can be accessed with Ctrl+P (or Cmd+P). Saving your current work is a quick Ctrl+S (or Cmd+S). For saving under a new name or location, use Ctrl+Shift+S (or Shift+Cmd+S). Creating a backup copy is possible with Ctrl+Alt+Shift+S (or Alt+Shift+Cmd+S). Exiting Inkscape is done with Ctrl+Q (or Cmd+Q).
Window and View Management: Optimizing Your Display
Inkscape offers several shortcuts to manage the application's windows and display elements, helping you declutter your workspace or maximize screen real estate.
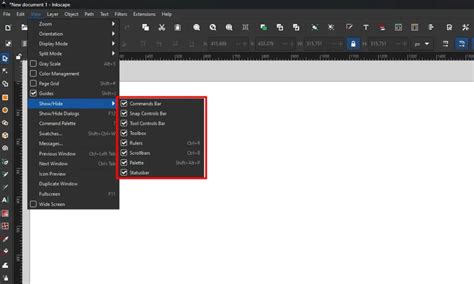
Toggling rulers on and off is done with Ctrl+R (or Cmd+R). Scrollbars can be shown or hidden with Ctrl+B (or Cmd+B). The palette can be toggled with Alt+Shift+P. Fullscreen mode is activated by F11. Toggling toolbars on and off is achieved with Shift+F11, while Ctrl+F11 (or Cmd+F11) toggles both toolbars and fullscreen. The main menu can be accessed with F10, and drop-down menus with Shift+F10. Closing the current document window is done with Ctrl+F4 or Ctrl+W (or Cmd+F4/Cmd+W). Navigating between multiple open document windows is possible with Ctrl+Tab (or Cmd+Tab) for the next window and Ctrl+Shift+Tab (or Shift+Cmd+Tab) for the previous.
Object Manipulation: Editing and Arranging Your Creations
The core of vector graphics lies in manipulating objects, and Inkscape provides a robust set of shortcuts for these tasks.
Creating a new layer is done with Ctrl+Shift+N (or Shift+Cmd+N). Moving layers up and down in the stacking order can be done with Shift+PageUp and Shift+PageDown, respectively. Raising or lowering a layer by one step is achieved with Ctrl+Shift+PageUp and Ctrl+Shift+PageDown (or Ctrl+Shift+Cmd+PageUp/Ctrl+Shift+Cmd+PageDown). Moving a layer to the very top or bottom is done with Ctrl+Shift+Home and Ctrl+Shift+End (or Cmd+Shift+Home/Cmd+Shift+End).
Undo and Redo operations are fundamental: Ctrl+Shift+Y or Ctrl+Z (or Shift+Cmd+Y/Cmd+Z) for undo, and Ctrl+Shift+Z or Ctrl+Y (or Shift+Cmd+Z/Cmd+Y) for redo. Copying selected objects is Ctrl+C (or Cmd+C), cutting is Ctrl+X (or Cmd+X), and pasting is Ctrl+V (or Cmd+V). For pasting objects precisely in place, use Ctrl+Alt+V (or Alt+Cmd+V). Pasting styles from one object to another is done with Ctrl+Shift+V (or Shift+Cmd+V), and pasting a path effect uses Ctrl+7 (or Cmd+7).
Duplicating a selected object is a quick Ctrl+D (or Cmd+D). Cloning an object, which creates a linked copy where changes to the original affect the clone, is done with Alt+D. Unlinking a clone to make it an independent object uses Alt+Shift+D. Selecting the original object from a clone is done with Shift+D. Creating a bitmap copy of an object is Alt+B, and tracing a bitmap to convert it into vector paths is Alt+Shift+B. Converting an object to a pattern is Alt+I, and converting a pattern back to objects is Alt+Shift+I.
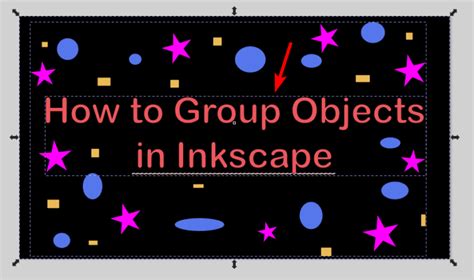
Grouping selected objects is essential for managing complex designs and is done with Ctrl+Shift+U or Ctrl+G (or Shift+Cmd+U/Cmd+G). Ungrouping selected objects is then Ctrl+Shift+G or Ctrl+U (or Shift+Cmd+G/Cmd+U). Manipulating the stacking order of selections is also covered: Home raises a selection to the top, End lowers it to the bottom, PageUp raises it one step, and PageDown lowers it one step.
Tweak Tool Shortcuts: Fine-Tuning Your Artwork
The Tweak tool, a versatile instrument for deforming and manipulating paths, has a dedicated set of modifier keys that change its behavior. These shortcuts allow for rapid adjustments without repeatedly accessing tool options.
The primary Shift+M (or Shift+0) activates the basic move mode. Shift+I (or Shift+1) engages the move in/out mode. Shift+Z (or Shift+2) activates the move jitter mode. Scaling is controlled with Shift+< or Shift+> (or Shift+3). Rotation is managed with Shift+[ or Shift+] (or Shift+4). Duplicating or deleting elements with the tweak tool is done via Shift+D (or Shift+5). Pushing paths is Shift+P (or Shift+6), and shrinking/growing paths uses Shift+S (or Shift+7). Attracting or repelling paths is toggled with Shift+A (or Shift+8), and roughening paths with Shift+R (or Shift+9). Color painting and color jitter are controlled by Shift+C and Shift+J, respectively. Applying a blur effect is done with Shift+B.
Adjusting brush width is achieved with the Left and Right arrow keys, while Home or End sets the brush width to its minimum or maximum. The force of the tweaking operation can be modified using the Up and Down arrow keys.
Leveraging Public Collections and Customization
The provided information highlights the value of "Public Collections" within tools like KeyCombiner, which allow users to practice and select shortcuts relevant to their workflow. This approach emphasizes that not every shortcut needs to be memorized; instead, users can build personalized collections of the most useful commands. The data also touches upon the possibility of customizing shortcuts within Inkscape itself, a feature available through the keyboard shortcut editor in Preferences -> Interface. While some users might prefer to stick with defaults for ease of learning, the option to remap keys allows for a truly personalized and efficient user experience, especially for those with specific ergonomic needs or preferences for certain key placements. This customization can be particularly beneficial for users who switch between different software or have distinct ergonomic requirements, ensuring that frequently used actions are always within easy reach.
The discussion around keyboard layouts and potential shortcut conflicts, particularly concerning accent keys on German QWERTZ keyboards, underscores the importance of Inkscape's flexibility. While default shortcuts are designed for broad usability, the ability to reconfigure them ensures that users worldwide can adapt the software to their specific input devices and language settings without compromising productivity. This adaptability is a hallmark of open-source software and a testament to Inkscape's commitment to user-centric design.
The goal is to make shortcuts accessible and intuitive, avoiding the need for contorted finger gymnastics. Assigning shortcuts to the most frequently used features, rather than attempting to shortcut every single menu item, is a pragmatic approach that balances efficiency with learnability. This philosophy ensures that users can build a powerful command set that enhances their workflow without overwhelming them with memorization.