Procreate, the acclaimed digital art application for iPad, empowers artists with unparalleled flexibility in managing their creative projects. A cornerstone of this flexibility lies in the ability to efficiently select and manipulate multiple layers simultaneously. Whether you're organizing complex compositions, duplicating elements across canvases, or simply rearranging parts of your artwork, understanding how to select multiple layers is a fundamental skill that significantly enhances your workflow. This guide delves into the various methods and functionalities Procreate offers for multi-layer selection, ensuring you can navigate and control your digital canvas with confidence.
Understanding the Layers Panel
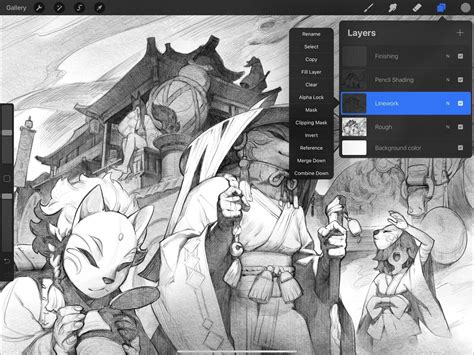
The Layers Panel is the central hub for all layer management within Procreate. Accessible from the top right-hand corner of your screen, this panel displays each element of your artwork as an individual layer. By default, layers are given sequential titles, but they can be easily renamed for better organization. When you import designs or draw elements, each new addition typically occupies its own layer, creating a stack of visual components that can be independently edited. The last layer you interact with is usually highlighted in blue, indicating it's the currently active layer. However, to harness the power of Procreate's editing capabilities, you'll often need to select more than one layer at a time.
The Core Method: Swiping to Select
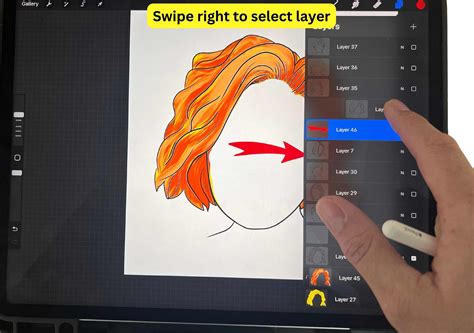
The most direct and commonly used method for selecting multiple layers in Procreate involves a simple swipe gesture. After opening the Layers Panel, tap on one of the layers you wish to select. This layer will become your "Primary layer," appearing in the panel as a bright blue highlight. To select additional layers, known as "Secondary layers," you simply swipe your finger or Apple Pencil to the right on the desired layer.
As you swipe right on a secondary layer, it will appear to "bounce" slightly to the right and become highlighted in a darker blue, indicating it has been added to your selection. You can repeat this process, swiping right on as many additional layers as you need to include in your selection. This allows for the bulk selection of layers, which is crucial for operations like grouping, moving, duplicating, or deleting multiple elements at once.
If you find you've accidentally selected a layer, deselecting it is just as straightforward: simply swipe right on the selected layer once again. This toggling action ensures precise control over your layer selections.
Grouping Selected Layers for Organization
One of the primary benefits of selecting multiple layers is the ability to group them. This is particularly useful when working with designs composed of several individual elements, such as sticker designs or complex illustrations. Once you have selected all the layers that constitute a specific design or component, tap the "Group" button that appears at the top right corner of the Layers Panel.
The selected layers will then be consolidated into a single "Grouped Layer." You can expand or collapse this group by tapping the arrow on its right-hand side, allowing you to view or hide the individual layers within it. Grouping not only tidies up your Layers Panel but also enables you to move, transform, or edit the entire group as a single unit. This is a powerful organizational tool that prevents your Layers Panel from becoming overwhelming.
To ungroup layers, simply tap on the group name within the Layers Panel, and then select "Ungroup" from the pop-up menu.
Advanced Selection Techniques and Features
Procreate offers several other sophisticated methods for selecting and managing layers, catering to various workflows and preferences.
Layer Select Gesture Control
For those seeking a more intuitive, touch-based approach, Procreate's "Layer Select" feature is invaluable. This functionality allows you to select layers directly from the canvas without needing to open the Layers Panel.
To enable Layer Select, navigate to Actions (wrench icon) > Prefs > Gesture Controls. Within this menu, locate and activate "Layer Select." Once activated, as you move your finger or Apple Pencil around the canvas, the content on different layers will be highlighted. Lifting your finger or Pencil will then select the highlighted layer beneath your touch. If multiple layers overlap in the area you're touching, a pop-up panel will appear, listing all available layers for you to choose from.
This feature can be further customized by assigning it to specific touch or Apple Pencil shortcuts. For Apple Pencil Pro users, the "squeeze" function can be assigned to Layer Select, offering a quick and seamless way to access this powerful tool. When you are painting, smudging, or erasing with a group selected in the Layers Panel, Layer Select can also automatically appear, streamlining your workflow.
Multi-select in Other Procreate Features
While the primary focus is on layer selection within the main canvas, it's worth noting that multi-select functionality extends to other areas of Procreate, particularly in relation to video and animation. For instance, in Procreate's animation features, you can use Multi-select to adjust the length and positioning of content and keyframes. By tapping the "Multi-select" button in the main toolbar, you can then circle or draw over content, tracks, or keyframes in your Timeline to select them. Holding down on one of the selected elements summons a context menu for actions like cutting, copying, and pasting. Similarly, within Flipbook (Procreate's animation assist feature), you can circle or draw over frames to select multiple frames and then tap and hold to bring up a context menu for frame manipulation.
Bulk Operations: Move, Lock, Duplicate, and Delete
Once multiple layers are selected, Procreate allows you to perform a range of "bulk operations" efficiently.
Moving and Rearranging Layers
Selected layers can be easily moved within the layer order. Tap and hold on one of your selected layers or a Layer Group. While holding, you can drag the entire selection up or down in the Layers Panel to reorder them. This is incredibly useful for adjusting the stacking order of elements in your artwork.
For moving layers between canvases, you can tap and hold a layer or group of layers to "pick them up." While still holding them, navigate to your Gallery and tap on your destination canvas with another finger. The selected layers will then be transferred.
Locking Layers for Protection
To prevent accidental edits to completed layers, Procreate offers a "Lock" function. When a layer is locked, a small padlock symbol appears next to its name in the Layers Panel. This acts as a safeguard, ensuring that your carefully crafted elements remain untouched until you choose to unlock them. You can lock multiple selected layers simultaneously by tapping the "Lock" option that appears when layers are selected.
Duplicating Layers for Iteration
The "Duplicate" function allows you to create an exact copy of an existing layer or a group of selected layers. This is essential for creating variations of an element, backing up your work, or building complex repeating patterns. Selecting multiple layers and then tapping "Duplicate" will create copies of each selected layer.
Deleting Layers
When you no longer need certain layers, "Delete" provides a way to remove them. You can select multiple layers and then tap the "Delete" option. It's important to note that deletion in Procreate should generally be considered permanent. While actions can be undone with a two-finger tap, it's always wise to ensure you have backups or are certain about your deletion choices. When you select a Secondary layer, "Delete" and "Group" are among the new options that appear on the top right of the Layers panel.
Understanding Layer Hierarchy and Selection
When you select multiple layers, one layer is designated as the "Primary layer" (bright blue) and the others as "Secondary layers" (dark blue). This distinction is important because certain contextual menus and options will appear based on the primary layer selected. For example, if you select content and keyframes and then tap and hold on a keyframe, you'll see a context menu specifically for keyframes. Similarly, if you've selected multiple layers and tap and hold on one to pick it up for moving, tapping other layers while still holding will add them to your drag selection.
Beyond Basic Selection: Other Layer Operations
Procreate offers a suite of other layer-specific actions that become more powerful when used in conjunction with multi-layer selection.
Renaming, Filling, and Clearing
Within the Layer Options menu (accessed by tapping a layer), you can "Rename" layers for better organization. "Fill Layer" allows you to color an entire layer with a selected color, and if Alpha Lock is enabled, it will only fill the existing artwork on that layer. "Clear" will remove all content from a layer.
Alpha Lock and Clipping Masks
While not directly multi-select functions, Alpha Lock and Clipping Masks are crucial for non-destructive editing and work in tandem with layer management. Alpha Lock restricts painting or drawing to the existing pixels on a layer. A Clipping Mask functions similarly but can be applied to any layer and can even be stacked above a base layer, allowing for sophisticated visual effects without altering the original artwork.
Merging Layers
"Merge Down" combines the active layer with the layer directly below it. You can also merge multiple groups with a simple pinch gesture by pinching together the top and bottom layers you wish to merge. Merging layers can help manage layer limits and simplify your canvas. This action can be undone immediately with a two-finger tap.
Advanced Procreate Techniques for Beginners | Master Procreate with These Tools
By mastering these various methods of selecting and manipulating multiple layers in Procreate, you unlock a new level of efficiency and creative control. From organizing complex projects with groups to performing bulk edits and leveraging advanced gesture controls, understanding multi-layer selection is fundamental to becoming a proficient Procreate artist.