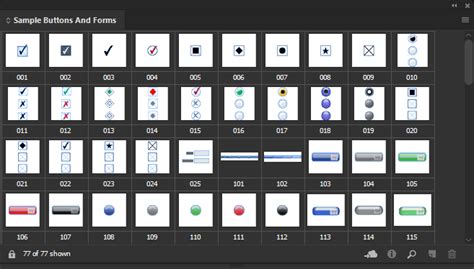
InDesign offers robust capabilities for creating interactive forms that can be exported directly to PDF. This functionality eliminates the need for post-creation edits in external PDF editors like Adobe Acrobat, streamlining the workflow for designers. The software supports a variety of common form elements, including text fields, radio buttons, checkboxes, and signature fields, all of which can be incorporated directly onto your document pages. The "Buttons and Forms" panel serves as the central hub for adding these interactive elements, and the procedures for implementing form fields are consistent with those for adding buttons, simplifying the learning curve. Forms designed in InDesign are fully compatible with Adobe Reader and Adobe Acrobat, ensuring broad accessibility.
A crucial aspect of creating user-friendly and accessible forms is the establishment of a logical tab order. This allows users to navigate through the form fields seamlessly using the Tab key, without requiring a mouse. For screen reader compatibility, it is essential to enable the "Use for Tagging order" option within the Articles panel menu when creating Tagged PDFs. This ensures that screen readers follow the predetermined navigation sequence.
Designing Forms with InDesign: Beyond Basic Layout
The ability to design forms directly within InDesign is a significant advantage for designers. You can add simple form elements directly within the document pages, integrating them into your overall design aesthetic. This means that common field types such as text fields, radio buttons, checkboxes, and signature fields are all supported and readily available for use. The "Buttons and Forms" panel is your primary tool for integrating these interactive elements into your layout. The process of adding interactive form fields is designed to be intuitive, mirroring the procedures for adding buttons, thus requiring no new, specialized knowledge.
The ultimate goal is to create forms that are not only functional but also work seamlessly with widely used applications like Adobe Reader and Adobe Acrobat. Beyond just functionality, the creation of user-friendly and accessible forms necessitates the assignment of a usable tab order. This ensures that users can navigate through the form fields efficiently without the need for a pointing device, enhancing the overall user experience. To further bolster accessibility, especially for users relying on screen readers, it's imperative to enable the "Use for Tagging order" from the Articles panel menu. This setting is critical for Tagged PDFs, as it dictates the sequence in which screen readers will interact with the form elements.
Advanced List Formatting: Checkboxes and Numbering
A particularly intriguing challenge encountered in InDesign involves creating lists where items are simultaneously numbered and feature bullet points that resemble checkboxes. While a rudimentary approach might involve manually typing a checkbox character followed by a tab and then the number, this method quickly becomes unmanageable for extensive lists or when the text needs to remain editable. Such a scenario would present a significant hurdle if items need to be added or removed, transforming a simple list into a tedious manual formatting task.
The need for an automated solution to set up paragraph styles for such complex list formatting led to an innovative approach. This method, developed by Kelly Vaughn, offers a clever and unconventional way to achieve this sophisticated formatting. The process begins by selecting all the text intended for the list.
Step 1: Creating the Numbered List Paragraph Style
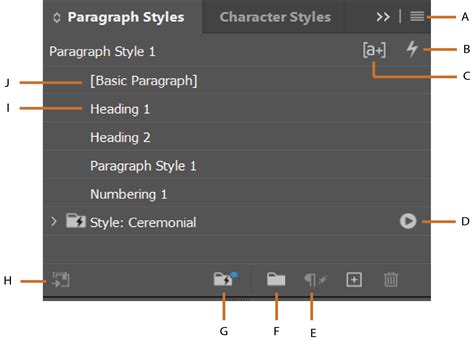
The first step involves establishing a paragraph style for the numbered list. After selecting the text, you would access the control panel, ensuring it's set to Paragraph formatting, and click the Numbered List button. With the text still selected, open the Paragraph Styles panel. Holding down the Option key (or Alt on Windows) and clicking the "New Paragraph Style" button is a crucial step. This action forces InDesign to open the "New Paragraph Style" dialog box and automatically imports the current formatting, including the numbered list attribute.
Within the dialog box, you can name the style, for instance, "numbered list." It's important to enable the "Apply Style to Selection" checkbox to immediately apply the new style to the selected paragraphs. A common preference is to disable the "Add to CC Library" checkbox, preventing paragraph styles from automatically appearing in the CC library, which can clutter the library for some users. Before finalizing, navigate to the "Bullets and Numbering" section. Here, ensure the "Mode" is set to "Continue from Previous Number" rather than "Start At number one," which would reset numbering for each paragraph. This setting ensures a continuous numbering sequence for the entire list. Clicking "OK" creates and applies this paragraph style.
Step 2: Crafting the Checkbox Bullet Paragraph Style
The next phase is to create a second paragraph style specifically for the checkbox bullet. Again, using the Paragraph Styles panel, Option/Alt-click the "New Paragraph Style" button to open the dialog box. Name this style, for example, "checkbox bullet." Crucially, unlike the previous style, you will not want this paragraph style to be applied to the existing paragraphs, so ensure the "Apply Style to Selection" checkbox is turned off.
Proceed to the "Bullets and Numbering" section and change the "List Type" from "Numbers" to "Bullets." The challenge now is to find or create a bullet character that resembles a checkbox. Since a direct checkbox bullet is not available, click the "Add" button on the right side of the dialog box. A reliable source for such characters is the Wingdings font, or alternatively, Zapf Dingbats. Type "WING" (or the relevant font name) and press Tab to display the font's characters. Scroll through the characters until you find a suitable checkbox symbol. Select it and ensure the "Remember Font with Bullet" checkbox is enabled. This step is vital as it links the chosen character to its specific font, ensuring consistency. Click "OK" to add the character to the dialog box, select it, and then click "OK" again to finalize the "checkbox bullet" paragraph style.
Step 3: Merging Styles with the Table of Contents Feature
The ingenious part of this technique lies in merging these two distinct paragraph styles - the numbered list and the checkbox bullet - into a single, cohesive list. This is achieved by leveraging the Table of Contents (TOC) feature in a highly unconventional manner.
First, select the text frame containing your list using the Selection tool and drag it off the main page onto the pasteboard. It's important that at least a small portion of the text frame remains touching the page for the TOC feature to function correctly.
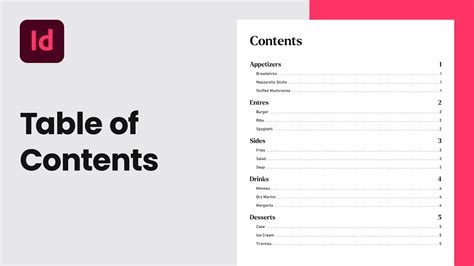
Next, navigate to the "Layout" menu and select "Table of Contents." In the dialog box that appears, delete the default title "Contents." Then, double-click on "numbered list" in the available styles list. This action moves it to the list on the right, effectively adding it to your table of contents. This is the paragraph style currently applied to your list paragraphs.
Ensure you can see all available options by clicking "More Options" if it appears. Within the "Page Number" pop-up menu, select "No Page Number" as you only require the text content, not associated page numbers. Above this, in the "Entry Style" pop-up menu, choose the "checkbox bullet" paragraph style you created. This assigns the checkbox appearance to each entry. Finally, uncheck the "Create PDF Bookmarks" option, as it's not needed for this purpose.
Upon clicking "OK," InDesign will scan for all paragraphs formatted with the "numbered list" paragraph style and generate a new list, applying the "checkbox bullet" paragraph style to each item.
Step 4: Applying and Updating the Merged List
After clicking "OK" in the Table of Contents dialog, InDesign's cursor will transform, loaded with your newly generated TOC. Click and drag to create a new text frame on your page. This frame will now display your list, featuring both numbering and checkbox bullets. The real power of this method lies in its dynamic nature; the list can be easily updated.
For instance, if you need to remove an item, such as "sky diving," triple-click on that line to select it and press Delete. InDesign will automatically adjust the numbering of the remaining items. To reflect these changes in the formatted list on your page, simply click inside the text frame containing the list, go to the "Layout" menu, and choose "Update Table of Contents." Clicking "OK" in the subsequent dialog will update your list, removing the deleted item. This seamless update process makes managing complex lists significantly more efficient.
InDesign Tutorial - Creating and Formatting Tables and Creating Interactive Forms
Ensuring Form Accessibility and Navigation
Beyond the visual design of forms, their accessibility and usability are paramount, especially when dealing with interactive elements like checkboxes. The concept of a "tab order" is fundamental to this. A well-defined tab order ensures that users can navigate through interactive fields sequentially using the Tab key. This is particularly important for individuals who rely on keyboard navigation due to motor impairments or for anyone who prefers not to use a mouse.
The Importance of Tab Order
When designing forms, the default tab order in InDesign might not always align with the logical flow of information. It's crucial to explicitly define this order to create a predictable and intuitive user experience. By assigning a usable tab order, you empower users to move from one field to the next in a logical progression, filling out the form efficiently without needing to click on each element individually. This not only enhances usability but also contributes significantly to the overall accessibility of your document.
Implementing Tab Order for Screen Readers
To make your forms accessible to users of screen readers, the tab order needs to be correctly interpreted by assistive technologies. This is achieved through PDF tagging. When exporting your InDesign document as a Tagged PDF, you must ensure that the tab order is correctly embedded. InDesign provides a mechanism for this within the "Articles" panel.
By enabling the "Use for Tagging order" option from the Articles panel menu, you instruct InDesign to use the order of items within the Articles panel as the basis for the PDF tags. This means that if you have organized your form fields logically within the Articles panel, screen readers will follow that same logical order when navigating the form. Therefore, meticulously arranging your form elements within the Articles panel is a critical step in ensuring that your interactive forms are fully accessible to all users, regardless of their input methods or assistive technologies.
Advanced Form Field Considerations
While InDesign provides a robust set of tools for creating interactive PDF forms, understanding the nuances of different form field types and their behaviors is key to designing effective and professional forms. Each field type serves a specific purpose, and their correct implementation can significantly impact user experience and data collection accuracy.
Checkboxes: Simple Selections
Checkboxes are ideal for scenarios where a user can select one or more options from a list. For example, in a survey, a user might select multiple interests from a provided list of checkboxes. When designing checkboxes in InDesign, you can define their appearance, including their default state (checked or unchecked). It's also important to consider their labels, ensuring they are clear and concise, accurately describing the option the checkbox represents.
Radio Buttons: Exclusive Choices
Radio buttons, in contrast to checkboxes, are used when a user must select only one option from a group. For instance, a "Gender" field might offer "Male," "Female," and "Other" as radio button options, where selecting one automatically desists the selection of another. In InDesign, you group radio buttons together to ensure this exclusive selection behavior. When creating a group of radio buttons, you designate one as the default selected option if necessary.
Text Fields: Data Input
Text fields are the most common form element, used for collecting free-form text input from users. This can range from simple name fields to more complex comment boxes. In InDesign, you can specify the type of text field (single-line or multi-line) and set options such as character limits or formatting rules. For enhanced accessibility, consider providing clear placeholder text within the field to guide users on the expected input.
Signature Fields: Digital Signatures
For forms requiring a legal or official signature, InDesign supports signature fields. These fields allow users to digitally sign the document, typically using Adobe Acrobat or Adobe Reader. When exporting to PDF, these fields are recognized, enabling the digital signature process. It's important to clearly indicate where a signature is required and to inform users about the process involved in providing their digital signature.
Exporting and Testing Interactive Forms
Once your form is designed and all interactive elements are in place, the final step is exporting it to PDF and thoroughly testing its functionality. InDesign's "Export Adobe PDF" function is where you'll enable the interactive features.
Exporting to Interactive PDF
When you go to "File > Export," choose "Adobe PDF (Interactive)" as the format. Within the export dialog box, ensure that options related to forms and interactivity are enabled. This typically includes settings for form fields and JavaScript actions, if you've incorporated any. Properly exporting as an interactive PDF is crucial for the form fields to function correctly in viewers like Adobe Reader and Acrobat.
Rigorous Testing
After exporting, it is absolutely essential to test your form thoroughly. Open the exported PDF in Adobe Reader and Adobe Acrobat. Navigate through all the fields using the Tab key to verify the tab order. Test each checkbox, radio button, and text field to ensure they behave as expected. Submit the form (if it has a submit button) to check if data is captured correctly. Verify that any special formatting or validation rules you've applied are functioning as intended. This testing phase is critical for catching any errors or usability issues before distributing the form.
By following these steps, designers can effectively create and implement interactive forms within InDesign, leveraging its powerful features to produce professional, user-friendly, and accessible documents.