Adobe Photoshop, a cornerstone of digital image editing, offers a robust suite of tools to transform ordinary images into stunning works of art. For both beginners and seasoned professionals, understanding the nuances of Photoshop can unlock immense creative potential. A particularly powerful, yet sometimes underutilized, feature is Creative Cloud Libraries. This web service acts as a central hub, allowing seamless access to your assets across various Adobe desktop and mobile applications, significantly streamlining workflow and enhancing project consistency. This tutorial delves into the intricacies of Creative Cloud Libraries within Photoshop, exploring how to manage, utilize, and integrate your creative assets effectively.
Understanding the Creative Cloud Libraries Panel
The Libraries panel in Photoshop serves as your gateway to this powerful asset management system. You can access it by navigating to the Window menu and selecting "Libraries." Upon opening, you'll be presented with a panel displaying all your current resources and libraries. This panel is structured to house multiple libraries, each acting as a distinct group or folder for your assets, organized thematically or by project. At the top level, you can view all your library names, and more efficiently, search across all libraries for a particular resource or asset. Therefore, adopting a clear and descriptive naming convention for your assets is crucial for quick and effective retrieval. While there isn't a strict limit on the number of libraries you can create, maintaining a manageable number will prevent excessive scrolling through hundreds of options.
Key Components of the Libraries Panel:
- Libraries List (A): Displays all your created libraries.
- Search (B): A search bar to quickly find specific assets across all your libraries.
- Assets (C): Shows the individual assets within the currently selected library.
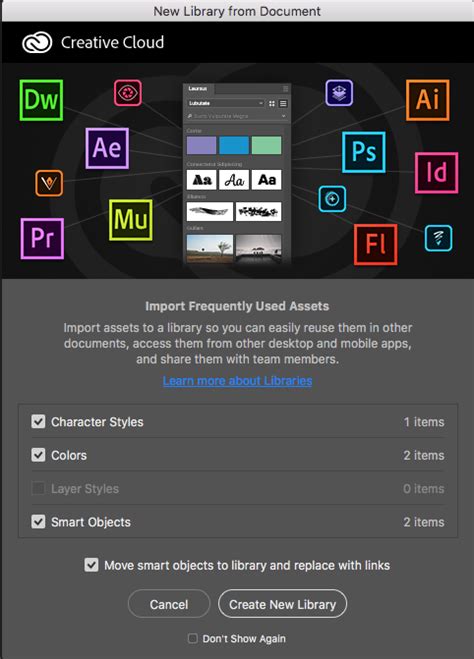
- Library from Document (D): A function to create a new library directly from the assets present in your open document.
- Add Graphics (E), Add Character Style (F), Add Layer Style (H): Buttons or options to add specific types of assets to the current library.
- Sync Status (I): Indicates whether your libraries are syncing correctly across devices.
- Delete (J): Option to remove selected assets or entire libraries.
- Show items in a list (K): Toggles between list and grid view for assets.
- Libraries Options (L): Provides access to settings for managing libraries, such as creating new ones or importing/exporting.
Creating and Populating Your Libraries
The ability to create new libraries is fundamental to organizing your creative assets. You can initiate this process directly within the Libraries panel. This is particularly useful for segmenting assets by project, client, or type, ensuring a clean and efficient workflow.
Adding Assets to Libraries:
There are several methods for adding assets to your Creative Cloud Libraries:
- Drag and Drop: You can directly drag layers, layer styles, character styles, graphics, or even entire layer groups from your Photoshop document into the desired library within the Libraries panel. As you drag an item over the panel, a '+' symbol will appear, indicating where it will be placed. The format of the asset (e.g., 'layer', 'smart object') will often be displayed.
- Using "Add" Buttons: Specific buttons within the Libraries panel allow you to add foreground colors, character styles, and layer styles directly. For instance, to add a character style, you would first format your text with the desired font, size, and color, then click "Add Character Style (F)." Similarly, layer styles can be added by clicking "Add Layer Style (G)."
- "Library from Document" Feature: When you open a document that contains assets that can be automatically added to a library, Photoshop may prompt you to create a new library. Alternatively, you can manually initiate this by clicking "Library from Document (D)" in the Libraries panel. This is a convenient way to capture all relevant elements from a project into a dedicated library.
- Adding All Selected Items: If you have multiple shapes or elements selected, you can often use an "Add All" option. However, be mindful that this might add them as a single group, which may not always be the most useful organization.

Recommended Asset Formats:
While various asset types can be stored, saving elements as Smart Objects is highly recommended. A Smart Object encapsulates all its component assets, including smart filters, adjustments, shapes, brushes, and styles. When you drag a Smart Object from a library back into a Photoshop document, it retains all its editable properties. This means you can double-click the Smart Object layer in your Layers panel to access and modify its original components, and these changes can then be reflected in the library if desired.
Utilizing Assets from Libraries in Photoshop
Once your assets are in a Creative Cloud Library, they become readily accessible in any Photoshop document, across multiple devices, and even in other Creative Cloud applications like Illustrator and After Effects.
Linked vs. Unlinked Assets:
When you use an asset from a library in your Photoshop document, you have two primary options:
- Linked Assets: These are instances that remain associated with the original asset in the library. When the original asset in the library is updated, its linked instances in your Photoshop documents will automatically update as well. Crucially, any effects or adjustments applied to these instances in Photoshop are retained during the update. This is invaluable for maintaining consistency across multiple projects or versions of a design.
- Unlinked Assets: These assets are embedded directly into your Photoshop document and become decoupled from the original library asset. Photoshop places the asset as a new layer within your document. While this offers complete independence, you lose the benefit of automatic updates if the original library asset changes. To create an unlinked asset, hold down the Alt (Windows) or Option (macOS) key while dragging the item from the library into your document.
Accessing and Editing Library Assets:
To use an asset from your library, simply drag it from the Libraries panel into your Photoshop document. If you've dragged a Smart Object, you'll notice it appears as a smart filter layer. Any modifications you make to this Smart Object in your Photoshop document are initially local. If you wish for these changes to be reflected in the library itself, you would typically need to re-save or update the asset in the library.
Breaking the Link:
As mentioned, holding Alt/Option while dragging creates an unlinked copy. If you have already placed a linked asset and wish to break its connection to the library, you can right-click on the asset within the Libraries panel and look for options like "Duplicate" or "Copy to…" which might allow you to create a standalone version, or you might need to manually recreate it as an unlinked asset.
Advanced Library Management and Integration
Creative Cloud Libraries extend beyond simple asset storage; they facilitate sophisticated workflow enhancements and inter-application collaboration.
Renaming and Organizing Assets:
Within the Libraries panel, you can right-click on an asset to access options for renaming, duplicating, or copying it to another library. You can also add descriptions of up to 130 characters to assets, providing further context and aiding in future searches.
Importing and Exporting Libraries:
The Libraries Options (L) menu offers the ability to create new libraries, import existing libraries (in .cclib format), and export libraries. Exporting a library allows you to share your organized assets with collaborators or clients, who can then import them into their own Creative Cloud environments.
Integration with Other Creative Cloud Apps:
Creative Cloud Libraries are the connective tissue between Adobe's applications. Assets stored in a library can be seamlessly accessed and utilized in:
- Adobe Illustrator: Drag vector graphics, colors, and text styles directly into your Illustrator projects.
- Adobe After Effects: Incorporate graphics, animations, and compositions from your libraries into motion graphics and visual effects.
- Adobe Premiere Pro: Use graphics, titles, and color palettes within your video editing projects.
- Adobe Fresco and Adobe Capture: Mobile applications can also contribute to and access Creative Cloud Libraries, allowing you to capture elements from the real world (like colors or shapes) and bring them into your Photoshop workflow.
This cross-application compatibility ensures that your brand assets, design elements, and reusable components are consistent across all your creative endeavors.

Adobe Stock Integration:
Adobe Stock is deeply integrated with Creative Cloud Libraries. You can search for and license stock assets directly from within the Libraries panel. Once licensed, these assets can be added to your libraries, making them readily available for use in your Photoshop projects and across other Creative Cloud applications. The visual search functionality within the Libraries panel even allows you to find stock images that are visually similar to an existing library element, accelerating the process of finding the perfect visual.
Enhancing Your Photoshop Workflow with Libraries
Beyond asset management, Creative Cloud Libraries contribute to a more efficient and professional Photoshop workflow.
Consistency and Brand Identity:
For designers working on multiple projects or for larger teams, maintaining brand consistency is paramount. Libraries allow you to store and share approved color palettes, typography styles, logos, and graphic elements. This ensures that every project adheres to brand guidelines, regardless of who is working on it.
Saving Time and Reducing Redundancy:
Instead of repeatedly recreating common elements like gradients, brushes, or layer styles, you can save them to a library once and access them instantly. This significantly reduces redundant work and frees up time for more creative tasks.
Collaboration Made Easy:
Creative Cloud Libraries facilitate seamless collaboration. Team members can share libraries, ensuring everyone is working with the latest versions of assets and maintaining a unified design language. This is particularly beneficial for projects involving multiple designers, editors, or developers.
Photoshop Fundamentals and Creative Cloud Resources
While this tutorial focuses on Creative Cloud Libraries, it's worth noting the broader context of Photoshop's capabilities and the extensive learning resources available.
Core Photoshop Tools and Techniques:
Photoshop offers powerful tools for image enhancement, including:
- Cropping and Resizing: Essential for focusing on subjects and preparing images for different platforms (e.g., web images often require reduced file size).
- Color and Tone Adjustments: Brightness and contrast controls, Levels, and Curves allow for fine-tuning image tonality.
- Layers and Masks: Fundamental for non-destructive editing, allowing independent manipulation of image elements and selective visibility.
- Blending Modes: Control how layers interact with each other, creating unique visual effects.
- Photo Manipulation: Advanced techniques like Content-Aware editing, Clone Stamp, and Frequency Separation enable sophisticated retouching and image transformation.
- Filters: Offer a wide range of creative effects, with Smart Filters providing non-destructive application and editability.
Typography and Graphic Design:
Photoshop is also a powerful tool for graphic design. The Type Tool allows for text creation and editing, with options for precise positioning and styling. Text layers are versatile, supporting effects, Warp Text, and integration with layer masks for seamless blending. Creating custom brushes and text styles further enhances design capabilities. For graphic design projects like logos, web graphics, and print materials, Photoshop provides the tools to craft compelling visuals, with tutorials available to refine these skills.
Learning Resources:
Adobe Creative Cloud offers a wealth of resources for learning Photoshop, including:
- Dedicated Learn Photoshop Section: Content organized by topic and difficulty, featuring video lessons, step-by-step guides, and hands-on projects.
- Online Tutorials: Many tutorials are available online and do not require downloads, though some may offer downloadable project files for interactive learning.
- Step-by-Step Guides: Break down complex tasks into manageable steps.
- Online Forums and User Groups: Provide peer support and opportunities for community learning.
Student and Teacher Discounts:
Adobe provides special deals and resources for students and teachers, offering significant savings on Photoshop and the entire Creative Cloud suite. These versions contain the same features as the full professional versions, making powerful design tools accessible for educational purposes.
Optimizing Your Photoshop Experience
To further enhance your productivity within Photoshop, consider these workflow optimizations:
- Workspace Customization: Dragging panels and adjusting the workspace layout to suit your preferences can greatly improve efficiency.
- Keyboard Shortcuts: Setting up custom keyboard shortcuts for your most-used tools and menu items (Edit > Keyboard Shortcuts) can dramatically speed up your workflow. Grouping similar tools logically on custom toolbars can also be beneficial.
- Batch Processing: Photoshop's batch tools, such as Droplets, allow you to apply the same edits to an entire folder of photos automatically. Scripts can also be used for more complex automated tasks.
By mastering Creative Cloud Libraries and integrating them with Photoshop's extensive toolset, you can elevate your creative process, ensuring consistency, efficiency, and seamless collaboration across all your design projects. The ability to store, access, and share assets across applications transforms how you work, allowing you to focus more on creativity and less on repetitive tasks.