Creating compelling audio visualizations within DaVinci Resolve can elevate your video projects, transforming static sound into a dynamic visual experience. This guide delves into the process, leveraging powerful tools and techniques to achieve professional-grade results. We will explore the core concepts, the essential plugins, and the step-by-step implementation required to build a sophisticated audio visualizer that reacts precisely to your music.
The Foundation: Understanding Audio Visualizers
At its heart, an audio visualizer translates the characteristics of sound - amplitude, frequency, and timing - into visual elements. This translation can manifest in various forms, from simple waveform displays to complex, abstract animations. The fundamental principle involves analyzing the audio track and mapping its data points to changes in visual properties like size, position, color, and motion.
The process typically begins by extracting the audio data. This raw data represents the sound's intensity over time. For a basic visualizer, this data can be directly mapped to a visual representation, such as a line graph that moves up and down with the audio's volume. More advanced visualizers involve complex algorithms that interpret frequency content to drive different visual elements, creating a richer and more engaging experience.
Harnessing the Power of Reactor and the Audio Waveform Plugin
To achieve sophisticated audio visualizations in DaVinci Resolve, external tools often become invaluable. One such powerful combination is the use of the "Reactor" system, a popular plugin host, in conjunction with a dedicated "Audio Waveform" plugin. These tools streamline the process, offering pre-built functionalities that can be customized to your specific needs.
The "Audio Waveform" plugin, when installed and integrated via Reactor, provides the fundamental capability to generate visual representations of your audio. Its core function is to analyze the incoming audio signal and output a corresponding visual element. This can be a simple line, a series of bars, or even more complex shapes, all driven by the nuances of the sound.
Installation and Setup:
The first crucial step is to ensure proper installation of both Reactor and the Audio Waveform plugin. Typically, this involves downloading the necessary files from their respective developers and following the provided installation instructions. For Reactor, this often means placing its files in a specific DaVinci Resolve plugin directory. The Audio Waveform plugin will then be accessible through Reactor. Once installed, these tools become integrated into DaVinci Resolve's effects library, ready to be applied to your timeline.
Building the Base Visualizer Effect
With the necessary plugins in place, the initial phase of creating the audio visualizer involves setting up the base effect. This stage focuses on establishing the fundamental visual element that will represent the audio. The Audio Waveform plugin will be applied to a dedicated Fusion composition or directly within the Edit page if the plugin supports it.
The plugin itself will offer various parameters to control the appearance of the visualizer. These might include options for line thickness, color, opacity, and the overall shape of the waveform. Experimenting with these initial settings is key to establishing the desired aesthetic for your visualization. At this point, you can have a functional visualizer that reacts to the audio.
The first part of the video tutorial focuses on establishing this base effect. You can choose to leave the visualizer at this stage if its behavior aligns with your project's requirements. The default settings often provide a good starting point, allowing the waveform to appear and react to the audio's amplitude.
Refining the Timing: Achieving Precise Start-to-End Synchronization
A common challenge, and one that often distinguishes a basic visualizer from a polished one, is ensuring that the visualizer begins precisely when the audio begins and completes its animation in sync with the audio's duration. "Unluckily," as the original prompt notes, "my OCD kicked in and I just had to figure out how to make the visualiser actually start at… you know the start of the audio waveform." This desire for perfect synchronization is a hallmark of professional video production.
The solution to this timing issue often lies in manipulating the playback or animation of the visualizer itself, independent of the audio track's timeline. This involves introducing controls that can stretch, compress, or offset the animation.
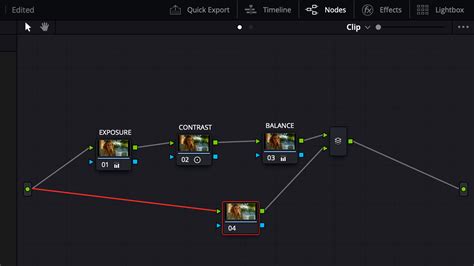
The Stretch Node and Transform Nodes for Precise Timing:
To achieve the desired start-to-end synchronization, a clever combination of nodes within DaVinci Resolve's Fusion page is employed. The core of this solution involves:
The Stretch Node: This node is crucial for manipulating the duration of an animation or effect. By applying a stretch node to the output of the Audio Waveform plugin, you gain control over how its animation unfolds over time. The goal here is to stretch the visualizer's animation to match the exact duration of your audio clip.
Transform Nodes: Two transform nodes are then utilized to refine the positioning and timing of the stretched visualizer.
Transform Node 1 (Default Value X = 0.5): This node is typically used to adjust the horizontal position of the visualizer. Setting the X value to 0.5 often centers the visualizer or places it at a specific point within the frame. This node might be used to position the "ongoing" part of the visualizer.
Transform Node 2 (Value of X = 1): This second transform node plays a critical role in the delayed start. By setting its X value to 1, you effectively push this instance of the visualizer further along the horizontal axis. This is where the magic of delayed synchronization happens.
How it Works Together:
The concept is to have two instances or representations of the visualizer's animation. The first instance, potentially controlled by the default transform node, might represent the ongoing, real-time visualization. The second instance, however, is deliberately delayed.
The stretch node ensures that the animation of the visualizer, when applied to the entire duration of the audio, will unfold correctly. Then, the two transform nodes work in tandem. The first transform node might set up the initial visualizer, while the second transform node, with its X value of 1, creates a delayed version. This delay is achieved because the visualizer's animation, when stretched to the full audio length, is now being "read" from a different point in its own timeline due to the transform.
"This makes it so that the time-stretched part of the visualizer is displayed at the bottom and is delayed until the original waveform comes to the end." This statement elegantly describes the outcome. The stretched visualizer's animation, when processed through the second transform node with X=1, effectively delays its appearance on screen. It waits for the "original waveform" (referring to the natural progression of the audio) to reach a certain point, at which point this delayed visualizer animation then "catches up" or aligns.
Advanced Customization and Creative Applications
Once the fundamental synchronization is achieved, the possibilities for customization are vast. The Audio Waveform plugin and the underlying Fusion nodes offer a plethora of parameters that can be tweaked to achieve unique visual styles.
Color and Gradients: Instead of a single color, explore using gradients to add depth and dynamism. The color of the visualizer can be linked to the audio's frequency content, with different colors representing different frequency ranges. For instance, low frequencies could be represented by blues and purples, while high frequencies might be depicted as reds and oranges.
Shape and Form: Beyond simple lines, consider how the visualizer's shape can evolve. Can it be a series of pulsing circles, expanding bars, or even more abstract particle systems? Many plugins allow for the manipulation of points, curves, and even 3D geometry, all driven by the audio data.
Motion and Animation: The base visualizer might simply rise and fall with amplitude. However, you can introduce secondary animations. This could include subtle pulsing, rotation, or even movement across the screen, all synchronized with the audio's rhythm and intensity. The transform nodes, when keyframed or expression-driven, can add significant motion.
Integration with Other Visual Elements: The audio visualizer doesn't have to exist in isolation. It can be layered with other video footage, graphics, or text. Consider how the visualizer can interact with these elements. For example, it could cast light or shadows, or its motion could trigger other animations.
Using Audio Data for More Than Just Amplitude: While amplitude is the most straightforward audio characteristic to visualize, frequency analysis opens up a new dimension. Plugins can often break down audio into frequency bands (bass, mid-range, treble). Each band can then be used to control different visual parameters, creating a rich, multi-layered visualization. This allows for a more nuanced representation of the music's complexity.
How to Edit Advanced Animations in DaVinci Resolve (IN-DEPTH)
Understanding the Underlying Principles: First Principles and Lateral Thinking
To truly master audio visualization, it's beneficial to think from first principles. What is the core data we are working with? It's a time-series dataset representing sound pressure levels. How can we map this data to visual attributes? This involves understanding concepts like:
- Mapping: Assigning numerical values from the audio data to visual properties.
- Keyframing and Expressions: Using animation techniques to control how these mappings change over time.
- Node-Based Compositing: Understanding how individual nodes in Fusion interact to build complex effects.
- Time Stretching: Manipulating the duration of an animation sequence.
Lateral thinking also plays a role. Instead of just using the audio waveform as a direct representation, consider indirect methods. Could the silence in the audio trigger a visual event? Could the transient sounds (like drum hits) cause a burst of particles? Thinking about the implications of the audio beyond its most obvious characteristics can lead to highly original visualizations.
Avoiding Clichés and Common Misconceptions
When creating audio visualizers, it's easy to fall into common traps. One such cliché is the generic "bar graph" visualizer that simply bounces up and down. While functional, it lacks originality. Another misconception is that audio visualization is solely about representing volume. As discussed, frequency and rhythm offer far richer possibilities.
Furthermore, over-reliance on default settings can lead to a generic look. The power of DaVinci Resolve and its plugins lies in their customizability. Pushing beyond the presets and experimenting with parameters will yield more unique and impactful results.
A common misconception is that advanced audio visualization requires extensive programming knowledge. While scripting can enhance capabilities, powerful tools like Reactor and dedicated plugins often provide robust functionality through intuitive interfaces, making advanced visualization accessible to a wider range of users.
Considerations for Different Audiences
The approach to audio visualization can be tailored to suit various audiences and project types.
For a 5th Grader: A simple, brightly colored waveform that bobs enthusiastically with the music. Focus on clear, direct mapping of volume to height. The visual should be energetic and easy to understand.
For a General Audience (e.g., YouTube Content Creators): A visually appealing and dynamic visualization that complements the video content. This might involve more stylized waveforms, subtle animations, and color schemes that match the video's mood. Synchronization with the audio's beats is often appreciated.
For Professional Video Editors/Motion Designers: Highly customizable and technically precise visualizations. This involves deep dives into Fusion, potentially using expressions to link multiple parameters, and integrating custom textures or 3D elements. The goal is often to create a unique visual identity for the audio.
The techniques discussed, particularly the use of stretch and transform nodes for precise timing, are applicable across these levels, with the complexity of the visual output increasing based on the user's skill and desired outcome.
The Second and Third Order Implications of Dynamic Visualizations
The impact of well-executed audio visualization extends beyond mere aesthetics.
Enhanced Engagement: Dynamic visuals capture and hold viewer attention more effectively than static content. They create a more immersive experience, drawing the audience deeper into the content.
Emotional Resonance: Visualizations can amplify the emotional impact of music. A fast, energetic visualizer can underscore the excitement of a track, while a slow, flowing visualizer can enhance a melancholic mood.
Brand Identity: For musicians and content creators, a consistent and unique audio visualizer can become part of their brand identity. It's a recognizable element that helps audiences connect with their work.
Accessibility: For viewers who may be deaf or hard of hearing, audio visualizations can provide a visual interpretation of the sound, making the content more accessible and engaging.
Technical Sophistication: The ability to create precise and complex audio visualizations demonstrates a high level of technical skill within DaVinci Resolve, which can be a selling point for freelance professionals.
By understanding these deeper implications, creators can move beyond simply making a visualizer and instead craft a powerful communicative tool that enhances their overall message. The careful application of nodes like the stretch node and transform nodes, as detailed in this guide, is a testament to the detailed control available within DaVinci Resolve for achieving such sophisticated results.
tags: #davinci #resolve #audio #visualiser