Substance Painter stands as a potent tool, capable of significantly elevating the visual fidelity of 3D assets. Despite its power, it remains an underutilized gem for many motion designers and 3D artists. This guide aims to demystify Substance Painter, providing a clear pathway to integrate it into your existing 3D workflow, enhancing your renders with unparalleled detail and life. While the built-in texturing tools in many leading software packages can be powerful, they often present a steep learning curve or are too cumbersome for efficient workflow. This is precisely where Substance Painter shines, offering a more intuitive and effective approach to material authoring.
Understanding the Power of Substance Painter
At its core, Substance Painter can be conceptualized as a sophisticated Photoshop tailored specifically for 3D models. It empowers artists to hand-paint textures directly onto their 3D assets, seamlessly blending this manual artistry with procedural tools. This combination allows for the creation of intricate details, such as realistic edge wear, grime, and surface imperfections, that would be incredibly time-consuming, if not impossible, to achieve through traditional methods.
A significant challenge in the realm of 3D rendering is the inherent variability in how different render engines handle material properties. Each engine may possess unique methodologies for achieving similar visual outcomes, leading to a fragmented and often frustrating workflow. Substance Painter addresses this by acting as a universal material editor. It enables the creation of highly detailed and customized materials that can then be rendered consistently across a multitude of render engines. This means an exceptional material crafted for Octane can be effortlessly adapted for standard renderers, Redshift, or even real-time engines like Unreal Engine, ensuring visual parity regardless of the final output.
This versatility is a cornerstone of Substance Painter's appeal. It automates many of the complex technical aspects involved in texture conversion, freeing artists to concentrate on their creative vision. The software intelligently manages the translation of texture maps and material properties, allowing for a more fluid and enjoyable creative process.
Preparing Your Model for Substance Painter in Cinema 4D
Before diving into Substance Painter, it is crucial to prepare your 3D model correctly. A fundamental requirement for Substance Painter is that your model must be UV unwrapped. If you are new to UV unwrapping, resources exist to guide you through the process using modern UV tools. However, to streamline the learning experience, this tutorial provides a pre-UV unwrapped 3D model, allowing you to focus on the texturing aspect.
The initial step in Cinema 4D involves creating a single material for your object. For the purpose of this tutorial, we will use the "SOM Pyramids" model. Utilizing a single material significantly streamlines the workflow once you transition to Substance Painter.
- Assign a Material: Select your object and create a new material.
- Utilize Fill Selection Tool: Navigate to the Polygon mode. Activate the Fill Selection Tool (U+F). This tool allows for the individual selection of polygons, which in this case, are the individual pyramids.
- Apply Vertex Colors: Select each pyramid individually. Hold down the Shift key and switch to point selection mode to select all associated points. Then, bring up the Commander (Shift+C) and type "Vertex." This action will assign a vertex color to the selected geometry, typically appearing as black by default.
- Color Sampling: To ensure color accuracy, sample the desired colors from the School of Motion Logo provided in the program files. With a pyramid selected, use the color picker to sample the target color and then apply it. Repeat this process for all pyramids, ensuring your color scheme is consistent.
Once your model is colored and prepared in Cinema 4D, it's time to export it for use in Substance Painter.
Exporting and Baking Your Model in Substance Painter
The export process from Cinema 4D to Substance Painter is critical for preserving your model's data.
- Export as FBX: Ensure your model has a UV tag applied, as this contains all essential UV information. Navigate to File > Export > FBX. In the export window, critically, make sure the "Vertex Colors" box is checked. This option ensures that the vertex color information you painstakingly applied in Cinema 4D is transferred to Substance Painter.
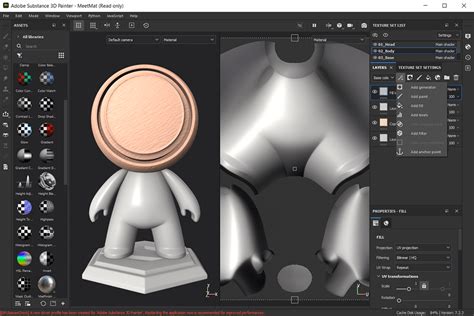
- Import into Substance Painter: Open Substance Painter and import the FBX file you just exported. Drag and drop the file into the application. Crucially, deactivate "Auto-Unwrap" and set your Template to "Metallic Roughness." This template is a standard and widely compatible setup for physically based rendering (PBR) workflows. Click "OK" to load your model. You should now see your model and its corresponding UV map. A quick test to confirm functionality: try drawing on the model; your strokes should be accurately reflected on the UV map.
Before you can begin texturing in earnest, the process of "baking mesh maps" is essential. This step generates crucial data that Substance Painter uses for advanced texturing techniques.
- Access Texture Set Settings: Locate the "Texture Set Settings" panel within Substance Painter.
- Bake Mesh Maps: Scroll down to find the "Bake Mesh Maps" option and click it. This action opens a dedicated window. Typically, this is where you would import a high-polygon mesh (e.g., from ZBrush) to bake details onto a lower-polygon model. However, for this workflow, we will leverage vertex colors.
- Configure Baking Settings:
- ID: Under the "ID" section, change the color source to "Vertex Color." This tells Substance Painter to use the colors you assigned in Cinema 4D as identifiers for different parts of your model.
- Common: In the "Common" tab, increase the "Output resolution" to "2K" (or your desired resolution). Higher resolutions provide more detail for your textures.
- Bake Textures: Click "Bake Selected Textures."
Baking essentially generates a suite of utility maps, including normals, ambient occlusion (AO), curvature, and position maps. These maps provide crucial surface information that Substance Painter's procedural tools and generators utilize to create realistic effects like edge wear, dirt accumulation, and surface imperfections. Without these baked maps, generators would have no data to work with, and the resulting textures would lack depth and realism.
EVERYTHING you need to know about SUBSTANCE PAINTER!
Leveraging Masks and Generators for Dynamic Texturing
With your model baked and ready, you can now delve into the creative process of texturing. Within the "Project" tab, you'll find your UV map, which was colored in Cinema 4D. Dragging these colors into the "Fill" option of a layer allows you to assign base materials to specific sections of your model based on those vertex colors.
Let's explore the "Shelf" to find and apply materials. For this example, we'll combine two materials: a plastic base and a metallic surface.
- Apply Base Material: Drag your chosen plastic material onto your object. Initially, it might override the vertex colors. To retain your color scheme, deselect the color influence for that layer. Substance Painter will now respect the Fill layer's colors, applying the plastic material while preserving your custom colorization.
- Add Secondary Material: Repeat the process with an aluminum material. This adds depth and visual interest to the object.
Now, the goal is to apply the metallic material selectively, specifically to the edges, to create a more realistic and less uniform appearance.
- Add a Black Mask: To isolate the metallic material, add a "Black Mask" to the aluminum layer. A black mask conceals the layer's properties. You can then "paint away" the black to reveal the aluminum where desired, much like in Photoshop.
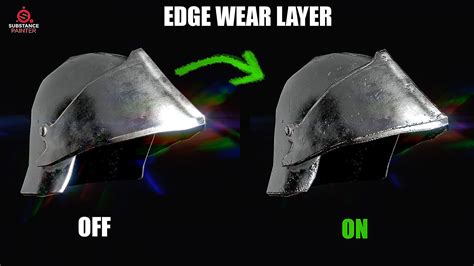
- Utilize Generators: With the mask selected, click the "Wand" icon and choose "Add Generator." This opens a library of procedural generators. Select a generator like "Metal Edge Wear."
- Observe Generator Effects: The "Metal Edge Wear" generator will automatically apply the underlying aluminum material to the edges of your object, based on the baked curvature and ambient occlusion maps. This is where the baking process becomes indispensable; these generators rely heavily on the data from the utility maps to produce clean and impressive results.
Substance Painter offers a vast array of generators and masks, allowing for intricate control over material application. You can tweak parameters, adjust intensity, and combine multiple generators and masks to achieve virtually any textural effect imaginable. This iterative process of layering, masking, and generating allows for a highly dynamic and non-destructive texturing workflow.
Exporting Textures for Cinema 4D and Building Shaders
Once you are satisfied with the texturing in Substance Painter, the next step is to export these textures and set up your shaders back in Cinema 4D.
- Export Textures: Navigate to File > Export Textures. You will see a preview of all the texture maps that will be generated. While you might not need every single map, it's generally safe to export them all.
- Select Destination and Preset: Choose your desired file destination. For Cinema 4D, setting the Texture format to "Metallic Roughness" is highly recommended as it's compatible with most renderers. For specific renderers like Redshift or Octane, you can select their respective presets, which are optimized for those engines. The default preset generally works well for standard Cinema 4D materials. Click "Export."
Now, let's integrate these exported textures into a shader within Cinema 4D.
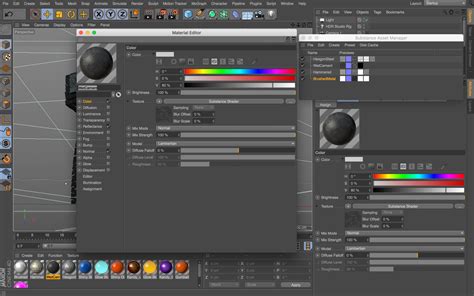
- Open Cinema 4D Material: Go back to Cinema 4D and select the material you initially created for your object.
- Configure Shader Channels:
- Basic Menu: In the "Basic" tab of the material settings, you can begin building your shader. While you can achieve advanced results within the "Reflectance" channel, we will focus on the "Color" channel for this demonstration.
- Normal and Displacement: Activate the "Normal" channel (for your Bump Map) and the "Displacement" channel.
- Color Channel: Under the "Color" tab, within the "Texture" section, drag and drop the exported "Base Color" map. This will bring your original color scheme back into the material.
- Reflectance Channel: Navigate to the "Reflectance" tab. Remove the "Default Specular" and add a new layer, selecting "GGX" as the reflectance type. This provides a physically plausible specular highlight.
- Roughness Map: Scroll down to "Roughness." Expand the "Textures" section and drag in your exported "Roughness Map." This map controls the micro-level variations in surface reflectivity, making materials look less perfectly smooth.
- Metallic Map: Under "Reflection Strength," you can add your exported "Metallic Map." This map dictates which parts of the material are metallic and which are not, influencing how light interacts with the surface.
- Normal Map: Go to the "Normal" tab and drag in your exported "Normal Map." This map simulates surface detail without adding actual geometry, creating the illusion of bumps, dents, and scratches.
- Displacement: Finally, go to the "Displacement" tab and add your exported displacement map. This map adds actual geometric detail by displacing the model's polygons. Exercise caution and start with a low "Height" value, as excessive displacement can distort your model. Ensure "Sub Polygon Displacement" is activated; this subdivides your model dynamically during rendering, allowing for finer displacement detail.
Achieving Realistic Renders
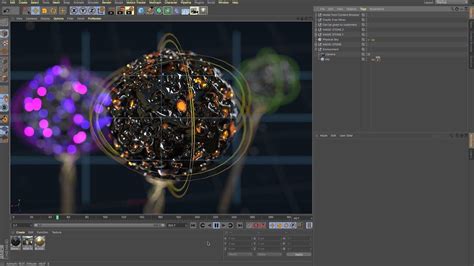
With your shader fully constructed in Cinema 4D, it's time to render and witness the results of your Substance Painter workflow. Add your model to a scene with appropriate lighting and environment setup.
The rendered output should showcase remarkably well-transferred textures, with the intricate details and material properties you created in Substance Painter faithfully represented. This seamless integration highlights the power of Substance Painter as a bridge between artistic creation and technical rendering.
The ability to author complex, layered materials in Substance Painter and then efficiently export them for use in various render engines like Cinema 4D, Octane, Redshift, or even game engines, makes it an indispensable tool for any 3D artist aiming to elevate their work. The workflow, from preparing your model with vertex colors in Cinema 4D to baking mesh maps and utilizing generators in Substance Painter, culminating in the precise shader construction back in Cinema 4D, provides a robust and flexible pipeline for creating visually stunning 3D assets.
Substance Painter is more than just a texturing tool; it's a comprehensive material authoring solution that empowers artists to achieve a new level of detail and realism in their 3D projects. By mastering this workflow, you unlock the potential to create assets that are not only visually appealing but also technically sound and adaptable across different rendering environments. The investment in learning Substance Painter will undoubtedly pay dividends in the quality and efficiency of your 3D texturing endeavors.