DaVinci Resolve, a powerhouse in professional video editing, color correction, motion graphics, and visual effects, has long been a sought-after tool for creators. While its capabilities are undeniable, installing this near-3GB behemoth on Linux, particularly Ubuntu, has historically presented a unique set of challenges for users, ranging from amateur photographers and video creators to seasoned professionals. The program, heavily utilized in the film industry for crafting blockbuster movies and beyond, requires a specific environment to run optimally. This guide aims to demystify the process, addressing the common snags and providing a clear path to getting DaVinci Resolve up and running on your Ubuntu 24.04 machine.
The journey to installing DaVinci Resolve on Linux is not always a straightforward one. Unlike many other applications that install seamlessly, Resolve often requires a more deliberate approach. The program itself, a substantial download, is typically provided as a single .run file or a .zip archive, necessitating a registration on the Blackmagic Design website to access the download link. Once downloaded, the near-3GB program offers a wealth of features, but unlocking its full potential on Ubuntu involves navigating a series of potential roadblocks.
The Initial Hurdles: Downloads and Dependencies
The first step in the installation process involves obtaining the DaVinci Resolve software. This requires visiting the official Blackmagic Design website, where you’ll need to register to receive a download link. The downloaded file, often a .zip archive containing a .run installer, is the gateway to the software.
Upon attempting to run the installer, users may encounter immediate issues. DaVinci Resolve often complains about missing or outdated system packages. While the installer does attempt to bundle many necessary libraries within its own path, typically under /opt/resolve/libs, it doesn't always include everything. This is where the system's own library versions can clash with the program's expectations, leading to errors and preventing it from launching.
To circumvent these initial dependency issues, it's crucial to ensure your system has the necessary prerequisites. The Ubuntu repositories are the primary source for these packages. If DaVinci Resolve flags any missing libraries during the installation, it's advisable to install them. This often involves a simple command in the terminal, such as sudo apt install <package_name>. For those who prefer to bypass the package check entirely, this is an option, but it may lead to further complications down the line.
Troubleshoot DAVINCI RESOLVE STARTUP issues on Linux
The Library Conundrum: Resolving Conflicts
One of the most persistent problems encountered during DaVinci Resolve installations on Linux revolves around conflicting shared libraries. The program is designed with specific library versions in mind, and when these don't align with the versions present on the host system, errors abound. A common workaround involves strategically moving certain conflicting shared libraries out of the way.
The DaVinci Resolve binary, when executed, looks for its required libraries. If these are not found in its designated path or if system-wide versions are interfering, the program may fail to launch. By relocating the problematic libraries from the program's own path (e.g., /opt/resolve/libs) to a temporary location, you can force the program to rely on the system versions, or vice-versa, depending on the specific conflict. This process, while effective, requires a careful understanding of the library paths and the nature of the errors encountered.
For instance, if the program complains about a specific library version, you might need to move that library file from /opt/resolve/libs to a backup directory. This action forces the Resolve binary to search for and potentially use an alternative version available in the system's library paths. This tactic is particularly relevant when encountering errors that mention specific .so (shared object) files.
Graphics Card Compatibility and Performance
DaVinci Resolve is a graphically intensive application, and its performance is heavily reliant on the graphics card and its drivers. The program has specific requirements, and it will not run on integrated graphics. A discrete Nvidia card with up-to-date drivers is often recommended for optimal performance, especially for the Studio version.
When installing, if you are using a discrete Nvidia card, ensure you have the latest proprietary drivers installed. Ubuntu's "Additional Drivers" tool is a convenient way to manage these. Failure to have the correct drivers installed will likely result in the program complaining about the graphics processing mode or failing to launch altogether, often presenting a blank or white screen.
For users with older hardware, there's an option to tell the program to use OpenCL. This can be a lifesaver if your GPU doesn't fully support the preferred processing modes. The instructions for enabling OpenCL can vary, but it often involves specific driver configurations or environment variables.
The User Interface: Scaling and Customization Woes
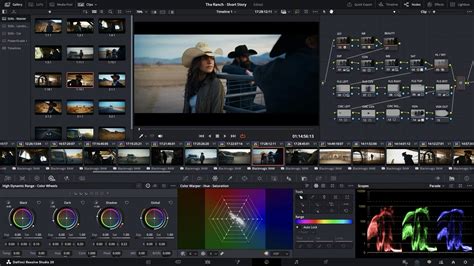
Beyond the technical installation hurdles, many users find themselves grappling with DaVinci Resolve's user interface (UI). The default UI is notoriously dark, with gray text on a gray background, which some find visually jarring and detrimental to eye comfort, even in a dimly lit room. Crucially, there is no built-in option within the program to change the UI theme or color scheme. This "odious" UI, as some describe it, can be a significant ergonomic discomfort for prolonged use.
However, the UI does offer scaling options, typically allowing adjustments to 100%, 150%, or 200%. This feature is particularly important for users with high-resolution displays (HD/UHD scaling). The challenge arises when this scaling doesn't align with the desktop environment's scaling settings, leading to elements appearing too large or too small, or even being cut off from the screen.
To address UI scaling issues, environment variables can be employed. For instance, setting specific variables in your shell's configuration file (.bashrc or .zshrc) or through a desktop entry file can influence how Resolve renders its interface. A common approach involves experimenting with variables like GDK_SCALE or QT_SCALE_FACTOR to achieve the desired display size. The goal is to make the program show fully on the screen while ideally restoring your desktop environment's scaling to your preferred setting. Finding the correct environment variable and value often requires trial and error, or consulting online forums and guides that detail specific solutions for Linux HD/UHD scaling.
Scripted Solutions: Streamlining the Installation
Recognizing the complexities of manual installation, several community-driven scripts have emerged to simplify the process. One such prominent tool is "MakeResolveDeb," created by Daniel Tufvesson. This script is designed to automate the conversion of the official DaVinci Resolve .run installer into a Debian .deb package. This package can then be installed using the standard dpkg command, much like any other application on Debian-based systems like Ubuntu.
The MakeResolveDeb script essentially streamlines multiple steps: it handles the extraction of the installer, manages the resolution of library dependencies, and packages the application for easier installation. When using this script, you typically download the official Resolve installer, then execute the script, which then generates the .deb file. This file can then be installed using sudo dpkg -i <resolve_package_name>.deb. This method significantly reduces the manual intervention required and is often considered the easiest way to install DaVinci Resolve on Ubuntu and its derivatives.
The process using MakeResolveDeb generally involves:
- Downloading the official DaVinci Resolve installer from Blackmagic Design.
- Ensuring necessary build tools are installed on your system (e.g.,
build-essential,fakeroot,dpkg-dev). - Running the MakeResolveDeb script with appropriate arguments, specifying whether you are installing the free or Studio version. The script will then create the
.debpackage. - Installing the generated
.debpackage usingdpkg. - Potentially installing any remaining missing dependencies if the script didn't catch them all.
Alternative Approaches: Distrobox and Containerization
For users seeking a more isolated and potentially less intrusive installation, containerization solutions like Distrobox have gained traction. Distrobox allows you to create and run containers of various Linux distributions within your existing system. This means you can install DaVinci Resolve inside a container specifically configured for it, without directly modifying your host Ubuntu system.
Projects like "DavinciBox" leverage Distrobox to create a tailored environment for DaVinci Resolve. This approach can simplify dependency management, as the container can be set up with all the necessary libraries and configurations without interfering with your main Ubuntu installation. However, it's important to note that Distrobox itself might have version requirements, and it may not be readily available on older Ubuntu versions. For instance, Linux Mint 22 is cited as a requirement for certain Distrobox-based solutions.
Using Distrobox involves:
- Installing Distrobox on your Ubuntu system.
- Creating a new container (e.g., based on a compatible distribution like Fedora or Rocky Linux, which are sometimes better supported by DaVinci Resolve).
- Installing DaVinci Resolve within that container, following the standard installation procedures for the chosen distribution.
This method offers a degree of separation and can be beneficial for managing complex software dependencies.
Specific Distribution Considerations: Fedora and Rocky Linux
While this guide focuses on Ubuntu, it's worth noting that Blackmagic Design officially supports CentOS and Rocky Linux. The Linux downloads sometimes even include an ISO file for Rocky Linux. For users running Fedora, which is closely related to Red Hat Enterprise Linux (like CentOS and Rocky Linux), specific steps are often recommended.
If you are running Fedora and have an NVIDIA GPU, you are considered to be in a favorable position for running Resolve. The key steps typically involve:
- Ensuring proper NVIDIA drivers are installed. This often requires enabling the RPM Fusion repository and installing the CUDA driver.
- Downloading the official DaVinci Resolve installer from Blackmagic Design.
- Running the installer which, on these distributions, can be more straightforward than on Debian-based systems.
The installation process on Fedora might involve using RPM Fusion for driver management and then proceeding with the official installer, which is designed to work within that ecosystem.
Advanced Troubleshooting and Workarounds
Even with scripted solutions, users might encounter persistent issues. For example, the free version of DaVinci Resolve on Linux has specific requirements, such as needing uncompressed .mov files for certain codecs like H.265 10-bit. These file sizes can be substantial, around 5-30 GB for a 10-minute video, which is a significant consideration for storage and workflow.
Furthermore, DaVinci Resolve may not like videos with the AAC codec due to licensing requirements. Solutions for such issues can often be found in official Blackmagic Design forums or community discussions, where users share workarounds and fixes.
If you encounter problems after installation, such as the program not launching from the application menu, you might need to edit the .desktop file located in /usr/share/applications. This often involves adding the progl command before the executable path in the Exec= line, allowing the program to be launched correctly from the desktop environment.
Finally, for those with very old hardware, enabling OpenCL alongside Mesa drivers can be a viable option, particularly if you are also using it for other applications like Blender or Darktable. This ensures that your graphics card is utilized to its fullest potential, even if it's not the latest hardware.
Conclusion: A Rewarding, Though Sometimes Arduous, Installation
Installing DaVinci Resolve on Ubuntu, while not always a trivial undertaking, is achievable with the right knowledge and tools. The process can involve navigating dependency conflicts, managing graphics drivers, and addressing UI scaling quirks. Whether you opt for manual library management, the streamlined MakeResolveDeb script, or a containerized approach with Distrobox, the goal is to unlock the immense power of this professional video editing suite on your Linux machine. The journey might be fraught with a few snags, but the reward of using such a capable tool for your cinematographic endeavors, despite any ergonomic discomfort from its UI colors, is often well worth the effort. As you embark on your creative journey, remember that the Linux community is a rich resource for troubleshooting and sharing solutions, ensuring that even the most daunting software installations can ultimately be successful.