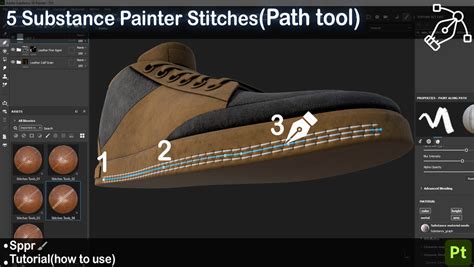
Substance Painter stands as a cornerstone in the modern 3D artist's toolkit, offering unparalleled control over material creation and texturing. While its core functionalities are widely recognized, delving into the nuances of asset management and workflow integration can significantly elevate an artist's efficiency and the final quality of their work. This guide aims to demystify the process, drawing from industry insights and practical application, to provide a robust understanding of how to leverage Substance Painter's library features and integrate it seamlessly into broader 3D pipelines.
The Power of a Well-Organized Library in Substance Painter
A fundamental aspect of efficient texturing within Substance Painter lies in the effective management of its asset library. This library serves as a central repository for all your custom materials, alphas, brushes, and other resources, enabling quick access and consistent application across projects. The ability to add new library locations allows artists to organize their assets beyond the default Documents folder, catering to custom drive setups or shared network resources. This flexibility is crucial for teams and individuals seeking to maintain a structured and accessible asset base.
Managing these libraries is straightforward through the Settings menu. It is imperative to note that no project should be open when making these adjustments to ensure proper application of changes. When a new library path is added, Substance Painter automatically mirrors the default folder structure (alphas, colorluts, effects, etc.) within that location. This organizational framework is key; placing assets into specific folders ensures they are recognized and utilized with their intended purpose within the software. This structured approach not only streamlines workflow but also promotes consistency and reduces the time spent searching for necessary assets.
The default library path is typically located within the user's Documents folder, a familiar and accessible location for most. However, the software also maintains resources within its own installation directory, providing a baseline set of default assets. The interface allows for easy referencing of these paths, often via right-clicking on a resource, which displays the designated name used to reference that location.
Adding a new path via the "Add" button not only defines the storage location but also automatically generates the necessary sub-folder structure. This proactive setup is a significant time-saver, ensuring that new assets can be immediately organized according to best practices. Conversely, the "Remove" button allows for the decluttering of the library, removing paths from the interface and ceasing the listing of resources from those locations in the Assets interface. This ensures that only relevant and actively used assets are readily available.
Integrating Substance Painter into the 3D Workflow: A Case Study
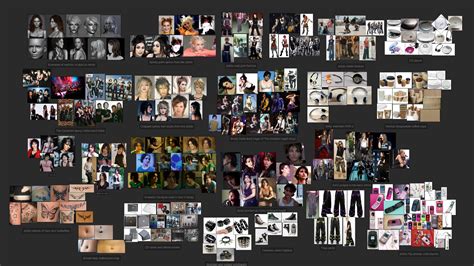
The process of creating realistic 3D characters, as exemplified by Max Bianchini's work on Ellie's portrait, highlights the integral role of Substance Painter. Bianchini, a Senior Texture and Look Dev Artist, emphasizes the importance of a structured approach, starting with meticulous reference gathering using PureRef. References are categorized into macro groups such as anatomy, game assets, illustrations, film shots, hair, and specific element close-ups. This detailed preparation lays the groundwork for accurate texturing.
The modeling workflow, often initiated in ZBrush and refined in Maya, involves creating base meshes with consistent topology and UVs. Bianchini utilizes pre-wrapped Scan Store or XYZ skin textures as a foundational layer for skin shaders. This optimization strategy, where all basemeshes share similar topology and UVs, significantly streamlines the texturing process in Substance Painter.
For Ellie's portrait, Bianchini leveraged Substance Painter for high-resolution texture creation across various UDIMs, essential for achieving cinematic quality. His personal library of frequently used assets, including custom presets for skins, eyes, and mouths, plays a critical role in optimizing time and ensuring shader consistency.
The texturing process itself begins with base maps, often sourced from libraries like ScanStore. These maps are then meticulously reworked within Substance Painter to match the specific references. This involves detailed work on Albedo maps, adding unique character features such as scars, freckles, and moles. Subsequently, Roughness, Specular, and Coat maps are developed, alongside additional layers for elements like dirt and blood.
Bianchini's exploration of a dynamic skin shader setup, where dirt and blood maps could be activated via numerical attributes, showcases an advanced approach to character variation. Although this complex setup was ultimately discarded in favor of a cleaner look for Ellie, it demonstrates the potential for creating adaptable and layered textures within Substance Painter. This ability to add variation by simply activating attributes offers immense flexibility in character development.
Recent Advancements in Substance 3D Painter
The evolution of Substance 3D Painter is marked by continuous updates designed to enhance artist efficiency and expand creative possibilities. The release of Substance 3D Painter 12.0 at the Game Developers Conference (GDC) 2026 in San Francisco brought significant improvements across various aspects of the software. Key enhancements included updates to the layer stack, projection tools, rendering capabilities, and project setup.
One of the standout features introduced is the 'Warp to Geometry' tool, a product of Adobe Research. This innovative tool significantly optimizes the application of decals onto complex geometries, uneven surfaces, or meshes with holes, a common challenge in 3D texturing. The 'Flatten Inside Layer Stack' option further streamlines workflow by allowing artists to merge layer contents into a single, savable result, which can then be used as a Smart Material. This feature not only aids in project organization but also simplifies the export of flattened layers or masks, facilitating data reuse and sharing.
Warp Projection in Substance 3D Painter | Adobe Substance 3D
Substance Painter 12.0 also introduced advanced post-effects, including Depth of Field, bloom, and lens flares. These tools provide artists with enhanced preview and presentation capabilities, allowing for a more accurate visualization of textures within their intended final context, such as in a game engine. The update also simplified project setup with a new interface and a 'Reload Mesh' option, which improves iteration processes by enabling geometry updates without the need to restart the project from scratch.
Looking ahead, the Substance 3D Painter 12.1 Public Beta promised further enhancements, including improvements to baking workflows, Skew Map painting functionality, and the highly anticipated initial OpenPBR support. These updates underscore Adobe's commitment to keeping Substance Painter at the forefront of 3D texturing technology.
Substance 3D Designer and Interoperability
Concurrent with the advancements in Substance Painter, Substance 3D Designer also received updates focusing on procedural shape workflows and OpenPBR support. The new 'Shape Spatter v2' node offers real-time scattering of 3D shapes, providing artists with extensive control over properties like shape and size, thereby enhancing procedural material creation. Additional updates included new Ribbon graph samples and an improved displacement UI, designed to streamline modern pipeline material authoring.
Adobe's release of a high-quality OpenPBR implementation on GitHub further promotes the adoption of this industry-standard material definition language across diverse 3D workflows. This commitment to open standards is vital for ensuring interoperability between different software packages and renderers.
The Substance 3D Assets library continues to expand, incorporating new content such as Ribbon assets for creating detailed elements along model paths and Texture Generators for adding material variations. This ever-growing library serves as an invaluable resource for artists seeking to quickly populate their projects with high-quality, customizable assets.
Substance Painter as a Universal Material Editor
For motion designers and 3D artists working across various render engines, Substance Painter offers a unique advantage as a universal material editor. While different render engines employ distinct methods for achieving similar visual results, Substance Painter acts as a unifying tool. It enables the creation of effects that will appear consistent across engines like Octane, Standard Render, Redshift, or Unreal Engine. This versatility significantly reduces the technical overhead associated with cross-platform material development, allowing artists to concentrate on creative aspects.
A prerequisite for utilizing Substance Painter effectively is having models with properly unwrapped UVs. While this might be a hurdle for newcomers, resources like dedicated tutorials on UV unwrapping and the provision of pre-UV-unwrapped models in project files facilitate a smoother onboarding process.
The integration process typically involves preparing models in software like Cinema 4D, often by assigning vertex colors to define material areas. Models are then exported, commonly as FBX, ensuring that vertex color information is preserved. Within Substance Painter, the FBX file is imported, with auto-unwrap deactivated and the template set to Metallic Roughness.
The crucial step of "baking" mesh maps in Substance Painter is essential for leveraging the software's procedural tools. This process generates utility maps (like ID, ambient occlusion, and normals) that inform generators and masks. By using the vertex colors imported from Cinema 4D as an ID map, artists can then apply different materials and effects to specific parts of the model.
Masks and generators are powerful tools within Substance Painter. A black mask, for instance, hides layer properties, allowing artists to selectively reveal them through painting or by using generators. Generators, which rely on the baked utility maps, can create realistic effects like edge wear, dirt, or rust, automatically conforming to the model's geometry.
Exporting textures from Substance Painter involves selecting the appropriate output template, such as Metallic Roughness for Cinema 4D, or specific presets for renderers like Redshift and Octane. These exported textures are then used to build shaders within the target 3D software, recreating the detailed materials authored in Substance Painter. The process of building shaders in Cinema 4D, for example, involves assigning the exported Base Color, Roughness, Metallic, Normal, and Displacement maps to the corresponding channels of a material. Activating options like Sub Polygon Displacement further enhances the visual fidelity by adding geometric detail.
The ability to create complex, multi-layered materials in Substance Painter and seamlessly transfer them to various rendering environments underscores its value as an indispensable tool for modern 3D asset creation. The continuous development and expansion of its features, coupled with its robust library management capabilities, ensure that Substance Painter remains a critical component in the workflow of artists aiming for high-quality, realistic 3D assets.