Clip Studio Paint is a powerful piece of art software, primarily popular among anime/manga artists and illustrators. It offers a wide range of features that make it a great option for both beginners and professionals. Upon launching Clip Studio Paint, users are initially greeted by a parent launcher called Clip Studio. While this launcher might appear somewhat clunky at first glance, with its numerous menus and buttons, persistence in exploration will reveal its underlying logic and utility.
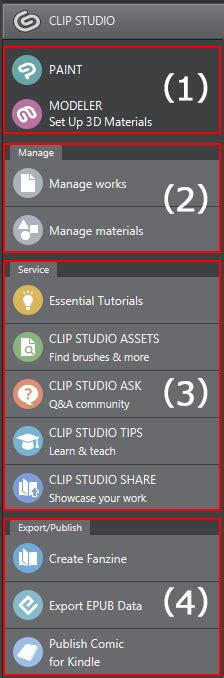
The Clip Studio launcher provides the essential ability to launch into Clip Studio Paint itself, or to access the Modeler App. The Modeler App is a valuable tool that aids in posing figures for drawing reference. Within the top-left corner of the Clip Studio launcher, users can select between the Clip Studio Paint application or the Modeler, which assists in setting up 3D models for artistic reference. Beyond these primary functions, the Clip Studio launcher offers further capabilities. It facilitates the synchronization of artwork across different devices and instances of Clip Studio Paint, as well as the downloading of brushes and assets directly to a user's device.
File Format Versatility: Seamless Integration with Photoshop and Beyond
One of the most notable features of Clip Studio Paint is its robust capability to handle a diverse array of file formats. A particularly favored feature among users is Clip Studio Paint's ability to both open and save Photoshop files (.PSD). This means that even large Photoshop files containing hundreds of layers can be seamlessly integrated. Drawings initiated in Clip Studio Paint can be saved in PSD format, preserving all layers, with the resulting file being nearly identical to one created in Photoshop, barring certain advanced features. This interoperability is incredibly helpful for artists who frequently work between the two programs.
In addition to its super useful .PSD capability, Clip Studio Paint is compatible with all standard image files, including JPG, PNG, and TIFF. Furthermore, it extends its compatibility to vector files such as AI, EPS, and SVG, simplifying the process of importing and exporting artwork from various sources.
Mastering Canvas Navigation: Tools for Efficient Workflow
Efficient navigation of the canvas is paramount for a smooth creative process. The Hand tool, found within the Tool palette, is the primary instrument for moving the canvas around the workspace. By default, the Hand tool may appear as the Rotate tool. To access the Hand tool, users need to expand the Sub tool menu by clicking an arrow, and then select the Hand tool from the available options. The Move tool is also quite useful for repositioning the canvas within the workspace. The Rotate tool, on the other hand, is invaluable for angling the canvas, which can significantly improve pen stroke accuracy.
For users with larger screens and more available screen real estate, opening the Navigator palette can be highly beneficial. The Navigator palette is packed with useful features that enhance the viewing and manipulation of artwork.
The Navigator Palette: A Window to Your Work
The Navigator palette is a crucial component of the Clip Studio Paint interface, offering functionalities that streamline the artistic process. Beyond the essential "flip horizontal" feature, its most important function is the ability to view the artwork as a zoomed-out thumbnail. As an artist paints or draws, it is vital to periodically step back from the immediate details and gain a holistic view of the entire piece. The Navigator palette provides this opportunity at a glance, allowing artists to assess their work in its entirety.
Optimizing Workflow: Shortcuts for Essential Actions
Given the importance of frequently flipping the canvas horizontally to check for visual balance and errors, setting up a shortcut for this action is highly recommended. While the Flip-Horizontal option is readily available within the Navigator palette, there is also a method to flip the canvas through the Edit menu (Edit → Rotate → Flip canvas → Flip Horizontal). However, this menu-driven approach is not the most efficient for an action that should be performed regularly.
10 Best Clip Studio Paint Shortcuts for Artists
To optimize this workflow, creating a custom shortcut is the preferred method. This can be achieved by navigating to CLIP STUDIO PAINT in the top-left corner of the screen, then selecting "Shortcut Settings." Within the shortcut settings of Clip Studio Paint, navigate to "View → Rotate/Flip → Flip Horizontal," and then click "Edit shortcut." Users can then assign their preferred key combination, such as Command + F, or any other combination that feels natural and efficient for their workflow.
Brushes and Tools: The Building Blocks of Digital Artistry
Clip Studio Paint boasts a comprehensive suite of brushes and tools suitable for a wide spectrum of artistic styles, including pencils, paintbrushes, markers, and more. A significant advantage of these tools is their high degree of customizability. Users can create new brushes and fine-tune existing ones, adjusting parameters such as brush size, angle, and pressure sensitivity.
Core Drawing and Painting Tools
The primary tools for drawing and painting in Clip Studio Paint include the Pen, Pencil, Brush, and Airbrush tools. Generally, the Pen tool is utilized for creating clean line art, while the Pencil tool is preferred for sketching. However, the flexibility of Clip Studio Paint allows for the creation of line art using the Pencil tool as well, emphasizing that the ultimate result and the artist's natural workflow are paramount.

For painting, the Brush tool offers a more painterly feel, whereas the Airbrush tool excels at creating smooth, soft transitions, ideal for gradients. In addition to these, the Blend tool is another essential instrument for painting. The blending capabilities of Clip Studio Paint are remarkably natural, often feeling akin to traditional watercolor or oil painting.
The Sub Tool Palette: Unlocking Tool Customization
Accompanying each tool in the Tool palette is a comprehensive Sub tool palette, which functions as an editing menu for the tool's numerous functions. To access this wealth of options, users simply need to select a tool and then click on the arrow pointing to the right at the top of the Tool palette.

The software's pencil and paint brushes are designed to be as realistic as the best digital tools available. The true power lies in their customizability. Artists are encouraged to pause and experiment with the features within the Sub tool palette for each brush. Making small adjustments, drawing a bit, observing the effect, and then iterating on those changes allows for a deep understanding of how brushes can be modified to achieve desired looks and feels. Experimenting with size, shape, and texture is key. However, it's important to remember that simplicity is often best, especially when starting. Fancy brushes are not a prerequisite for creating great art; Clip Studio Paint likely comes equipped with all the necessary brushes for beginners.
Smart Coloring: The Power of the Smart Bucket Tool
Clip Studio Paint includes a Smart Bucket Tool, a highly efficient feature that enables rapid coloring of line art through software recognition. This tool also allows for coloring on a layer separate from the line art, which is a crucial workflow for maintaining clean artwork.
To effectively use the Smart Bucket Tool for coloring on a separate layer, the "Refer to other layers" option must be enabled within the tool's Sub tool palette. This setting allows the tool to recognize edges from other layers, facilitating accurate color fills. It may be necessary to ensure that line art shapes are closed or to fine-tune the tool's settings for optimal shape recognition. However, perseverance with this tool is highly rewarding, as it offers significant time-saving benefits once mastered. The default settings often provide good results.
Precision Editing: Adjusting Line Width Post-Drawing
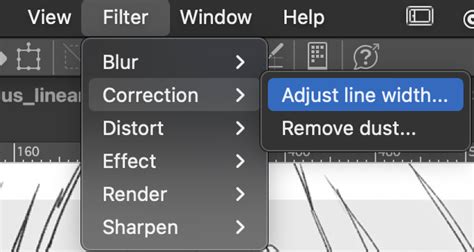
One of Clip Studio Paint's more remarkable tools is the ability to adjust line width after the line has been drawn. This functionality is accessed through the Filters menu by navigating to Filters → Correct line → Adjust line width. The accompanying dialog box provides controls to make lines thicker or thinner, which is particularly useful for creating delicate illustrations with subtle, thin lines that can be challenging to achieve consistently in digital art.
The Layer System: Foundational for Non-Destructive Editing
Clip Studio Paint's layer system is a cornerstone of its functionality, enabling artists to work on different aspects of their artwork independently. This non-destructive approach allows for changes to be made to one layer without impacting others. Users can create multiple layers, each with its own customizable settings, such as opacity and blending mode.
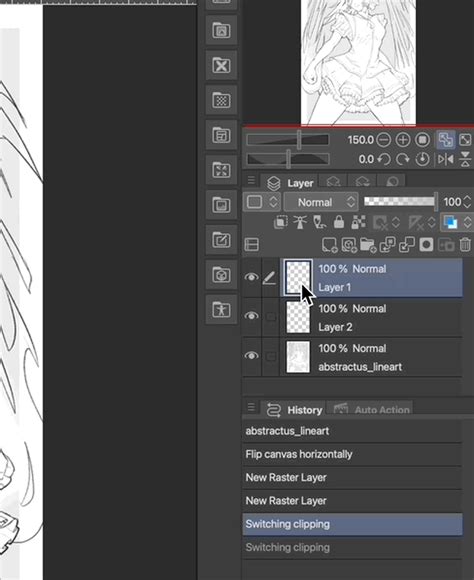
The fundamental features of Clip Studio Paint's layers are very similar to those in Photoshop, which is advantageous as Photoshop's layer tools are widely considered the industry standard. The software also features "Clipping Layers," a function analogous to Photoshop's "Create Clipping Mask." This feature allows one layer to be "clipped" to another, meaning the content of the clipped layer will only appear within the boundaries of the pixels on the layer it's clipped to. This is an indispensable tool for digital painters, and Clip Studio Paint's implementation is highly effective. To use this feature, artists can right-click on the layer they wish to clip and select "Clip to layer below."
Color Management: Tools for Expressive Hues and Shades
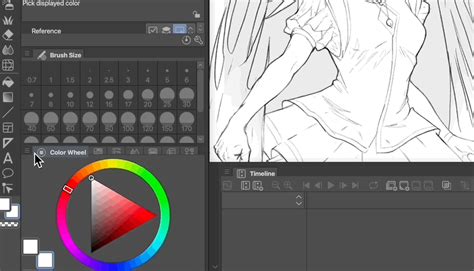
Clip Studio Paint provides a comprehensive set of color management tools, including a color wheel, color palettes, and a color picker. Users can also create custom color palettes and adjust the transparency of colors, ensuring they have everything needed to achieve the desired hues and shades in their work.
The Eyedropper and Color Spaces
At a basic level, the Eyedropper tool allows for the sampling of colors directly from the canvas. Clip Studio Paint offers a variety of Color Spaces to choose from, including CMYK and RGB. A particularly useful option is HSV (Hue, Saturation, Value), accessible via Window > Color Slider.
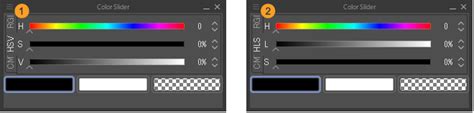
The HSV color space is beneficial as it encourages thinking in foundational art terms. It focuses on the core properties of color: Hue, Saturation, and Value. This framework allows artists to easily consider questions like, "What is the right saturation for this hue?" While personal preference dictates the best method for color selection, Clip Studio Paint likely includes most common approaches. In addition to CMYK and RGB sliders, users can opt for the HSV or HSL color wheel.
Retouching and Editing: Advanced Manipulation Tools
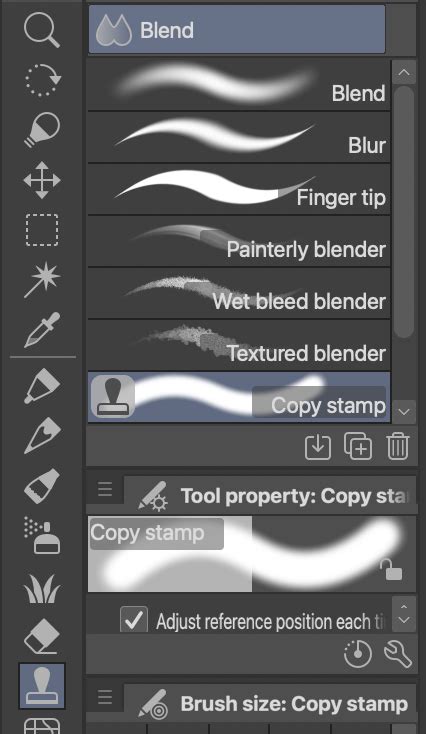
Clip Studio Paint is equipped with a range of tools for editing and retouching artwork. The Copy Stamp tool, equivalent to Photoshop's Clone Stamp, allows for the duplication and pasting of artwork sections with desired blending effects. This tool is typically found hidden within the Blend tool's Sub palette.
Custom Brushes for Blending Effects
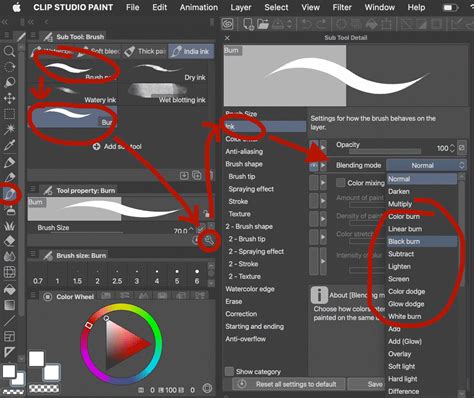
A powerful technique within Clip Studio Paint involves creating custom brushes with various blending modes. This can effectively substitute for the Burn and Highlight tools commonly used by Photoshop users. To achieve this, an artist can duplicate an existing brush in the Sub tool menu, then click the wrench icon in the bottom-right of the Tool Property palette. Within the opened property palette, navigating to the "Ink" section allows for the selection of new blending modes. Popular modes such as Multiply, Burn, Soft Light, Color Dodge, and Overlay are frequently used for painting.

Perspective and Animation: Tools for Dynamic Creation
Perspective Rulers for Accurate Frameworks
Clip Studio Paint features a Perspective rulers tool that enables the creation of accurate perspective frameworks for drawing. This is accessed through the Layer menu by navigating to Layer > Ruler - Frame > Create Perspective Ruler, after which the desired perspective view can be selected.
Advanced Animation Capabilities
The software also offers impressive animation tools, including a timeline, keyframe animation, and onion skinning. These animation tools function seamlessly, though creating highly polished animations requires a significant time investment. The onion skinning feature allows for the simultaneous viewing of multiple frames, facilitating smoother animation. Frame-by-frame animation, in the traditional 2D style, is also fully supported. The timeline is typically located at the bottom of the screen, and users can even incorporate camera movement into their animations. The capabilities within Clip Studio Paint are particularly noteworthy given its relatively lower resource consumption compared to Photoshop, as experienced across multiple machines.
In the animation timeline, layers from the Layer palette and layer folders are displayed as vertical Tracks on the left side of the Timeline palette. Each [Frame] of the timeline is represented horizontally on the right side of the Timeline palette.
Comic and Manga Creation Tools: Streamlining Sequential Art
Clip Studio Paint is exceptionally well-suited for the creation of comics, manga, and graphic novels, offering specialized tools such as the panel layout tool and the word balloon tool. The word balloon tool allows for the addition of speech and thought bubbles to comic panels. This tool can be found towards the bottom of the Tool palette. Upon selecting it, users can access the Sub tool palette to choose from various speech bubble styles. To begin creating comics or manga, a new canvas can be initiated by going to File > New and then selecting "Comic" from the Project list.
Clip Studio ASSETS: Expanding Your Creative Arsenal
The Clip Studio ASSETS platform provides access to a vast library of downloadable brushes, textures, and 3D models for Clip Studio Paint. Collectively, these are referred to as "materials" within the software and can be found under the ASSETS tab in the Clip Studio Launcher. This platform features both official Clip Studio Paint materials and thousands of user-created assets. To explore these resources, users can open the Clip Studio Launcher, navigate to "Clip Studio Assets," and click on "popular" to view the most downloaded brushes, textures, and 3D models.
Cloud Synchronization: Seamless Artwork Transfer
Clip Studio Paint integrates with the Clip Studio cloud service, enabling users to share their artwork across multiple devices. This cloud service also facilitates the sharing of settings between devices. The initial step for cross-device synchronization is logging into the same account on both devices.
Once logged in on a device, such as an iPad, opening Clip Studio Paint and tapping the Clip Studio logo in the top left, then selecting "Open Clip Studio," will reveal the synchronization options. Navigating to "Manage Works" and enabling syncing for desired artworks will initiate the process. After a brief synchronization period, the artwork will become available on other logged-in devices. By navigating to "Manage works" and then clicking on "Cloud" on the target device, users can access and download their synced artwork to continue working.
Time-Lapse Recording: Documenting Your Creative Process
Clip Studio Paint offers the ability to record a time-lapse of the drawing process. This feature can be activated within the new file dialog box (File > New) by clicking "record timelapse." If artwork is saved and then reopened in Clip Studio Paint, the time-lapse recording will continue automatically. Once the drawing is complete, the time-lapse can be exported as a video via File > Timelapse > Export timelapse.
Export Options: Sharing Your Masterpieces
Clip Studio Paint provides a variety of export options, allowing artists to share their work in numerous formats. Artwork can be exported as standard image files such as JPG, PNG, and PSD. Animations created within the software can also be exported as video files.
Evolution of Features: A Glimpse into Updates
Clip Studio Paint has seen continuous development, with numerous features being added and refined over time. Notable updates include enhancements to the History folder with sorting capabilities, automatic registration by material type, and the introduction of palettes like Align/Distribute and Layer Comps. Advanced features such as Fisheye perspective rulers, realistic mixing, Color Match, applying effects to multiple layers, Puppet Warp, Shading Assist, and various blur filters (Spin blur, Lens Blur) have been incorporated.
Further additions include filters for lens distortion and panoramas, Quick Filters and Quick Effects, Smart Shape tools, and the ability to paint on 3D models with enhanced realism. Support for 3D head models, 3D object material registration, 3D hand models, and a hand pose scanner have been introduced, alongside the import of 3D models with realistic rendering and POSEMANIACS integration. Workflow enhancements include batch export of layer comp settings, canvas cropping and extending, audio scrubbing, and compatibility with CLIP STUDIO TABMATE 2. Crucially, the software now offers save recovery data for every operation and the ability to record daily creative hours.
UPDATE (January 14, 2020): While updates may change icons and design, the core functionality generally remains consistent, making older versions still applicable for learning foundational concepts.
ORIGINAL CLASS DESCRIPTION INSIGHT: This class serves as a brief introduction to Clip Studio Paint (CSP), deconstructing its user interface to highlight essential tools for drawing. It is targeted at beginners, artists considering a transition from Photoshop, or anyone interested in exploring a new program efficiently. Whether aiming to create manga, comics, doodles, lineart, or paintings, this guide aims to teach canvas setup and introduce essential program components to facilitate the initial creative steps.
Understanding the Default Interface: A Guided Tour
Upon launching Clip Studio Paint, users are presented with the default interface. While this can initially appear overwhelming due to the multitude of palettes and options, a systematic breakdown can demystify its components.
The Tool Box: Your Creative Toolkit
The Tool Box houses all the various instruments used for creating comics and illustrations. At the top of the Tool Box are tools such as the magnifying glass, hand tool, and selection tools. Below these are the drawing tools, including the pencil, pen, brush, decoration, eraser, and blending tools. The bottom third of the toolbox contains tools like the fill tool, gradient tool, line and ruler tools, text tools, and correct line tools. The final section of the toolbox displays the current foreground and background color selections, along with a transparent color option.
Tool Property Palette: Fine-Tuning Your Tools
The Tool Property palette displays the specific options available for the currently selected tool. At the top of this palette are different categories of tools, such as those under the Pencil category, with the currently displayed category highlighted in blue. The central area of the palette showcases the various types of tools within that category.
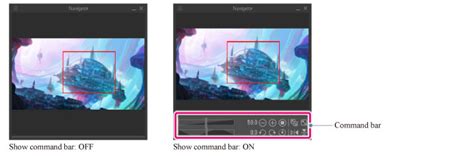
The Command Bar: Quick Access to Functionality
The Command Bar is a powerful, though unassuming, element of Clip Studio Paint. This compact interface provides quick access to frequently used functions, including creating new files, saving, undoing actions, and exporting files. Its complete customizability makes it an invaluable asset.
The Timeline Palette: For Animation Enthusiasts
The Timeline palette is specifically utilized when creating animations within Clip Studio Paint.
Quick Access and Material Library: Streamlined Operations and Assets
The Quick Access and Material Library area offers extensive functionality. The Quick Access window provides access to frequently used actions, similar to the Command Bar. Quick Access can be customized and features two sets, allowing for flexible configuration. For instance, Set 1 could be assigned to functions like save and undo, while Set 2 could house the most used tools or commands to simplify tasks like coloring. This section also contains the Materials Library, which holds a vast array of items, from comic frame templates and word balloons to photographs, special brush designs, and 3D models.
The Navigator Palette: Overview and Reference
The Navigator palette contains several tabs, each serving a distinct purpose. It displays the currently active file and a red rectangle indicating the currently viewed section of the canvas, which is particularly useful when working zoomed in on an illustration. Within this palette is also the Sub View palette, which can be used to display reference images and other helpful visual aids. The Item Bank tab showcases any 3D objects currently in use within the open file.
Layer Property Palette: Layer-Specific Settings
Beneath the Navigator palette is the Layer Property palette, which also features multiple tabs. The Layer Property tab provides access to the options available for the currently active layer. The Search Layer function within this palette allows for filtering and easily finding layers based on specific parameters, a highly useful tool for managing files with numerous layers. Finally, the Animation Cels tab is also housed within this palette.
The Layers Palette: Managing Your Artwork's Structure
The final primary interface element is the Layers palette, which also contains several tabs. The Layers tab displays all the layers within the currently active file. The History tab provides a record of actions performed on the file, allowing users to step back in time to easily undo unwanted changes. The Auto action tab enables the creation and execution of recorded sets of processes with a single button press.
With a foundational understanding of the default interface components, users can proceed to customize the layout of Clip Studio Paint to best suit their individual needs and workflows.