Clip Studio Paint, a powerhouse software primarily favored by anime, manga artists, and illustrators, offers a vast array of features suitable for both novices and seasoned professionals. Upon installation, users are greeted by the Clip Studio launcher, a parent application that, while initially appearing complex with its numerous menus and buttons, quickly becomes intuitive. This launcher provides access to Clip Studio Paint itself, as well as the Modeler App, which aids in posing figures for drawing reference.
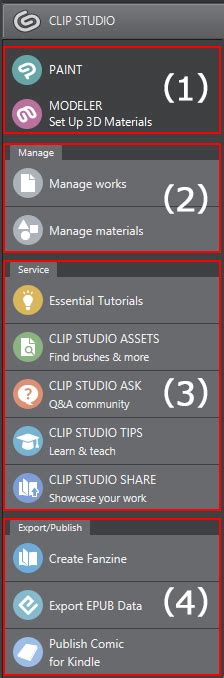
The Clip Studio launcher serves as a central hub. From its top-left corner, you can select either the Clip Studio Paint application or the Modeler, which assists in setting up 3D models for reference. Beyond launching these programs, the launcher facilitates artwork synchronization across different devices and instances of Clip Studio Paint, and allows for the download of brushes and assets. A quick reference guide for the most frequently used shortcuts is also available, proving invaluable for streamlining workflow.
One of Clip Studio Paint's most celebrated attributes is its robust file format compatibility. A particularly significant feature is its ability to both open and save Photoshop files (.PSD), even those with hundreds of layers. This means artwork initiated in Clip Studio Paint can be saved as a .PSD, preserving its layered structure and being nearly identical to a file created in Photoshop, barring some advanced features. This interoperability is immensely beneficial for artists who work across both programs. In addition to .PSD, Clip Studio Paint supports all standard image files like JPG, PNG, and TIFF, as well as vector files such as AI, EPS, and SVG, ensuring seamless import and export capabilities from various sources.
Navigating Your Canvas: Tools for Movement and Perspective
Efficiently moving around your canvas is crucial for a smooth creative process. The Hand tool, typically displayed as the Rotate tool by default, is your primary instrument for this. To access the Hand tool, you need to expand the Sub tool menu by clicking an arrow, and then select the Hand tool from the expanded options. The Move tool is equally useful for repositioning the canvas within the workspace. The Rotate tool, as its name suggests, is invaluable for angling the canvas, which can significantly improve pen stroke accuracy.
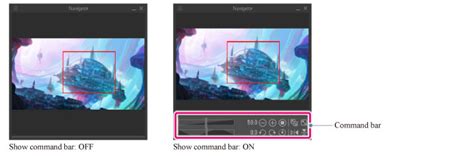
For those with larger monitors or more screen real estate, opening the Navigator palette is highly recommended. This palette is a treasure trove of useful features, with its most critical functions, aside from the Flip Horizontal feature, being the ability to view your work as a thumbnail - essentially a zoomed-out overview. As you work, especially when focusing on intricate details, it's vital to periodically step back and see the entire composition. The Navigator palette provides this essential overview at a glance.
Understanding the importance of flipping the canvas horizontally, especially for checking symmetry and overall composition, leads to the necessity of a shortcut. While the Flip-Horizontal option is readily available within the Navigator palette, there's also a method through the Edit menu: Edit → Rotate → Flip canvas → Flip Horizontal. However, this manual approach is cumbersome for a frequently used action. To optimize this, setting up a custom shortcut is paramount. This can be achieved by navigating to CLIP STUDIO PAINT → Shortcut Settings. Within the shortcut settings, go to View → Rotate/Flip → Flip Horizontal, and then click “Edit shortcut.” Assigning a key combination, such as Command + F, can dramatically speed up this process.
Brushes and Blending: Crafting Your Digital Medium
Clip Studio Paint boasts a diverse range of brushes and tools tailored for various artistic styles, including pencils, paintbrushes, markers, and more. A significant advantage is their high degree of customizability; users can create new brushes and meticulously adjust parameters like size, angle, and pressure sensitivity.
The core tools for drawing and painting are the Pen, Pencil, Brush, and Airbrush. Typically, the Pen tool is used for creating clean line art, while the Pencil tool is ideal for sketching. However, the software's flexibility allows for line art creation with the Pencil tool as well, emphasizing that the artist's preferred method and the final result are what truly matter. For painting, the Brush tool offers a more traditional, painterly feel, whereas the Airbrush excels at creating smooth gradients and subtle transitions.
Beyond these fundamental tools, the Blend tool is another indispensable asset for painters. Its blending capabilities are remarkably natural, closely mimicking the feel of traditional mediums like watercolors or oils. The effectiveness of the Blend tool lies in its intuitive operation.
Each tool in the Tool palette is accompanied by a comprehensive Sub tool palette, acting as an editing menu for the tool's extensive functions. To access this wealth of options, simply select a tool and then click the arrow pointing to the right at the top of the Tool palette. Here, you can fine-tune brush characteristics, experimenting with size, shape, and texture. It's advisable for beginners to start with simpler settings, as the default brushes in Clip Studio Paint are often sufficient for creating high-quality artwork.
Smart Coloring and Line Art Correction
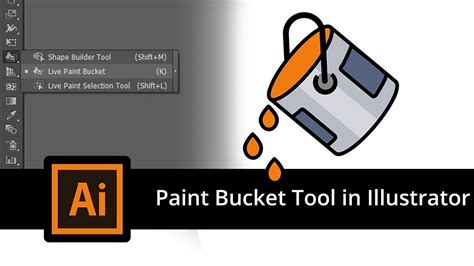
The Smart Bucket Tool is a remarkable feature for efficiently coloring line art. This tool intelligently recognizes your line art, enabling rapid filling of enclosed areas. Crucially, it allows you to color on a separate layer from your line art, which is ideal for maintaining a clean workflow. To enable coloring on a different layer, you must activate the “Refer to other layers” option within the tool's Sub tool palette. This setting allows the tool to detect edges from other layers for accurate color filling. It may require some adjustment of the tool's settings or ensuring your line art shapes are properly closed to achieve optimal recognition, but the time saved is substantial once calibrated.
Clip Studio Paint also provides an incredible tool for adjusting line width after the line has been drawn. Accessible via Filters → Correct line → Adjust line width, this feature allows you to make lines thicker or thinner. This is particularly beneficial for creating delicate illustrations with subtle, thin lines, which can be challenging to achieve consistently in digital art.
The Power of Layers and Clipping Masks
The layer system in Clip Studio Paint is one of its most powerful features, enabling artists to work on different aspects of their artwork independently. You can create numerous layers, each with its own opacity and blending mode settings, ensuring that changes to one layer do not adversely affect others. The fundamental layer functionalities are akin to those in Photoshop, which is advantageous as Photoshop's layer tools are widely considered the industry standard.
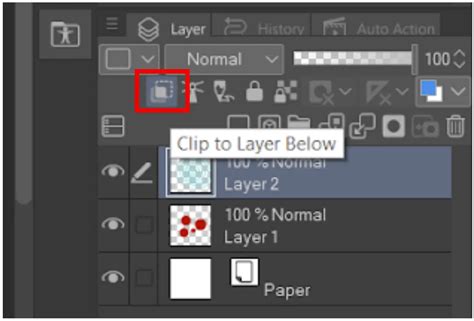
A particularly useful feature is "Clipping Layers," which functions identically to Photoshop's "Create Clipping Mask." This allows you to clip one layer to another, so that the content of the clipped layer only appears within the boundaries of the pixels on the layer below it. This is an essential tool for digital painters. To utilize this, right-click on the layer you wish to clip and select “Clip to layer below.”
Color Selection and Manipulation
Clip Studio Paint offers a comprehensive suite of color selection and manipulation tools. These include a color wheel, a color palette, and a color picker, alongside the ability to create custom color palettes and adjust color transparency. The software is equipped with everything needed to achieve desired hues and shades.
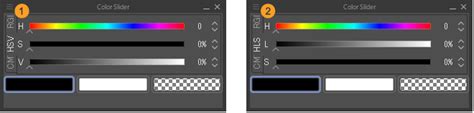
At its most basic, the eyedropper tool allows you to sample colors directly from the canvas. The software provides various Color Spaces, including CMYK and RGB, and importantly, HSV (Hue, Saturation, Value). Accessing these is done through Window > Color Slider. The HSV color space is particularly beneficial for artists as it encourages thinking in foundational art terms: Hue, Saturation, and Value. This framework simplifies the process of understanding and adjusting color properties. While HSV is a preferred choice for many due to its theoretical grounding, Clip Studio Paint likely includes other color selection methods, such as HSL, to cater to diverse artistic preferences.
Retouching, Editing, and Advanced Tools
For retouching and editing artwork, Clip Studio Paint provides a robust set of tools. The Clone Stamp tool, referred to as the Copy Stamp in Clip Studio Paint, allows for duplicating and blending parts of your artwork. This tool is typically found nested under the Blend tool's Sub palette.
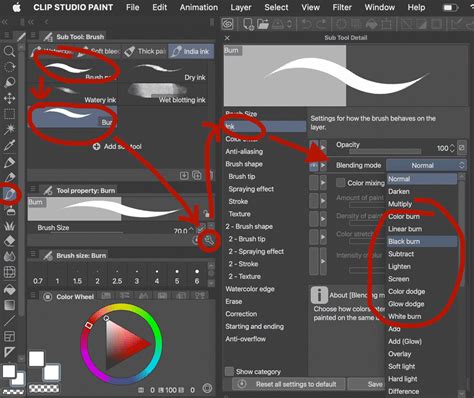
An advanced technique allows for the creation of custom brushes with various blending modes, offering an alternative to Photoshop's Burn and Highlight tools. This is achieved by duplicating an existing brush in the Sub tool menu, then accessing its properties via the wrench icon in the Tool Property palette. Within the Ink section, you can select new blending modes like Multiply, Burn, Soft Light, or Color Dodge.
The Power of Masking and Blending Modes in Clip Studio Paint!
Clip Studio Paint also features a Perspective rulers tool, invaluable for establishing accurate perspective frameworks for drawings. This is accessed through the Layer menu > Ruler - Frame > Create Perspective Ruler, where you can select the desired perspective view.
Animation and Comic Creation Features
The software's animation capabilities are surprisingly robust. It offers a timeline, keyframe animation, and onion skinning, allowing for the creation of animated illustrations. While these tools are powerful, achieving high-quality visual output requires a significant time commitment. Onion skinning aids in smooth animation by allowing you to view multiple frames simultaneously, supporting traditional 2D animation workflows. The timeline is conveniently located at the bottom of the screen, and the software even supports camera movement within animations. Notably, Clip Studio Paint often consumes fewer system resources than Photoshop, a significant advantage for many users.
In the Timeline palette, layers and layer folders are displayed vertically as Tracks on the left, while individual frames are shown horizontally on the right.

For comic and manga creators, Clip Studio Paint provides specialized tools, including a panel layout tool and a word balloon tool. The word balloon tool, found towards the bottom of the Tool palette, allows for the addition of speech and thought bubbles, with various styles available in its Sub tool palette. To begin a comic project, navigate to File > New and select "Comic" from the Project list.
Clip Studio ASSETS and Cloud Synchronization
The Clip Studio ASSETS platform is a vital resource for expanding your creative toolkit. Here, you can download a vast array of brushes, textures, and 3D models, collectively termed "materials" within the software. These are accessible through the ASSETS tab in the Clip Studio Launcher. The library includes official materials as well as countless contributions from the Clip Studio Paint user community. Browsing by "popular" within the Clip Studio Launcher's "Clip Studio Assets" section will reveal the most downloaded items.

Clip Studio Paint's cloud service enables seamless artwork synchronization across multiple devices. To leverage this, ensure you are logged into the same account on all devices. Within the Clip Studio Paint app, tap the Clip Studio logo in the top left and select "Open Clip Studio." Navigate to "Manage Works" and enable syncing for the desired artworks. Allow a few minutes for the synchronization to complete. On the target device, access Clip Studio, go to "Manage works," and then "Cloud" to find and download your artwork.
Recording and Exporting Your Creative Process
Clip Studio Paint allows you to record a time-lapse of your drawing process. This feature can be enabled when creating a new file via File > New by clicking "Record Timelapse." If you save and reopen your work, the time-lapse recording will continue. Once finished, you can export the video through File > Timelapse > Export timelapse.
The software also offers flexible export options for sharing your artwork. You can export in various image formats, including JPG, PNG, and PSD, and animations can be exported as video files.
Simple Mode vs. Studio Mode: Tailoring Your Workspace
Clip Studio Paint offers two primary interface modes to suit different user needs and skill levels.
Simple Mode is designed as an intuitive, user-friendly interface, perfect for beginners to start drawing immediately. It streamlines the workflow, focusing on essential tools for drawing with more of your screen real estate. This mode allows users to learn basic functions for brushes and layers while creating illustrations that emulate traditional media.
Studio Mode, on the other hand, unlocks the full potential of Clip Studio Paint, providing access to all available tools. This mode is ideal for users looking to advance their digital drawing skills, offering workspaces, vector tools, and advanced features for creating illustrations, comics, and animations. It challenges users to elevate their artwork and explore more complex techniques.
The choice between Simple Mode and Studio Mode allows users to tailor their experience, from quick, straightforward drawing sessions to in-depth, professional-level creation. Whether drawing on a smartphone or a larger display, users can leverage materials from Clip Studio Assets to enhance their creations, from character details to background decoration.
Exploring Advanced Techniques and Project Ideas
For artists looking to push their creative boundaries, Clip Studio Paint offers a wealth of advanced techniques and project inspirations.
Dynamic Poses and Character Rendering
- Dynamic Poses: Learn how to create expressive and dynamic character poses with tools like Simzart, bringing more life and energy to your characters.
- Realistic Hair Rendering: Master the art of rendering hair in a realistic manner, a common challenge in digital art.
- Convincing Skin Rendering: Achieve lifelike skin tones through various brushes and layer filters, as demonstrated by artists like Dave Greco.
Comic and Manga Production Workflow
Clip Studio Paint is exceptionally well-suited for comic and manga creation. The software streamlines the entire process, from initial sketching to final inking and coloring.
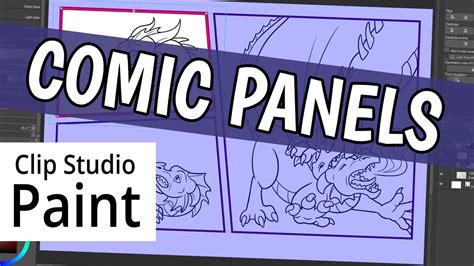
- Panel Creation: The Frame Border tool and its subtools, such as the Rectangle Frame tool and the Polyline frame tool, simplify the creation of comic panels. These tools allow for precise panel shaping, including irregular and circular frames, with automatic mask creation to keep artwork within designated areas.
- Comic/Manga Tools: Beyond panel creation, specialized tools like the panel layout tool and word balloon tool are essential for comic narrative. The Word Balloon tool, in particular, offers various styles for speech and thought bubbles.
- Lineart and Inking: Artists can achieve professional-quality line art using the Pen tool or even the Pencil tool for a more organic feel. Techniques for replicating professional comic artist inking styles are available.
- Coloring Comics: Discover efficient methods for coloring comics, including using the Smart Bucket tool and exploring various blending modes for brushes. Tips for coloring comics like a pro ensure vibrant and impactful visuals.
- Lettering and Typography: Mastering text and typography tools is crucial for comic storytelling. Clip Studio Paint provides tools for inserting, transforming text, managing fonts, and even creating custom fonts. Professional lettering and dialogue balloons enhance readability and narrative flow.
- Sound Effects: Adding sound effects can inject energy and personality into comics.
- Webtoon Creation: Specific guidance exists for preparing canvases for ideal webcomic creation, including inking techniques tailored for webtoons and planning workflows.
The Power of Masking and Blending Modes in Clip Studio Paint!
Animation Workflow and Techniques
Clip Studio Paint's animation features allow for the creation of dynamic animations, from simple character movements to more complex scenes.
- Frame-by-Frame Animation: Create animations in a traditional 2D style using frame-by-frame techniques.
- Keyframe Animation and Camera Movement: Incorporate keyframes and add camera movement to animations for added depth and dynamism.
- Onion Skinning: Visualize multiple frames simultaneously to ensure smooth transitions and fluid animation.
- Vector Animation: Explore the benefits of animating with vector layers for scalability and clean lines.
- Specific Animation Projects: Tutorials cover animating glowing campfires, crackling electricity, pixel art, and even creating animated emotes.
- Storyboard and Scene Planning: Learn basics of storyboarding from studios like MARZA ANIMATION PLANET and understand how to create simple walk cycles.
- Backgrounds for Animation: Drawing backgrounds can be simplified using perspective rulers, 3D models, pattern brushes, and textures.
Illustration and Digital Painting Techniques
Clip Studio Paint is also a powerful tool for digital illustration and painting, offering techniques to achieve various traditional media looks.
- Traditional Feel: Achieve a traditional art feel digitally, whether using pencils, watercolors, or paints.
- Watercolor Painting: Learn to create digital watercolor pieces with realistic effects.
- Pencil Illustrations: Replicate the look of pencil illustrations using specific drawing techniques and brushes.
- Painting Skin Tones: Develop skills in painting lively skintones with a variety of brushes and layer filters.
- Effect Lines: Utilize effect lines to add intensity and impact to action scenes.
- Shading Assist: Employ the Shading Assist tool to guide the coloring process and create atmospheric shading.
- Creating Custom Brushes: Design unique brushes for specific effects, such as gold, jewelry, ribbon, or pattern brushes.
Graphic Design Applications
While primarily an art software, Clip Studio Paint's capabilities extend to graphic design.
- Vector Tools: Utilize vector layers for scalable illustrations and design elements.
- Print Margins and Shape Tools: Prepare designs for print with features like print margins and versatile shape tools.
- Stamp Materials: Employ stamp materials for quick application of repeating elements or decorative motifs.
- Seamless Patterns: Learn to create seamless patterns, essential for fabric designs, backgrounds, and more.
- Project Ideas: Beginner-friendly graphic design projects include creating greeting cards, designing movie posters, and developing book covers, incorporating text, typography, and vector elements.
Customizing Your Workspace
The Clip Studio Paint interface is fully customizable to suit individual preferences and workflow needs. Users can arrange palettes and toolbars in the four corner frames and the middle of the screen, adapting the layout for both vertical and horizontal orientations. The Palette Bar can be configured to display items in a list or as optional content. Paired tool icons can show both palette icons simultaneously. The Command Bar can be populated with custom functions, including those from the "Selected area" function list. This high degree of customization ensures that each user can create an optimized workspace for their specific projects, whether it's illustration, comic creation, or animation.
Ultimately, Clip Studio Paint is an exceptionally versatile and powerful piece of software that empowers artists of all levels to bring their creative visions to life, offering a comprehensive set of tools and a flexible environment for digital art creation.