Navigating and manipulating your digital canvas is fundamental to an efficient and intuitive art creation process. In Clip Studio Paint, a robust suite of tools and customizable shortcuts allows artists to rotate, flip, zoom, and pan their canvas with remarkable ease. Whether you're a seasoned professional or just beginning your digital art journey, understanding these features can significantly enhance your workflow, enabling you to spot errors, refine details, and maintain a holistic view of your artwork. This article delves into the various methods for canvas manipulation in Clip Studio Paint, from essential tools to advanced shortcut customization, ensuring you can work with your canvas as fluidly as you draw.
Understanding Canvas Rotation and Flipping
The ability to rotate and flip your canvas is more than just a convenience; it's a critical technique for identifying visual discrepancies. When an artist spends extended periods viewing their work from a single perspective, the brain can become accustomed to the orientation, inadvertently overlooking proportion or symmetry issues. By inverting or rotating the canvas, you present your artwork in a fresh light, making these subtle errors more apparent.
The View Menu: A Starting Point
For those new to Clip Studio Paint or seeking a quick access point, the 'View' menu offers readily available options for canvas manipulation. Located at the top of the menu bar, you'll find sections dedicated to rotating and flipping.
- Rotate Left/Right: These commands, by default, rotate the canvas in 5-degree increments. This granular control is useful for slight adjustments.
- Flip Horizontal/Vertical: These options allow you to mirror your canvas across its horizontal or vertical axis. This is invaluable for checking the balance of characters or compositions.
Crucially, these 'View' menu operations only change your perception of the document; they do not alter the actual orientation of your artwork file. This means you can flip and rotate to your heart's content without affecting the final saved image.
Resetting Canvas Orientation
After performing rotations or flips, it's essential to know how to return your canvas to its default state. Several methods exist:
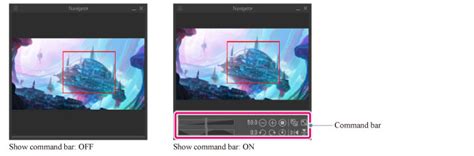
- Navigator Palette: The 'Navigator' palette, typically found on the right side of the interface, features a reset icon for both rotation and zoom. Clicking this icon will instantly return your canvas to its original orientation and scale.
- Scroll Bar: Similar to the Navigator palette, the scroll bars at the bottom and right of your canvas window also contain a reset icon for scale.
- View Menu: Within the 'View' menu, you can navigate to 'Rotate/Flip' and select 'Reset Rotation' or 'Reset Rotation/Inversion'. This action will reset the canvas rotation, but it does not reset the flipped status.
- Combined Reset: For a complete reset of both rotation and inversion, you can use the 'View > Rotate/Flip > Reset Rotation and Inversion' option, which also fits the canvas within the window. This is a comprehensive way to return everything to its default state.
Utilizing Dedicated Tools for Canvas Manipulation
Beyond the 'View' menu, Clip Studio Paint provides specific tools designed for dynamic canvas interaction. These tools offer a more direct and often faster way to adjust your view.
The Move Tool and its Sub-Tools
The 'Move' tool in the 'Tool' palette is your gateway to several canvas manipulation sub-tools.
- Hand Tool: Select the 'Move' tool, and then choose the 'Hand' sub-tool from the 'Sub tool' palette. This allows you to pan or "grab" and move your canvas freely within the canvas window. This is particularly useful for repositioning your artwork to focus on specific areas. When the Hand tool is active, only the canvas itself moves, ensuring that your tool selections and other interface elements remain stationary.
- Rotate Sub-tool: Within the 'Move' tool's options, you'll also find a 'Rotate' sub-tool. When activated, you can click and drag on your canvas to rotate it freely. This offers a more fluid rotation experience compared to the incremental steps found in the 'View' menu.
Keyboard Shortcuts for Panning and Rotation
For artists who prioritize speed, keyboard shortcuts are indispensable.
- Spacebar for Panning: A widely used shortcut across many art applications, pressing and holding the 'Spacebar' temporarily activates the 'Hand' tool. While held, you can click and drag to pan your canvas. Releasing the 'Spacebar' returns you to your previously selected tool.
- 'R' Key for Rotation: By default, pressing the 'R' key initiates the canvas rotation mode. You can then click and drag your mouse left or right to rotate the canvas. This provides a direct and tactile way to adjust the canvas orientation.
Zooming In and Out: Essential for Detail and Overview
The ability to zoom in and out is fundamental for both intricate detail work and assessing the overall composition of your artwork. Clip Studio Paint offers multiple ways to control your zoom level.
Zooming Methods
- Toolbar Magnifying Glass: The 'Tool' palette includes a 'Magnifying Glass' tool. Selecting this tool allows you to click on the canvas to zoom in, or hold 'Alt' (Windows) / 'Option' (macOS) and click to zoom out.
- Bottom Bar Zoom Controls: At the bottom of the Clip Studio Paint interface, a zoom control bar is usually present. This bar often features a slider and two magnifying glass icons for quick zoom in/out actions.
- Mouse Wheel Zoom: For a highly intuitive zoom experience, use your mouse wheel. Scrolling the wheel up typically zooms in, while scrolling down zooms out.
- Navigator Palette Zoom: The 'Navigator' palette also provides zoom controls, often in the form of a slider or input field, allowing precise zoom adjustments.
- Fit to Screen: To quickly make your entire canvas visible within the canvas window, you can use the 'View > Fit to Screen' option. This command resizes the canvas to fit the window, effectively resetting the zoom level. The scroll bar or Navigator palette also offer a 'reset icon' for this purpose.
Zoom Shortcuts
- Ctrl + '+' and Ctrl + '-': On Windows, holding 'Ctrl' and pressing the '+' key zooms in, while 'Ctrl' and the '-' key zooms out. On macOS, these shortcuts are typically 'Cmd + +' and 'Cmd + -'.
- Page Up/Page Down: Some users find assigning 'Page Up' for zooming in and 'Page Down' for zooming out (or vice-versa) to be an efficient workflow. These can be configured in the 'Shortcut Settings'.

Customizing Shortcuts for Peak Efficiency
While Clip Studio Paint comes with a set of default shortcuts, the true power lies in its customizability. For artists who frequently rotate, flip, or zoom, assigning dedicated hotkeys can dramatically speed up their workflow, reducing the need to navigate menus or switch tools.
Accessing Shortcut Settings
To customize your shortcuts:
- Go to
File > Shortcut Settings. - In the settings window, select the 'Setting area' as 'Main Menu'.
- Navigate through the menu categories to find the desired commands. For canvas manipulation, you'll primarily be looking under the 'View' menu.
Assigning Custom Shortcuts
- Rotation and Flip Shortcuts: To assign custom shortcuts for rotating left or right, navigate to
View > Rotate/Flip > Rotate LeftandRotate Right. You can then input your desired key combinations. For example, some artists prefer assigning 'Del' and 'End' to these actions. Similarly, for flipping, you can find options likeFlip HorizontalandFlip Verticalunder the 'View' menu. - Zoom Shortcuts: For zoom commands, look under the 'View' section for options like 'Zoom In' and 'Zoom Out'. You can then assign keys such as 'Page Up' and 'Page Down' if they are not already in use.
- Important Considerations:
- Avoid Conflicts: When assigning new shortcuts, ensure that the keys you choose are not already assigned to another critical command. Clip Studio Paint will usually warn you if a conflict exists.
- Tool vs. Menu Commands: Be mindful of whether you are assigning shortcuts to 'Tool' commands or 'Menu Commands'. For canvas rotation and flipping, 'Menu Commands' under the 'View' section are generally the most effective.
By investing time in setting up personalized shortcuts, you can transform repetitive actions into near-instantaneous operations, allowing you to stay immersed in your creative flow.
Advanced Canvas Manipulation Techniques
Beyond basic rotation and zooming, Clip Studio Paint offers features that can alter your perception of the canvas or integrate with other elements of your workflow.
Parenting to Camera for View Control
In some workflows, particularly those involving 3D elements or complex scene setups, you might consider parenting the template to the camera, or vice-versa. This approach can be useful if you want the canvas orientation to be directly influenced by a camera's perspective. While this might seem like an advanced technique, the core idea is to link the canvas's view to another object, allowing for synchronized movement and rotation. This is distinct from simply rotating the canvas itself, as it ties the canvas's orientation to a specific viewpoint defined by the camera.
Using Keyframes for Dynamic Canvas Orientation
For animation or dynamic presentations, you can employ keyframes to control canvas rotation and position over time. By setting keyframes for both the camera and the canvas, you can rotate them independently or in conjunction. This allows you to "flip between keyframes" in the timeline to achieve specific orientations instantaneously. This method is particularly powerful when you need to showcase different views of your artwork in a sequence, mimicking the effect of rotating the canvas for drawing but applied to a rendered output.
The Empty Method
Another approach, often discussed in relation to object manipulation in 3D software, is the "Empty method." This involves having an "Empty" object assigned to each page or canvas. By manipulating these Empty objects, you can indirectly control the canvas's orientation. This method can be particularly useful if you are working with multiple pages or sections and want a consistent way to manage their orientation outside of the direct canvas manipulation tools. If you work exclusively in a top-down orthographic view, rotating outside of camera view is straightforward. This method then allows you to enter camera view only when you need to see the overall piece in its intended orientation.
The TourBox: A Hardware Solution for Enhanced Workflow
For artists seeking to further optimize their canvas manipulation and overall workflow, hardware controllers like the TourBox have gained significant popularity.
TourBox Functionality
The TourBox, particularly models like the Elite, is designed to provide tactile control over software functions. Users can create custom presets for Clip Studio Paint, assigning specific buttons, dials, and wheels to actions like rotating the canvas, zooming, panning, and switching tools.
- Custom Presets: The ability to create custom presets means that you can tailor the TourBox to your exact needs. For example, a dial could be assigned to smooth canvas rotation, while a button could instantly reset the canvas.
- Workflow Improvement: Many users report a significant improvement in their workflow after integrating a TourBox. The physical feedback and dedicated controls can reduce hand strain from reaching for keyboard shortcuts and allow for more fluid, intuitive interaction with the software. The tactile nature of the device can also help artists perform these actions more subconsciously, keeping their focus on the artwork itself. The first generation TourBox, available for several years, already offered substantial workflow enhancements, with newer models like the Elite providing even more options and compatibility.
Understanding Canvas Size and Editing
While not directly a shortcut for rotation, understanding how to adjust canvas size is also part of overall canvas management.
Changing Canvas Dimensions
Clip Studio Paint allows for easy canvas resizing. When you initiate a change in canvas size, a new window will prompt you, and a frame will appear around your canvas. Within this window, you can modify the Width, Height, and specify the desired measurement Unit. The ability to edit the frame directly provides a visual and intuitive way to adjust the canvas size, offering more direct control than simply inputting numerical values.
Conclusion: Embracing Fluid Canvas Interaction
Mastering canvas manipulation in Clip Studio Paintâfrom quick shortcuts to dedicated tools and even external hardwareâis key to unlocking a more efficient and enjoyable creative process. The ability to rotate, flip, zoom, and pan seamlessly allows artists to critically assess their work, execute intricate details, and maintain a strong compositional overview. By exploring the various methods outlined, customizing your shortcuts, and considering tools that enhance tactile control, you can transform how you interact with your digital canvas, ensuring your focus remains on bringing your artistic vision to life. Remember that the 'View' menu offers fundamental options, the 'Move' tool provides direct manipulation, and custom shortcuts are your pathway to ultimate speed. Each technique, when integrated into your workflow, contributes to a more fluid and responsive artistic experience.