Ever wonder how professional photographers give their images a polished look? The secret often lies in how they use Lightroom presets. Ready to add that professional sheen to your photos? You're in the right place. This guide will walk you through the process of importing presets into various versions of Adobe Lightroom, from desktop to mobile, ensuring you can elevate the quality of your images with ease.
Understanding Lightroom Presets: The Foundation of Efficient Editing
Lightroom presets are pre-configured editing settings that allow you to apply a consistent look and feel to your photographs with a single click. They are essentially a collection of adjustments for exposure, color, contrast, and other parameters that photographers develop to achieve specific aesthetic styles. These can range from emulating the look of classic film stocks to creating dramatic cinematic tones. The ability to import and utilize these presets significantly streamlines the editing workflow, saving time and enabling aspiring photographers to achieve professional-grade results more readily.
The structure of a preset file itself can offer insights into how Lightroom categorizes and applies them. While the user interface presents them in an organized manner, the underlying file structure plays a crucial role. It has been observed that some presets consistently land in the 'User Presets' category, while others find their designated spots. This behavior is often dictated by specific records within the preset file itself. By editing the preset file, which is text-based, one can add a record that defines in which group a particular preset should be added. Importantly, the name within this record must be enclosed in quotation marks. Furthermore, presets are filtered by their initial letter, meaning clusters starting with 'A' will appear above clusters starting with 'B', and so on. The 'Cluster_Name' is an internal identifier and is not displayed within Lightroom, offering flexibility in organization without affecting the user-facing group names.
Importing Presets into Lightroom Classic (Version 7.3 and Later)
For users of Adobe Lightroom Classic version 7.3 or later, which utilizes the .xmp file format for presets, the import process is straightforward.
- Download Your Presets: Begin by downloading your purchased Lightroom presets. These typically come in a .zip file, especially for current versions and those released since April 2018.
- Unzip the Files: After downloading, unzip the .zip file. On a Mac, you can usually double-click the file. On Windows, right-click and select "Extract All." This will reveal the individual preset files, often in .xmp format.
- Launch Lightroom Classic: Open Adobe Lightroom Classic on your desktop.
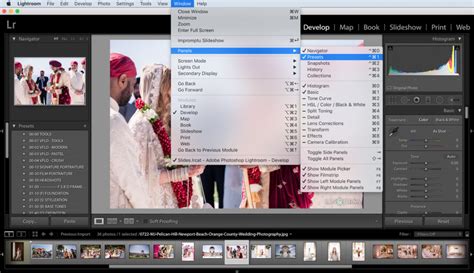
- Navigate to Import: In the Develop Module, click on "File" in the top menu bar, then select "Import and Develop Profiles and Presets."
- Locate and Select Presets: A dialog box will appear, allowing you to navigate to the folder where you saved your unzipped presets. You can select either the .zip file directly or individual .xmp files.
- Confirm Import: Once selected, click "Import."
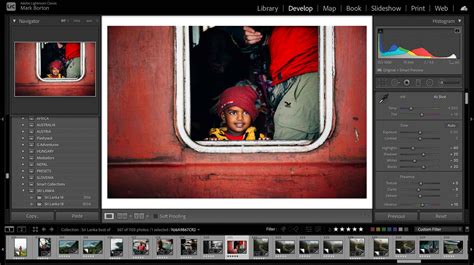
- Access Your Presets: Your newly imported presets will now be ready for use and can be found in the Presets section on the left-hand side of your Develop Module.
Importing Presets into Older Lightroom Versions (Lightroom 4, 5, 6, and Classic CC 7.2 and Older)
If you are working with older versions of Lightroom, such as Lightroom 4, 5, 6, or Lightroom Classic version 7.2 and earlier, you will likely be dealing with .lrtemplate files. The import method differs slightly:
- Download and Unzip Presets: Download your purchased Lightroom presets, which will be in a .zip file for these older versions. Unzip the file to access the .lrtemplate files.
- Open Lightroom: Launch the Lightroom application.
- Access Preferences:
- On Windows, click "Edit" in the head menu, then select "Preferences."
- On a Mac, click "Lightroom" in the head menu, then select "Preferences."
- Navigate to Presets Tab: In the Preferences window, click on the "Presets" tab.
- Locate Lightroom Presets Folder: Click the button labeled "Show Lightroom Presets Folder" (for older versions) or "Show All Other Lightroom Presets" (for newer versions). This will open the Lightroom folder in your file explorer.
- Find Develop Presets Folder: Within the opened Lightroom folder, locate and open the "Develop Presets" folder.
- Copy Preset Files: Copy the downloaded and unzipped .lrtemplate files into this "Develop Presets" folder.
- Restart Lightroom: Close and then restart Lightroom.
- Use Your Presets: Your presets will now be available in the Presets section.
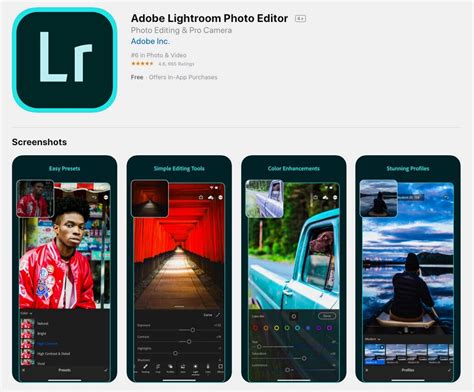
Importing Presets into Lightroom Mobile (iPad, iPhone, and Android)
Importing presets into Lightroom Mobile can be achieved through various methods, depending on your subscription and device.
Method 1: Syncing from Lightroom Desktop (Recommended for Creative Cloud Subscribers)
This is the easiest and fastest way to get presets onto your mobile devices if you have a Creative Cloud subscription.
- Install Presets on Lightroom Desktop: First, install your presets into the Lightroom CC desktop application (not Lightroom Classic). Follow the desktop import instructions provided earlier for .xmp files.
- Automatic Syncing: Once installed in Lightroom CC, your presets will automatically sync to your mobile devices (iPad, iPhone, Android) via the Creative Cloud.
- Access on Mobile: Open the Lightroom mobile app, and your presets should be available and ready to use.
Method 2: Importing Directly to Lightroom Mobile (Without Desktop Sync)
This method is for users who do not have a Creative Cloud subscription or prefer to import directly onto their mobile device.
For Android Devices:
- Transfer ZIP File: Download the preset product onto your desktop computer and then transfer the "mobile-presets_android…" ZIP file to your Android device.
- Open Lightroom App: Launch the Lightroom application on your device and select an image from your library.
- Access Presets Tab: Scroll down to the bottom of the toolbar and tap on the "Presets" tab.
- Import Presets: Tap the three-dot icon and select "Import Presets."
- Locate and Import: Navigate to the folder where you saved the ZIP file and import it. Alternatively, you can extract the ZIP file using your device's file manager and import individual files.
- Presets Ready: All imported presets will appear in a new group within the Presets tab.
For iPhone/iOS Devices:
- Transfer DNG Files: Download the preset product to your desktop computer, extract the "mobile-presets_iphone…" ZIP file, and transfer all the resulting .dng files to your iPhone. AirDrop is highly recommended for this step due to its speed and convenience.
- Create Folder and Album:
- Open the Lightroom app on your iPhone.
- In your library, tap the "+" icon to create a new "Folder." You can name this folder something like "Presets."
- Open this new folder and tap "Create New Album." Name this album after the specific set of presets you downloaded (e.g., "Vintage Film Presets").
- Import DNG Files: Once inside the album, tap the "Add" icon to import new images. Select the .dng preset files you transferred to your device.
- Apply Presets: These .dng files will now appear as photos in your album. To use them as presets, open one of the imported DNG photos, tap the three-dot menu, and select "Create Preset." Name the preset and save it. Repeat this for all DNG files to create individual presets.
Importing Presets Directly to Lightroom on iPad
A particularly convenient method, discovered by accident by many users, is the ability to import Lightroom presets directly into Lightroom on your iPad, bypassing the desktop version entirely.
- Locate Presets: Access your presets from either local storage on your iPad or a cloud storage service like iCloud Drive.
- Zip Sets (if importing a set): If you are importing a group or set of presets, ensure they are zipped into a single file.
- Import: Open the Lightroom app on your iPad. Navigate to where you can add photos or presets (the exact location might vary slightly with app updates, but often involves tapping the '+' icon or accessing a 'Presets' section). Select your zipped file or individual preset files to import.
- Ready to Use: Once imported, the presets will be available within the Lightroom app on your iPad.
How to Install Mobile Lightroom Presets on iPad
Understanding Preset File Structure and Organization
The behavior of presets â where they appear in Lightroom and how they are grouped â is influenced by their underlying file structure. As noted, some presets might consistently end up in 'User Presets,' while others integrate into specific groups. This is often controlled by records within the preset file itself. By editing these text-based files, one can insert specific entries, like Cluster_Name = "Your Preset Name", enclosed in quotation marks. This entry helps define the group to which a preset is added. The 'Cluster_Name' is an internal designation and does not appear in Lightroom's interface, offering a way to manage organization discreetly. This filtering by the first letter of the cluster name means that presets starting with 'A' will appear before those starting with 'B', creating an alphabetical sorting within groups.
Troubleshooting Common Preset Import Issues
- Incorrect File Format: Ensure you are using the correct file format for your Lightroom version (.xmp for newer versions, .lrtemplate for older versions, .dng for mobile).
- Corrupted ZIP Files: If a ZIP file appears corrupted, try re-downloading it.
- Lightroom Not Restarting: After copying .lrtemplate files, always restart Lightroom for the changes to take effect.
- Mobile Syncing Issues: For Method 1 on mobile, ensure your Lightroom desktop and mobile apps are signed into the same Adobe Creative Cloud account and that syncing is enabled.
- "Cannot Load File" Error with DNGs: This message can sometimes appear when opening DNG preset files on mobile. It's usually safe to ignore, as the file is intended to be used for creating a preset, not as a regular image.
Deleting Presets: A Common Hassle
One area where Lightroom's preset management can be frustrating is deletion. There doesn't seem to be an easy, built-in way to delete entire sets of presets at once. Users often find themselves having to delete them one by one, which can be a time-consuming process, especially if you've imported many presets. This is a common point of feedback for users looking for a more streamlined management experience.
Elevate Your Editing with Presets
Now that you understand how to import Lightroom presets, you're equipped to significantly enhance the quality and consistency of your images. Presets offer a powerful way to apply professional-grade edits swiftly. Whether you're aiming for a specific film look or a unique artistic style, mastering preset import is a crucial step in refining your photographic workflow and breathing new life into your captured moments.