Clip Studio Paint (CSP) is a powerful and versatile digital art software that offers a wealth of features designed to streamline the creative process for illustrators, comic artists, and animators alike. While many users are familiar with its basic functionalities, the program is packed with "secret features" and advanced techniques that can significantly enhance an artist's workflow and elevate their artwork. This comprehensive guide delves into some of these hidden gems, from color blending and selection tools to layer management and 3D model integration, aiming to unlock the full potential of Clip Studio Paint for artists of all levels.
Precision Coloring with Anti-Overflow and Area Scaling
Achieving clean and precise coloring is fundamental in digital art, and Clip Studio Paint provides robust tools to tackle this. One such feature is the "Anti-overflow" function, which, when combined with a designated "reference layer," ensures that your brush strokes stay within the boundaries of your line art. This is particularly useful when using tools like the Fill-in mono pen.
To utilize this, first, ensure your line art is on a separate layer. Then, select the "Fill-in mono pen" tool from the Pen sub tool palette. Within the tool's property palette, scroll down to find the "Do not exceed line of reference layer" option and check the box to enable it. For this to work, your linework layer needs to be designated as a reference layer. This is achieved by selecting the linework layer in the layer palette and clicking the lighthouse icon at the top of the palette, which signifies "Set as reference layer." With these settings in place, when you use the Fill-in mono pen to color, it will automatically stay within the lines of your reference layer.
While the Paint Bucket tool can also be used for filling areas, it sometimes struggles with small gaps in line art, especially if you only intend to color a portion of an enclosed area, like half of a character's head. The Fill-in mono pen, with the anti-overflow feature, offers more granular control.
Complementing the anti-overflow function is the "Area scaling" feature, accessible within the sub tool settings. This setting allows you to adjust how far the color extends beyond the line art boundaries. Setting Area scaling to a higher value, such as 20, ensures that the color fills right up to the edge of the line, preventing any white "ghosting" edges that can be problematic for printing. When this feature is not used, you might notice a thin white outline around your line art, which can detract from the final appearance, especially in print.
Enhancing Depth and Realism with Shading and Lighting Techniques
Shading and lighting are crucial for bringing a digital illustration to life, and Clip Studio Paint offers several techniques to achieve sophisticated results.
Dynamic Brushwork and Brush Size Adjustment
When shading, adjusting the maximum size of your brush dynamically while painting can lead to more natural and varied strokes. This allows for subtle shifts in density and coverage, preventing a flat or overly uniform appearance.
Simulating Bounced Light
Bounced light is a phenomenon where light reflects off surfaces and illuminates areas that would otherwise be in shadow. To simulate this in CSP, you can use a layer set to "Screen" mode placed above a "Multiply" layer that contains your base shading. By painting with a color that reflects the environment (e.g., blue from water), the "Screen" layer will add this light to the existing shadows. Imagine light reflecting off a bright blue pool of water; this reflected light would illuminate the underside of a character standing nearby.

Ambient Occlusion for Subtle Shadows
Ambient occlusion is a concept often applied in 3D rendering, referring to the darkening of areas where objects are in close proximity, as light struggles to penetrate these crevices. In CSP, this can be recreated on a "Multiply" layer by painting darker shadows in areas where different parts of the artwork meet or where objects are close together, such as the corner of a room or where limbs connect. This adds a layer of realism, even to stylized or cartoony artwork, by mimicking how light behaves in three dimensions.
Creating Highlights and Textures
For highlights, using a harder brush with low density on a "Screen" layer can effectively add bright accents. It's also important to differentiate textures. For instance, the texture of an eyeball should appear distinct from the character's skin. This can be achieved by varying brush types and application techniques.
Coloring Line Art for a Softer Impression
Coloring your line art can give an illustration a softer, more integrated look. To do this, first lock the transparent pixels on your line art layer. Then, select a color similar to the main fill color of the area, darken it, and use a large brush to apply it evenly over the entire layer, creating a base color for the lines. Subsequently, you can go into individual sections and color the lines to match the surrounding areas, further blending them into the artwork.
Achieving Visual Cohesion and Contrast in Coloring
When coloring, maintaining a balance between visual cohesion and contrast is paramount. Visual cohesion ensures that your characters feel like they belong in their environment, while contrast draws the viewer's eye to key elements.
Consistent Lighting and Shadow Direction
To make characters feel integrated into their surroundings, consistent lighting and shadow direction are essential. The direction of light should be the same for all elements in the scene, and the intensity of light and shadow should correspond to the distance from the light source. For example, characters outdoors during the day should be lit from above, mimicking the sun's position.
Understanding Shadow Color
Shadows are fundamentally the absence of light, yet they often appear to have color. This is because light hitting a colored surface is absorbed by pigments, with only specific wavelengths being reflected. When this reflected light interacts with other objects, it can cast colored shadows. In digital art, artists can exaggerate this effect to add vibrancy while maintaining cohesion.
Layer Modes for Efficient Coloring
Clip Studio Paint's layer modes are incredibly powerful for simplifying the coloring process. For flat colors, an airbrush can be used to apply skin tones, creating a softer look. It's also beneficial to establish a rough background first, as this can inform color choices for characters and ensure they harmonize with the environment.
For shading, a common technique involves creating a "Multiply" layer clipped to the flat color layer. By eyedropping the background color and filling this layer, you can quickly shade the entire character. Inner glows can be applied on an "Overlay" layer where light and shadow meet (the terminator line), and bounce light and highlights can be rendered on a "Hard Light" or "Normal" layer, with colors often picked from the background and airbrushed in. Experimenting with different layer modes can yield a variety of unique effects.
Understanding CLIP STUDIO PAINT Layer Types
Post-Coloring Refinements and Color Correction
After the initial coloring and shading, the "Cleanup" phase involves adding details and refining the artwork. The "Edit > Tonal Correction" menu offers a suite of tools for adjusting colors and values, which can be particularly helpful when an artist is stuck or unsatisfied with a particular aspect of the illustration.
Correction layers, accessed via "Layer > New Correction Layer," provide a non-destructive way to adjust colors across the entire illustration. The "Tone Curve" is a versatile tool that allows for fine-tuning of values, while "Gradient Maps" can apply a filter-like effect, unifying the colors. By creating a gradient map and setting it to a low opacity, artists can experiment with various gradients until they achieve a desired aesthetic.
Unlocking Hidden Gems and Streamlining Your Workflow
Beyond core coloring and shading, Clip Studio Paint boasts numerous features designed to optimize workflow and add unique touches to your art.
Customizing the Top Bar
The top bar of Clip Studio Paint is fully customizable. Artists can effortlessly add their preferred brushes, color swatches, or frequently used tools to this bar for quick access, significantly speeding up repetitive actions. Deleting unwanted items is equally straightforward.
Advanced 3D Model Proportions and Posing
Clip Studio Paint's 3D models offer a powerful way to establish lighting references and even pose characters. The software allows for detailed adjustment of 3D model proportions. Within the model's settings, sliders can be used to alter facial features and overall body shape, creating leaner or fuller figures. Individual body parts can also be sculpted with precision. Using 3D models for lighting reference can provide instant insights into how shadows fall and where light hits, helping to establish mood and consistency, especially when working under time constraints or across multiple scenes.
Automating Repetitive Tasks with Auto Actions
The "Auto Action" feature is a game-changer for automating repetitive tasks. Users can record a sequence of actions and play them back with a single click. This can range from applying specific color adjustments or filters to complex multi-step processes. CSP comes with a variety of default actions, and artists can also download custom actions created by the community. For instance, an action could be named "Overlay Pink" to quickly apply a specific pink overlay effect.
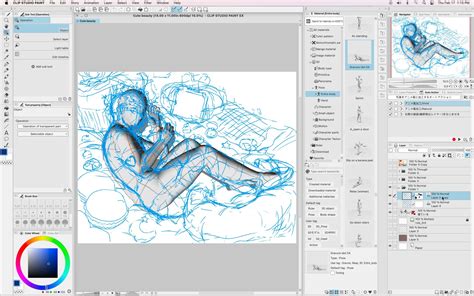
Efficient Layer Management with the "Select Layer" Tool
In projects with numerous layers, the "Select Layer" tool, found under the "Operation" tab, is invaluable. By dragging a selection box around an area of the canvas, this tool efficiently selects the corresponding layer(s), allowing for quick edits without the need to manually hunt through the layer palette.
The Power of Transparency Color
A truly unique and highly beneficial feature is the "Transparency Color" option. Unlike typical painting programs with just two color slots, CSP offers a third: Transparency Color. This transforms any brush into an eraser, allowing artists to use their favorite textured brushes for erasing, retaining the unique feel of the brush while benefiting from the precision of digital editing. The shortcut for this is typically "C." This is particularly useful for textured brushes that mimic traditional media, offering a seamless blend of traditional aesthetics and digital efficiency.
Leveraging Selection Tools for Enhanced Shortcuts
The selection tools in CSP can be further enhanced by customizing the toolbar that appears at the bottom after making a selection. Users can add shortcuts to this panel for filters, menu commands, or even custom Auto Actions. This creates a powerful shortcut system, enabling artists to focus more on their art and less on navigating menus or creating masks manually.
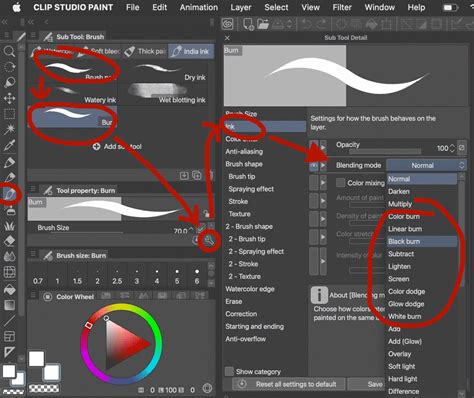
Color Jitter for Organic Strokes
The "Color Jitter" setting, found in the Sub Tool Detail palette, adds subtle variations in hue, saturation, and brightness to brush strokes. This creates a dynamic and organic feel, making strokes appear less flat and uniform. Even a small variation, such as +8 in Hue, can significantly enhance richness and realism, as seen in the subtle shifts of color within grass or ground textures.
Referencing Layers for Fill Tools
When working with separate layers, the Fill tool can be configured to respect line art on other layers. Users can choose to reference "All layers" or specify a "Reference layer," ensuring that the fill tool accurately targets the intended areas without bleeding into unwanted parts of the artwork.
Utilizing Masks for Non-Destructive Editing
Instead of directly erasing on a painted layer, using masks offers a non-destructive editing approach. Erasing from a mask means that any unintended removals can be easily rectified by simply painting back into the mask. This is especially useful when refining lighting, shadows, or special effects, allowing for greater flexibility and experimentation.
Streamlined Workflow with Simple Mode
For artists who prioritize a streamlined experience, especially for sketching during classes or in casual settings, Clip Studio Paint's "Simple Mode" offers a simplified interface that can be incredibly useful.
Mastering the Art of Color Harmony with Bruna Belfort's Insights
Digital artist Bruna Belfort, with over 17 years of experience, found Clip Studio Paint to be a transformative tool. She emphasizes that the software's extensive functionality can be overwhelming without guidance, leading her to develop a comprehensive guide, "Mastering Clip Studio Paint," to share her accumulated knowledge. She highlights five key techniques she wished she knew earlier:
- Color Jitter: As mentioned, this feature adds subtle variations to brush strokes, making them appear more dynamic and organic. It reduces the need for manual color picking and contributes to a richer, more realistic look.
- Referencing Layers for Fill Tool: This allows the Fill tool to accurately respect line art on other layers, ensuring precise coloring even when working across multiple layers.
- Selection Layers: These are invaluable for refining, storing, and reusing selections. They act like persistent masks, making it easier to isolate specific elements like outfits or create shape masks for detailed painting, saving the artist from re-selecting areas repeatedly.
- Masking Instead of Erasing: Instead of using the eraser tool directly on a painted layer, Belfort advocates for using masks. This non-destructive method allows for easy correction of mistakes or changes of mind by simply painting back into the mask.
- Using 3D Models for Lighting Setup: This is a powerful feature for quickly establishing lighting references. By loading a 3D model and adjusting its pose and lighting, artists can gain immediate insight into how shadows fall and light interacts with forms, helping to define the mood of a piece and ensure consistent lighting without guesswork. This is particularly beneficial when time is limited or consistency across a series is required.
Personalizing Your Workflow: Shortcuts and Tool Preferences
Customizing shortcuts and understanding tool preferences can significantly boost efficiency. For instance, remapping the eyedropper tool from Ctrl to Alt can be more comfortable for artists who frequently use the eyedropper. Exploring the various sub tool menus for pencils, pens, airbrushes, and brushes is highly recommended to discover personal favorites. The blending tool, particularly the blur tool within its sub-tools, is a favorite for many, while the decoration tool offers a wide array of fun, decorative brushes. The gradient and bucket tools are also highly regarded for their utility.
When sketching, the lasso selection tool, combined with Ctrl+T for transformation, allows for easy manipulation and repositioning of elements. Holding Ctrl during transformation enables skewing, adding another layer of control.
The process of rendering often involves piling on adjustment layers like Tone Curves and Gradient Maps to fine-tune the artwork. Tone Curves adjust values, while Gradient Maps can unify colors and add a filter-like effect. After these adjustments, flattening the drawing into a single layer to selectively apply the blur tool can further enhance the final look.
Ultimately, Clip Studio Paint offers a vast landscape of tools and features. By embracing exploration, experimenting with different functions, and personalizing the workflow through shortcuts and custom settings, artists can unlock the software's full potential and elevate their digital art to new heights.