Photoshop, a leading digital imaging software, offers a versatile toolkit for transforming ordinary photographs into captivating works of art that resemble traditional paintings. Whether you aim to create a unique profile picture, a heartfelt holiday gift, or simply explore new creative avenues, Photoshop provides accessible filters, brushes, and advanced techniques to achieve a painterly aesthetic. This guide delves into various methods, from leveraging the power of Generative Fill and AI to mastering intricate filter and brushwork combinations, allowing you to imbue your images with the essence of a painted masterpiece.
Embracing AI-Powered Artistry with Generative Fill
The integration of Adobe Firefly and Generative Fill in Photoshop has revolutionized image manipulation, offering an intuitive way to achieve painting effects with minimal effort. The core principle for creating convincing painting effects with Generative Fill lies in controlling its intensity. By applying Generative Fill at a lower intensity, the original image detail is preserved, while AI subtly blends in artistic elements.
To begin this process, ensure you are using Photoshop 2025 or a compatible version. In the toolbar, locate and click the Quick Mask icon, typically found near the bottom, directly beneath the color swatches. This action prepares Photoshop for masked adjustments.
Next, access the Fill dialog box. Within this dialog, modify the "Contents" option to "Color." This sets the stage for color-based adjustments. In the subsequent Color Picker, set the H (Hue) and S (Saturation) values to 0. This ensures you are working with grayscale, which acts as a control for the AI's influence. The crucial parameter here is B (Brightness). Set the Brightness value to 30 percent. This brightness value effectively functions as an "AI intensity" slider. A higher brightness value will result in a more pronounced impact from Generative Fill, leading to a more significant alteration of the image. For achieving a painting effect, a brightness value between 20-40 percent generally yields optimal results, with 30 percent often hitting the sweet spot for a balanced transformation. Once satisfied with the setting, click OK to close the Color Picker.
With the preparatory steps complete, you are ready to prompt Generative Fill. In the prompt box, enter the specific style of painting you wish to create. For instance, you might start with a prompt like "watercolor painting effect." As is customary with Generative Fill, Photoshop will present three distinct variations of the result within the Properties panel, allowing you to select the one that best aligns with your vision. You can easily experiment by altering your prompt; for example, changing "watercolor painting" to "oil painting" will yield entirely different artistic interpretations.

This AI-driven approach democratizes the creation of artistic imagery, enabling users to achieve sophisticated painting looks in mere moments. Whether you require a fresh profile picture or wish to enhance a beloved pet portrait, Generative Fill in Photoshop offers a novel and creative pathway to reimagine your favorite photographs.
Harnessing Filters for Quick Painterly Effects
Beyond AI, Photoshop offers a range of built-in filters that can rapidly impart a painterly aesthetic to your images without the need for manual brushwork.
A straightforward method to achieve a painterly look involves the application of specific filters. The process typically begins with duplicating your background layer. This is a crucial step for non-destructive editing, allowing you to revert or adjust changes without affecting the original image. On Windows, this can be achieved by pressing Ctrl+J, and on a Mac, Command+J.
Once the background layer is duplicated, apply the desired filter to this new layer. For instance, a "Basic Watercolour Filter" can be applied. After applying the filter, you might find that the result needs further refinement. Often, this involves blending new outlines or textures into the painting. A common technique is to change the blending mode of the layer from "Normal" to "Multiply" using the drop-down menu in the Layer panel. This blending mode can help integrate the filter's effects more naturally with the underlying image.
For an added touch of personalization and realism, you can further enhance your artwork by painting your own brushstrokes directly into the mix using the Brush Tool. Photoshop provides a variety of built-in brushes that are designed to mimic the appearance and behavior of real-world watercolor brushes or oil paint brushes, allowing for a highly customized finish.
Advanced Techniques for Realistic Digital Paintings
Achieving a truly realistic digital painting from a photograph in Photoshop often requires a more involved process, combining various filters, brushes, and design techniques. This approach goes beyond simply applying a single filter and aims to simulate the nuances of traditional painting.
Preparing Your Canvas and Brushes
Before diving into image manipulation, it's beneficial to set up your Photoshop workspace. Opening a new document via File > New or the Ctrl+N shortcut is the first step. For this tutorial's context, a canvas width of 1000 pixels, a height of 667 pixels, and a resolution of 72 ppi are suggested. This provides a manageable canvas for experimentation.
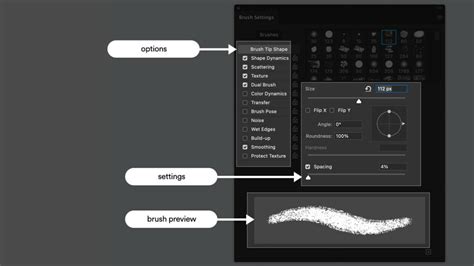
The Brush Tool (B shortcut) is central to many advanced painting techniques. Accessing brush options from the right-hand panel or via Window > Brush Presets allows you to select and customize brushes. For more authentic painting textures, it's often recommended to download specialized brush sets. For instance, a texture brush set might be required, and within it, a specific brush labeled "422" could be utilized.
Customizing brush settings is key to achieving unique effects. Key areas for adjustment include:
- Shape Dynamics: Toggle this option on and set parameters like "Jitter Size" to 100%, "Minimum Diameter" to 0%, "Jitter Angle" to 42%, and "Jitter Roundness" to 0%. These settings control the variation in brush stroke shape and orientation.
- Color Dynamics: Enabling this toggle and setting "Foreground/Background Jitter" to 40% introduces color variations within the brush strokes, mimicking natural paint mixing.
- Transfer: Within this section, set "Jitter Opacity" to 100% and leave all other settings at 0% or turned off. This ensures a consistent and controlled application of paint.
With your brush configured, you can begin applying it to your canvas. For example, setting the foreground ink color to black and filling the white background with the brush can create a textured base. The goal is to achieve a darkened canvas with enough lighter areas to maintain a textured look. Experimentation with brush movement is encouraged to achieve the desired visual outcome.
Enhancing Texture and Contrast with Unsharp Mask
To further refine the textured background and introduce more visual depth, the "Unsharp Mask" filter is frequently employed. Access this by navigating to Filter > Sharpen > Unsharp Mask. Applying this filter with parameters set as shown in accompanying visuals can help draw out lighter areas and create a more dynamic contrast.
Often, a single application of Unsharp Mask is insufficient. Repeating the filter application (Filter > Sharpen > Unsharp Mask again) can subtly enhance finer details, making them resemble more realistic painted brushstrokes. This double application, while subtle, contributes significantly to the overall painterly feel.
Integrating and Isolating Your Subject
The next critical step involves bringing your photograph into the prepared canvas. Open your desired stock photo (File > Open or Ctrl+O). Switch to your background document and paste the stock photo as a new layer (Ctrl+V or Edit > Paste).
If the pasted photo is larger than your canvas, use the Free Transform Tool (Edit > Free Transform or Ctrl+T) to resize it. Manually scale the image until it fits snugly within the canvas boundaries. You can use the + and - keys while holding Ctrl to zoom in or out of the canvas view during transformation. Once the image is correctly sized, press Enter to exit Free Transform mode.
Isolating your subject from its background is paramount for many painting effects. Click on the white space in the background to initiate a selection. This may require careful refinement to perfectly outline the subject. Use the Alt key to exclude parts of the subject that might have been inadvertently selected, and the Shift key to include any background areas that were missed. Zooming in is often necessary for capturing finer details.
Once the subject is precisely selected, click the "Refine Edge" button in the option bar. Within the Refine Edge menu, set the effect to black and white. Then, adjust "Smooth Edge" to 25 and "Contrast" to 40%, leaving other settings at their defaults. Ensure the "Output" is set to "Selection."
With the subject still selected, create a new layer (Layer > New > Layer or Shift+Ctrl+N). Then, create a layer mask for this new layer by going to Layer > Layer Mask > Reveal Selection. This transforms your active selection into a mask, effectively isolating your subject.
To prevent immediate alterations to the stock image, turn its visibility off by clicking the eye icon next to its layer. Then, select the layer thumbnail above your new masked layer to activate it. Ensure you have selected the layer itself, not the layer mask. Use the color fill tool to completely fill this layer.
Adding Imperfections and Simulated Brushstrokes
To imbue the image with a more authentic painted appearance, you'll add imperfections and simulated paint hatches. Select the mask thumbnail to work on the mask itself. Using the Brush Tool (B), select a texture brush. For instance, a "Dither and Hatches CS2" set might contain a suitable brush with a "crunchy, spray paint texture."
Adjust the brush settings in the "Shape Dynamics" tab: set the angle to 100% and leave other settings at 0% or unselected. Lightly spray this brush in clusters around the silhouette of your model. The aim is to cover most of the model with a tight aura around the silhouette, avoiding continuous strokes that can lead to an undesirable effect.
To further enhance this contour aura and add detail, apply the Unsharp Mask filter (Filter > Sharpen > Unsharp Mask) with an amount set to exactly 100%.
To simulate actual paint texture on the model, add subtle light and shadow to the flat silhouette. Set the foreground color to #ddaf91 and the background color to #edc9af. Reopen the spray brush used previously. In the "Brush" tab, toggle "Color Dynamics" and set the "Foreground/Background Jitter" to 100%, with all other settings at 0 or off.
Now, select the top layer (not the mask) and begin applying brush strokes to create texture. Multiple applications will be necessary for the texture to become apparent. The ideal result is light and subtle, as seen in examples.
Simulating Shadows and Depth
To introduce shadow details, duplicate the stock image layer (Layer > Duplicate Layer or Ctrl+J). Move this duplicate layer to the very top of the layer stack. Make this layer visible.
Apply the "Threshold" adjustment (Image > Adjustments > Threshold) and set the threshold to 201. This will create a stark black and white representation. Use the Magic Wand Tool to select any black area. Ensure the "Contiguous" checkbox in the tool option bar is unchecked.
Refine this selection using the "Refine Edge" menu. In the "Adjust Edge" submenu, set "Smooth" to 15, "Feather" to 3.5 px, and "Contrast" to 15, leaving other settings at their defaults.
Make this layer invisible again. With the area still selected, create a new layer and then a layer mask for it (Layer > Layer Mask > Reveal Selection). Now, the selection becomes a mask.
Bring up the Brush Tool and select a different brush from the "Dither and Hatches CS2" set â perhaps one with a spray paint-like texture. You can now begin drawing the shadow texture. It's advisable to move the brush in a wider area than the selection itself. Fill in the shadow texture until you are satisfied with the results.
Apply the Unsharpen Mask tool again (Filter > Sharpen > Unsharp Mask). Set the "Amount" to 165%, the "Radius" to 1.0 px, and the "Threshold" to 0. This will enhance the hatch texture, making it appear more realistic.
Adding Detail and Refined Brush Strokes
To further enhance the image with detail, create another copy of the original photograph layer and place it at the very top of the layer menu. Make this layer visible.
Navigate to Filter > Filter Gallery and select the "Angled Strokes" effect from the "Brush Strokes" subfolder. In the Angled Strokes menu, set "Direction Balance" to 44, "Stroke Length" to 7, and "Sharpness" to 8. This filter helps simulate angled brush strokes, enhancing the appearance of light sources.
Change the blending mode of this layer to "Darker Color." This allows the details of the top layer to combine with the textures of the layers beneath.
Now, adjust the image levels (Image > Adjustments > Levels or Ctrl+L). Set the lowest input level to 60. This action darkens the details, making them stand out more prominently against the underlying textures.
Create a layer mask for this layer (Layer > Layer Mask > Reveal All or by clicking the mask button). Select the default Brush Tool and press D to reset foreground and background colors to default (black and white). Use the paintbrush to paint over areas where you want more of the underlying texture to show through, such as areas with awkward shadows or where details are not appearing clearly.
Switch between black and white by pressing X or clicking the foreground/background swatches. Painting with black on the mask will reveal more of the underlying texture, while painting with white will hide it. Pay close attention to tricky areas, like dark lines around the model's skin. Apply this technique to the shadows as well.
Switch to the "Contour 2" layer (the one used for shadow contour). Use the default brush at varying opacities to manipulate its mask, allowing more or less of the texture to be visible. This step requires patience to achieve results similar to the example.
Refining Highlights and Eyes
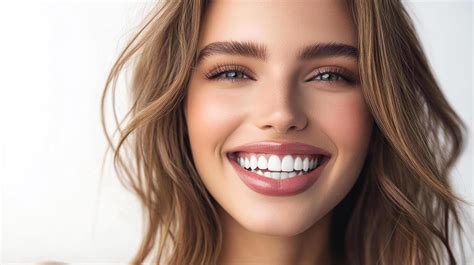
The current result is promising, but areas like the model's eyes and teeth might exhibit an undesirable color bleed due to the extensive filtering and texturing.
Create a brand new layer and position it at the top of the layer list. Select the default Brush Tool with white as your foreground color and set the brush opacity to 30%. Carefully paint over the white areas of the eyes, including reflections in the pupils. Adjust the layer's opacity until the whiteness appears natural and not overly photographic, maintaining the painted aesthetic. An opacity of 85% is suggested, but this will depend on the intensity of your initial application.
For the teeth, create yet another new layer at the top. This ensures that any adjustments to the teeth do not affect the eyes. Use the default brush with white foreground color and 30% opacity. Carefully fill in each tooth. Teeth in the foreground, receiving more light, should be brighter than those further back. Lower the layer's opacity to around 70% for a more natural look.
Adding Dramatic Lighting Effects
To add a final touch of drama and visual interest, implement dramatic lighting effects. Create a new layer and place it at the top. Set the layer fill amount to 0% in the layer menu. Double-click the layer to open the Layer Style options menu.
Toggle on "Gradient Overlay" and set the blend mode to "Overlay." Use the default black-and-white gradient, but reverse the colors so that black is on one side and white on the other. Click the gradient color selector to open the color menu. Adjust the opacity settings for your gradient, ensuring that white is completely transparent, allowing the black to fade into transparency. This final step adds depth and drama to your artwork.
By applying these diverse techniques, you can transform a standard photograph into a compelling digital painting within Photoshop, offering a unique artistic interpretation of your original image.
Exploring Alternative Styles and Techniques
Photoshop's versatility extends to mimicking various artistic styles, including pop art and different painting mediums.
Pop Art Effects
For those interested in emulating the iconic styles of artists like Andy Warhol or Roy Lichtenstein, Photoshop offers straightforward tutorials to add a pop art effect to a photo. These methods often involve manipulating color palettes, using bold outlines, and employing posterization effects to achieve the characteristic graphic look of pop art.
Watercolor Mockups
Creating a realistic watercolor effect or mockup in Photoshop can be achieved through a series of layered adjustments and filters. This process often begins with creating a new document and importing an image, which is then duplicated and converted into a smart object. Subsequent layers are created with various filters and blend modes, such as "Emboss," "Sharpen," "Cutout," "Overlay," and "Color," to build up the textured appearance of watercolor paper and paint. Filters like "Glowing Edges" and "High Pass" can add defining outlines and sharpening. Grouping these layers forms the foundation for the watercolor effect. Incorporating a border image, a textured overlay, and levels adjustments for contrast further enhances the realism of the watercolor mockup.
Oil Painting Without the Dedicated Filter
Not all Photoshop versions include the "Oil Paint" filter by default. However, this does not preclude achieving a convincing oil painting effect. Several techniques bypass the need for this specific filter.
One method involves a sequence of adjustments and filters:
- Duplicate the Background Layer: As always, this ensures non-destructive editing.
- Adjust Levels: Use
Image > Adjustments > Levelsto fine-tune the tonal range. - High Pass Filter: Apply
Filter > Other > High Passto enhance edges and details. - Unsharp Mask: Further sharpen the image with
Filter > Sharpen > Unsharp Mask. - Diffuse Filter: This is a key step. Apply
Filter > Stylize > Diffusemultiple times. To achieve a more uniform effect, rotate the image 90 degrees between applications of the Diffuse filter. Repeating this process four times, with rotations, can simulate various paint stroke angles and prevent visible flaws. - Reduce Noise: Apply
Filter > Noise > Reduce Noiseto smooth out any resulting noise. - Unsharp Mask (Again): Reapply
Filter > Sharpen > Unsharp Maskto bring back necessary details.
Additional steps might include duplicating the "Oil Painting" layer for more detail, merging layers for tone adjustment, and optionally adding colorful lights with a soft brush on a new layer, adjusting its blend mode and opacity.
Another approach utilizes the "Smudge Tool" extensively. This method involves creating a new layer from the background and then using the smudge tool with specific strengths (e.g., 20%) to blend mid-tones. Switching between "Normal," "Darken," and "Lighten" modes helps blend darker and lighter areas while avoiding distortion in critical features like faces. Following this, the "Angle Strokes" filter from the Filter Gallery can be applied to mimic oil painting strokes, with adjustable parameters for stroke length, sharpness, and direction balance. Selective color adjustments can then enhance whites, neutrals, and yellows, and overall color grading can be applied to create a vibrant oil painting look.
Utilizing the Mixer Brush Tool
The Mixer Brush Tool offers a more hands-on approach to simulating oil painting. This tool, found nested under the Brush Tool, allows for a realistic blending of colors, mimicking how oil paints behave on a canvas.
To use it effectively:
- Select the Mixer Brush Tool: Choose a soft round brush with approximately 80% hardness from the general brushes.
- Configure Brush Settings: Disable "Load brush after each stroke" and enable "Clean brush after each stroke." The "Moist" preset is often recommended for its oil painting simulation capabilities, though experimentation with other presets is encouraged.
- Prepare Your Layer: Create a new layer for the painting effect. Reduce the opacity of the original photo layer to around 75% to better visualize the painted areas.
- Begin Painting: Paint on the new layer, picking up colors from the underlying photograph and revealing them at full opacity. This process effectively creates the oil painting effect. To achieve the most realistic results, follow the contours of the subject in the photograph as you paint.
Using the Mixer Brush in Photoshop for Painting
By employing these diverse techniques, from AI-driven transformations to detailed manual brushwork, Photoshop empowers users to translate photographs into a wide spectrum of painted styles, unlocking new dimensions of creative expression.
tags: #photograph #to #painting #photoshop