Adobe Photoshop is an incredibly versatile tool that enables users to explore their creativity through a variety of features and commands, one of which is the Warp tool. The Warp tool in Photoshop is a powerful feature that allows us to manipulate the shape of images, text, and shapes by altering the underlying grid. It is a key tool in Photoshop, allowing us to adjust the perspective of different elements or the overall photo. The Warp tool in Photoshop allows you to stretch specific sections of your image. It is both a creative and a correcting tool. The numerous examples above give you a good starting point for trying out different warping methods. Try out each example so you can get a feel for the tool.
Accessing the Warp Tool
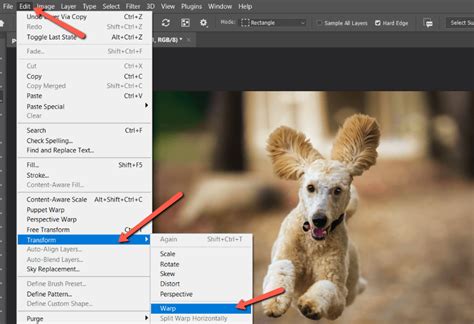
The Warp tool can be found in the Edit menu by navigating to Transform > Warp. Alternatively, you can access the Warp tool in Photoshop by pressing Cmd + T (Ctrl + T for Windows) to activate the Free Transform command on your current layer. Once Free Transform is active, a bounding box will appear around your selected layer. To engage the Warp functionality, you'll need to click on the Warp icon in the Options bar, which often looks like a curved grid over a curved arrow. When you select an image for warping, a gridded mesh should automatically appear over it.
Understanding the Warp Tool's Mechanics
The Warp tool operates on a grid system with control points. Clicking and dragging any part of this mesh will cause the image underneath to deform in the direction you drag it. When you bend or curve your image with the Warp tool, you will see short line segments with dots at the end appear in the grid. These are the control points, and they are essential components of the Warp Tool that we use to manipulate the image. These can be found at the intersection of the grid lines.
Customizable Grids and Control Points
The Warp tool offers a customizable grid that can have varying sizes and numbers of control points. You can add extra anchor points to have more control over the parts you want to warp and to lock parts of the image from distorting. To add more control points, you can use the split buttons in the Options bar to add grid lines or select a Grid preset. Click the Grid dropdown menu in the Options bar to change the default grid (1x1) to a different configuration. You can also create a custom grid and type the number of columns and rows in the Custom Grid Size pop-up window.
To split the grid, go to the Options bar and choose one of the three split buttons:
- Split Horizontally: Adds a horizontal line with anchor points.
- Split Vertically: Adds a vertical division with anchor points.
- Split Crosswise: Adds a vertical and horizontal division.
You can also add custom control points by holding down the Alt/Option key (on Windows or Mac) and clicking anywhere on the grid. This provides more control over image manipulation.
Warp Presets and Orientation
Photoshop’s Warp tool offers a range of warp presets. These are useful when you don’t require too much granular control for warping. You can find these presets in the Options bar. Click the Warp dropdown menu and choose a warp style to deform your image.
You can also change the orientation of a warp style using the "Change Warp Orientation" icon in the Options bar. This button typically looks like a curved grid next to a down arrow and a right arrow. This allows you to adjust how the warp is applied relative to the image.
Practical Applications of the Warp Tool
The Warp tool in Photoshop is incredibly versatile and can be used for both corrective and creative purposes.
Architectural Photography and Perspective Correction
The Warp tool in Photoshop is especially important for architectural photographers. When we take photos of buildings, we often have to look upwards. By pointing our camera up, the straight lines of a building converge, leading to perspective distortion. The Warp tool, particularly the Perspective Warp tool, helps correct these issues.
To use Perspective Warp, you first select the layer you want to edit. You are then able to set the parameters of the section you want to edit. Try to be as accurate as you can. You will want to zoom in to ensure each point is at the edge of the image you want to edit. Now, you can move each corner to match a flat surface. As the lines converge at the top, you will only want to drag the top corners outside of the frame. Having a grid over your image may be helpful. Applying a perspective warp requires a good understanding of the relationship between the camera's location and the objects being photographed.
Perspective warp tool Photoshop Tips and Tricks
Creative Design and Image Manipulation
Creatives will also find the warp tool important. It allows us to move shapes to fit inside a convincing 3D perspective. You can do this for both image and text. The Warp tool can also be useful for creating abstract images by messing around with the proportions of the images.
For example, you can take a logo and warp it to fit onto a curved surface like a television screen, making the placement look more realistic. Similarly, you can take an image of a flat object and warp it to appear as if it's wrapped around a cylindrical object. To achieve a Cylinder Warp, you would open the image, create a rectangular selection around it, and then go to Filter > Distort > Polar Coordinates, choosing the "Rectangular to Polar" option.
Another creative application involves using the warp tool to create unique effects like a magnifying glass distortion or to elongate objects, such as turning a regular car into a limousine by selecting the center points and dragging them to stretch the image.
The Puppet Warp Tool: For More Nuanced Control
Puppet Warp is a specialized warp tool in Photoshop that is specifically used to edit people and their movements, but it can be applied to any image. It is a quick, freehand way of manipulating an image.
How to Use Puppet Warp
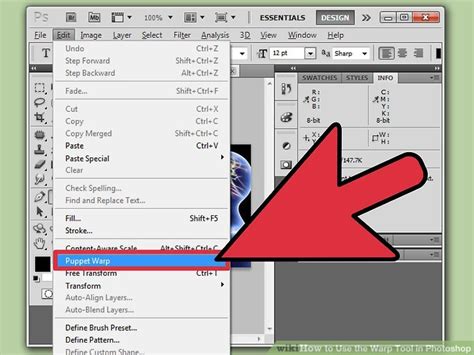
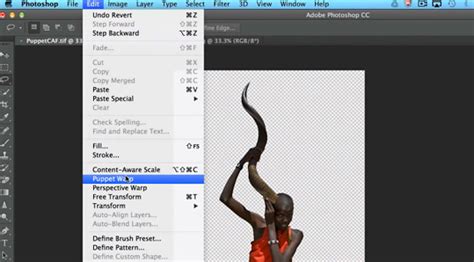
First, you will want to duplicate your layer and, if necessary, separate your subject using a selection tool. Then, find the Puppet Warp tool in Edit > Puppet Warp. A warp mesh will cover the image or selection, and then you can add anchor points by clicking on the mesh over the areas you want to distort.
It is best to place pins where a subject's joints would be. For example, if you are using the Puppet Warp tool to move the position of someone's arm, you might put a pin on their hand, another on their elbow, and a third on their shoulder. Once you've placed your array of pins, you can click and drag any pin individually to move it. This will warp the image accordingly, pushing or pulling the area around the pin as you move it.
The Puppet Warp tool relies on a good understanding of movements and how the tool works to make convincing edits. This will take practice.
Puppet Warp Settings
On the Options bar, you can adjust a few settings:
- Mode: Defines the elasticity of the mesh and how it looks when deforming the image. You can set it to Rigid, Normal, or Distort. Rigid keeps the mesh more still when morphing, while Distort is more stretchy, allowing you to change perspective.
- Density: Allows you to change the spacing of mesh points. "Fewer Points" work for basic objects with less movement. "More Points" provides a finer mesh with higher precision but requires more processing and computer resources.
- Expansion: Adjust the Expansion to add or reduce the space at the edges of the mesh.
- Pin Depth: Allows you to warp that part of the image to the background or foreground. Select one or more mesh points and click one of the Pin Depth buttons to warp to the back or to the front.
Warping Text
Not only can we warp images, but also text layers in Photoshop. To apply Warp to text, first, create a text layer. Then, select the "Create Warped Text" button in the options panel, and choose a style from the Warp drop-down menu. Alternatively, you can create a text layer, rasterize it or convert it to a Smart Object, and then apply the standard Warp transform (Edit > Transform > Warp) to manipulate its shape using the grid.
Advanced Techniques and Considerations
Custom Grids for Precision
The enhanced Warp tool offers the ability to work with custom grids, providing more control over image manipulation. Start by selecting the Warp command, then choose Grid from the options panel. Adjust the columns and rows as needed, and begin warping the image by dragging the control points.
Working with Layers and Selections
When working with the Warp tool, it's essential to have a good understanding of selection tools and layer management. Layers are an essential component of organizing and editing images. The Layers panel allows us to access and manipulate layers efficiently. Some common layer editing techniques include adding layer masks and using blending modes. Layer masks allow us to hide or reveal areas of a layer non-destructively, which is crucial for isolating elements before warping.
Before you can warp anything in Photoshop, you need to convert the background layer to an editable layer (e.g., by duplicating it). If you want to warp only a specific element in your photo, you need to use one of the selection tools, such as the lasso or the rectangular marquee tool, to select the element and then create a new layer from that selection.
Using Vanishing Points
One advanced technique to consider is using a vanishing point while manipulating the warp orientation. This adds an element of perspective to your images, enhancing the overall realism and depth.
Warp Tool in Third-Party Plugins
Beyond Photoshop's native tools, third-party plugins can offer even more advanced warping capabilities. For instance, Optics, a plugin from Boris FX, features a variety of warp filters designed for creative distortion. These include Pin Warp for precise localized warping, SWarpPolar for disk-like deformations, SWarpTransform for scale, shift, and perspective adjustments, and SWarpFishEye and SWarpMagnify for lens simulations. These plugins often come with extensive presets and offer a seamless integration into Photoshop workflows, allowing for non-destructive editing when used with Smart Objects.
Limitations and Future Updates
As of now, the Warp tool is not available in Photoshop for iPad. However, Adobe is continually updating the app and adding new features, so the Warp tool may become available in future updates.
Conclusion
The Warp tool in Photoshop is an important tool in Photoshop’s arsenal. It is both a creative and a correcting tool. Mastering selections and layer editing techniques is crucial for any Photoshop user to effectively utilize the Warp tool. The numerous examples provided offer a good starting point for trying out different warping methods. By experimenting with its various functions, users can achieve impressive results, from correcting perspective problems to creating entirely new artistic visions.