Photoshop offers a powerful suite of tools for isolating specific areas of an image, a fundamental skill for any digital artist or editor. Understanding how to effectively use these selection tools is paramount to manipulating images precisely, whether you're retouching portraits, creating composite scenes, or designing graphics. This guide delves into the core selection tools, starting with the foundational geometric marquees and progressing to more nuanced techniques, providing a clear path for users of all skill levels to master Photoshop's selection capabilities.
The Geometric Marquee Tools: Building Blocks of Selection
At the heart of Photoshop's selection arsenal lie the geometric marquee tools: the Rectangular Marquee Tool and the Elliptical Marquee Tool. These tools are indispensable for creating precise selections in the shapes of rectangles, squares, ovals, and circles. They are the workhorses of many selection tasks and are used on a regular basis by professionals and hobbyists alike.
The Rectangular Marquee Tool allows you to draw a selection in the shape of a rectangle. By holding down the Shift key while dragging, you can constrain the shape to a perfect square.
The Elliptical Marquee Tool functions similarly, enabling the creation of oval selections. Holding Shift while using this tool will produce a perfect circle.
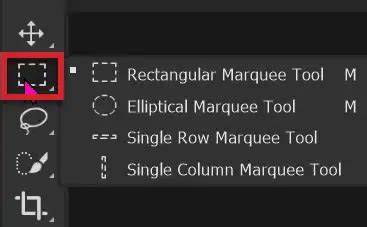
These tools are easily accessible via keyboard shortcuts. If another tool is currently active, pressing the 'M' key will switch you to the Rectangular Marquee Tool. To toggle between the Rectangular and Elliptical Marquee tools, use the shortcut Shift + M. Pressing Shift + M again will cycle back to the Rectangular Marquee Tool.
Understanding Selection Behavior: Marching Ants and Moving Pixels
Once you've made a selection using a marquee tool, you'll notice an animated dashed line surrounding the selected area. This is commonly referred to as "marching ants" and visually indicates the boundaries of your selection.
There are two primary ways to interact with this selection outline:
Moving the Selection Outline: If you drag your cursor outside the marching ants boundary, you will create a new selection outline. However, if you drag your cursor inside the marching ants, you are not moving the selected pixels themselves. Instead, you are repositioning the selection outline to a different location on the image.
Moving Selected Pixels: To actually move the pixels within the selection, you need to switch to the Move Tool. This tool can be accessed by pressing the 'V' key. When the Move Tool is active and your cursor is inside the selection outline, it will typically appear as an arrowhead with a pair of scissors. This visual cue signifies that dragging will cut the selected area from its background.
Working with Backgrounds and Floating Selections
When working with a flat image format like JPEG, which lacks distinct layers, moving a selection by cutting it will reveal the background color, which is typically white by default. If your background color swatch in the toolbox is set to a different hue, that color will be revealed in the newly created hole.
This action creates what is known as a "floating selection." While you can drag this floating selection to a new position, it's a somewhat precarious state. If you were to then select a new area with a marquee tool, the floating selection would automatically deselect and "drop" into place, potentially causing irreversible changes to your image. This can lead to a damaged image if not handled carefully.
The Safer Approach: Jumping Selections to New Layers
To avoid damaging your original image, the safer and more professional method for moving selections is to isolate them on their own independent layer. This is achieved through a very useful keyboard shortcut: Control + J (or Command + J on a Mac).
Pressing Control + J (or Command + J) will duplicate the contents of your selection onto a new layer. This leaves the original image untouched. You can then toggle the visibility of the original layer off to see your selection isolated on its new layer. With the selection on its own layer, you can then use the Move Tool (V) to reposition it freely without affecting the background.
To activate the Move Tool on the fly while another tool is selected, you can press and hold the Control key (on PC) or the Command key (on Mac). This will temporarily bring up the Move Tool cursor, allowing you to move the selected layer. Releasing the Control or Command key will return you to your previously active tool.
Advanced Layer Jumping Options
Photoshop offers further control over how selections are moved to new layers:
Control + Alt + J (or Command + Option + J on Mac): This shortcut not only jumps the selection to a new layer but also prompts you to name the new layer. This is incredibly useful for organizing complex projects with many layers.
Control + Shift + J (or Command + Shift + J on Mac): This shortcut also jumps the selection to a new layer, but instead of duplicating the content, it cuts the selection from the original layer, leaving a hole behind. This is equivalent to using the Move Tool with the scissors icon visible and then placing the cut selection on a new layer.
Control + Shift + Alt + J (or Command + Shift + Option + J on Mac): This comprehensive shortcut combines the functionality of cutting the selection to a new layer while also forcing the "New Layer" dialog box to appear. This allows you to name the layer and choose its destination, providing maximum control over the cut-and-paste operation. Because the Alt/Option key is included, it forces the display of the new layer dialog box, and with the Shift key down as well, it cuts a hole in the background.
Photoshop Selection Tools - The Essential Marquee Tools
These fundamental selection techniques, particularly the use of marquee tools and the ability to jump selections to new layers, form the bedrock of efficient image manipulation in Photoshop. Mastering these basics will empower you to tackle more complex selection challenges and unlock the full potential of your creative workflow. As you become more comfortable, you can explore more advanced selection methods like the Lasso Tools, Magic Wand, Quick Selection, and Pen Tool, each offering unique advantages for different selection scenarios. The ability to accurately and efficiently select parts of an image is a skill that will continuously serve you as you progress in your Photoshop journey, enabling precise edits, seamless composites, and impactful visual storytelling.