Adobe Photoshop, a powerhouse in image editing software, offers an accessible pathway to creating professional-looking fog effects, transforming ordinary photographs and artwork into scenes imbued with mystery and atmosphere. This article delves into the multifaceted techniques for generating realistic fog within Photoshop, catering to users with basic to advanced knowledge of the software. From foundational layer adjustments to sophisticated overlay manipulations, we will explore how to add a dreamy, ambient quality to your visual creations.
The Foundation of Fog: New Layers and Brushwork
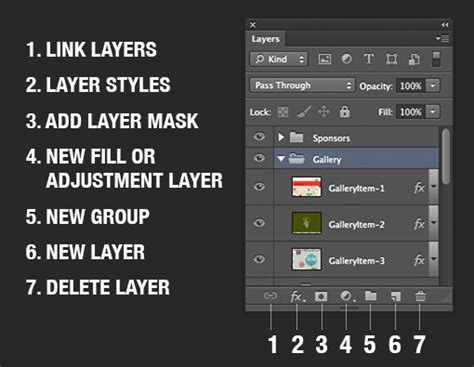
At the core of creating any realistic effect in Photoshop lies the intelligent use of layers. To begin crafting your fog effect, the essential first step is to create a New Layer specifically for this purpose. This isolation ensures that your fog elements can be manipulated independently without impacting the original image.
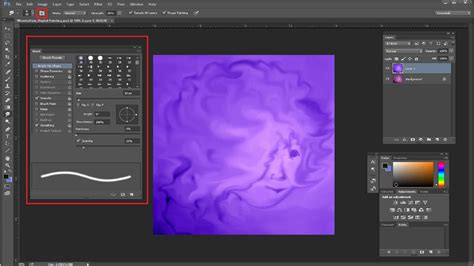
The primary tool for laying down the initial "mist" is the Brush Tool. Selecting a soft, round brush is crucial for achieving a natural, diffused appearance. The color white is typically the starting point, but its opacity is key to subtlety. Reducing the brush opacity to approximately 10-20% allows for a delicate build-up of fog, mimicking its natural translucency. By adjusting the opacity of this new layer, you gain granular control over the density of the fog, allowing it to appear more subtle or significantly more dense as per your artistic preference. This initial application forms the base upon which more refined details will be built.
Refining the Fog: Blending Modes and Color Adjustments
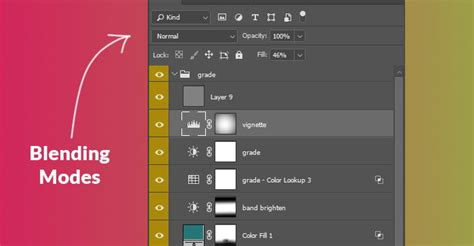
Once the basic layer of fog is established, the next critical phase involves refining its appearance through blending modes and color adjustments. Experimenting with different Blending Modes on the fog layer can dramatically alter how it interacts with the underlying image. Modes such as "Multiply" can deepen shadows and add a sense of atmospheric haze, while "Screen" can create a lighter, more ethereal mist.
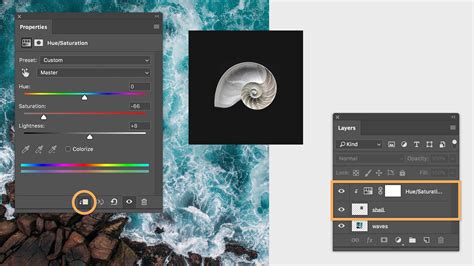
The color of the fog is paramount to its realism. While white is a common starting point, a truly convincing fog often incorporates subtle hues. Selecting a grey color that aligns with the desired mood is a good practice. Further adjustments can be made using the Hue/Saturation sliders or other color correction tools available within Photoshop. It is important to consider the overall contrast of your image; if certain areas appear too bright, increasing saturation or decreasing brightness levels can contribute to a more natural-looking integration of the fog. The interplay between color, opacity, and blending modes is where the fog effect truly begins to breathe life into the image.
Adding Depth and Texture: The Smudge Tool and Noise
To enhance the realism and give the fog a more tangible, less uniform quality, the Smudge Tool offers a powerful means of manipulation. This tool allows users to blend and manipulate pixels, creating smoky or misty atmospheres that feel organic. To employ the Smudge Tool effectively, zoom into an area of your image where you want to introduce more texture or variation in the fog. Then, drag the tool around in a circular or sweeping motion over the selected areas. Adjusting the brush size of the Smudge Tool is critical for controlling the denseness and detail of the fog effect. Larger brush sizes will create broader, softer movements, while smaller sizes can introduce finer wisps and tendrils. Users can also control how opaque or transparent certain regions of the fog appear by adjusting the opacity settings within the brush's palette menu.
Furthermore, introducing subtle noise can greatly enhance the texture of the fog, preventing it from appearing too smooth or digital. Applying a small amount of noise, often through the "Filter > Noise > Add Noise" option, can simulate the granular quality of real atmospheric particles. Adjusting the "Noise" and "Grain Size" settings until the desired results are achieved will contribute significantly to the overall believability of the fog effect.
Advanced Techniques: Overlays and Adjustment Layers
For those seeking to elevate their fog effects to a more sophisticated level, the use of fog overlays and adjustment layers provides a wealth of creative possibilities. Overlays are essentially images or textures that are placed on an additional layer, allowing for the insertion of new elements that were not originally present in the photograph.
Utilizing Fog Overlays
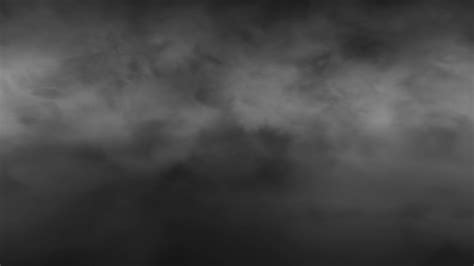
When working with fog overlays, the process typically begins with importing the desired overlay image into your Photoshop document. If the overlay has a dark background that you wish to eliminate, changing the layer's Blending Mode to "Screen" is a highly effective method. This mode allows lighter pixels to show through while rendering darker pixels transparent, seamlessly integrating the fog into your background. The opacity of the overlay layer can then be adjusted to control its intensity.
Resizing and rotating overlays is easily accomplished using Photoshop's Free Transform tool (Command/Control + T). This allows for precise placement and integration of the fog into the scene. Once the overlay is positioned, further refinement can be achieved with adjustment layers.
The Power of Adjustment Layers
Adjustment layers offer non-destructive ways to modify the appearance of your fog and the underlying image. A "Levels" Adjustment Layer, for instance, can be used to add more depth to the fog, particularly if the overlay contained a black background. By clipping this adjustment layer to the fog overlay (ensuring it only affects the layer directly beneath it), you can manipulate the black point, mid-tones, and white point to fine-tune the fog's luminance and contrast.

To enhance the background image and make the fog appear more integrated, additional adjustment layers can be employed. A "Color Lookup" adjustment layer, utilizing pre-set LUTs (Look-Up Tables) such as "FoggyNight.3DL," can impart a specific mood and color cast to the entire image, darkening it slightly and deepening the atmospheric effect. Finally, a "Brightness/Contrast" adjustment layer can be used to subtly enhance the overall impact of the scene, ensuring the fog complements rather than overpowers the original composition. The interplay between these adjustment layers and the fog overlay is key to achieving a truly photorealistic result.
Creating Custom Fog Brushes
For unparalleled control and personalization, creating custom fog brushes offers a highly effective approach. This technique involves using existing imagery, such as a photograph of a cloud, as the source for your brush.
Harnessing Clouds for Fog Brushes
Image-editing expert Aaron Nace demonstrates a method where channels are employed to isolate a cloud from its surrounding sky. By converting the background to black and then painting white over the cloud, a distinct brush shape can be generated. This custom brush, now imbued with the texture of a cloud, can be applied to your image to paint in fog.
How To Create a Smoke/Fog Brush In Photoshop
When painting with a custom fog brush, modifying brush settings is essential for achieving a realistic environmental effect. Adjusting brush flow, size, and scattering can mimic the natural variations in fog density and distribution. While a graphics tablet offers the most intuitive control, these effects can also be achieved using a mouse. The ability to craft a brush tailored to your specific needs allows for a unique and highly personalized fog effect.
Integrating Fog into Your Workflow: Practical Tips and Considerations
Beyond the specific tools and techniques, several practical considerations can significantly enhance your fog effect creation process. Understanding how fog behaves in different environments and how it interacts with light is crucial for achieving convincing results.
Understanding Light and Fog Interaction
Fog, being composed of tiny water droplets or ice crystals suspended in the air, scatters light. This scattering effect can create a diffusion of light sources, leading to phenomena like light beams or "god rays." To simulate these, one can create a new layer and paint random patches of white with the brush tool. Applying a radial blur (Filter > Blur > Radial Blur, with "Zoom" selected as the Blur Method) can transform these patches into streaks of light. Adjusting the zoom amount and the blur's center point allows for control over the intensity and direction of these light beams, adding a dramatic and realistic element to your foggy scenes.
Color Harmony and Ambient Light
When adjusting the color of your fog, it's essential to consider the ambient light of the scene. The fog will naturally pick up subtle color casts from its surroundings. For instance, if your image has a warm, golden sunlight, infusing a hint of yellow into the fog can significantly increase its realism. Using the Hue/Saturation adjustment with the "Colorize" option checked allows for precise control over the fog's color, enabling you to harmonize it with the overall lighting of your image. This attention to color detail bridges the gap between a digital effect and a naturally occurring phenomenon.
Layer Management and Performance
As you build up your fog effect with multiple layers, blending modes, and adjustments, it's important to be mindful of your Photoshop document's complexity. The more layers you add, the longer it may take for Photoshop to render your changes. Organizing your layers into groups and naming them descriptively can greatly improve workflow efficiency. Furthermore, understanding how different blending modes and adjustment layers impact performance can help you optimize your workflow for smoother editing.
Beyond Manual Creation: Plugins and Actions
For those who wish to expedite the fog creation process or explore a wider range of atmospheric effects, Photoshop plugins and actions offer powerful solutions. These pre-built tools can dramatically speed up workflow and provide access to sophisticated effects with minimal effort.
Leveraging Fog Plugins
Several excellent plugins are available on the market designed specifically for creating realistic fog effects in Photoshop. Tools like the Fogmaker plugin from Filter Forge provide users with comprehensive control over the density and intensity of the fog. These plugins often offer a more streamlined approach, allowing for quick application and adjustment of fog elements, which can be particularly beneficial for designers working under tight deadlines.
Exploring Fog Actions
Photoshop actions are pre-recorded sequences of commands that can be played back to automate tasks. There are numerous fog actions available that can transform your images with a single click. These actions often combine multiple layer adjustments, brush strokes, and filter applications to generate complex fog effects. The Fog Animation Photoshop Action, for example, stands out as a top-tier choice for creating various weather effects, including fog. Such actions can be invaluable for quickly experimenting with different looks without having to start from scratch each time.
The Evolving Landscape of Graphic Design
The techniques for creating realistic fog effects in Photoshop are part of a broader evolution in graphic design. As technology advances, so do the tools and methodologies available to designers. In the current landscape, and looking towards the future, the integration of 3D modeling and advanced digital illustration techniques are becoming increasingly prominent. However, the foundational skills of image manipulation within software like Adobe Photoshop remain critical.
The ability to manipulate layers, apply subtle color adjustments, and utilize tools like the Smudge Tool and various filters are timeless skills. Whether you are a beginner graphic designer looking to hone your craft or a seasoned professional seeking to expand your repertoire, practicing these techniques regularly is key. Drawing inspiration from existing artwork and understanding the powerful impact of color in visual design will further elevate your abilities. Adobe Photoshop, with its extensive library of effects and filters, continues to be an indispensable tool for creatives, enabling them to translate their imagination into stunning visual realities. The pursuit of creating realistic fog effects is a testament to the software's versatility and its enduring role in shaping the visual world.