The pursuit of flawless imagery in fashion and advertising often leads to the digital darkroom of Adobe Photoshop. While the allure of perfect skin, seamless backgrounds, and precisely placed elements might seem like magic, it's frequently the result of skilled manipulation with powerful tools. Among these, the Clone Stamp tool stands out as an indispensable asset for designers and retouchers. This versatile instrument allows for the precise duplication of image areas, enabling the removal of distractions, the correction of imperfections, and even the repositioning of objects, ultimately contributing to the polished aesthetic demanded by the fashion industry.
The Core Functionality: Duplicating Pixels
At its heart, the Clone Stamp tool operates on a fundamental principle: sampling pixels from one location and painting them onto another. As Dan Rodney, a seasoned designer and web developer with over 20 years of experience, explains, "The Clone Stamp uses a sampling point from one area to copy portions and colors to cover another area. It can be very effective for covering unwanted areas or moving objects to a different place." This direct pixel-to-pixel transfer offers a level of control that is crucial for detailed retouching.
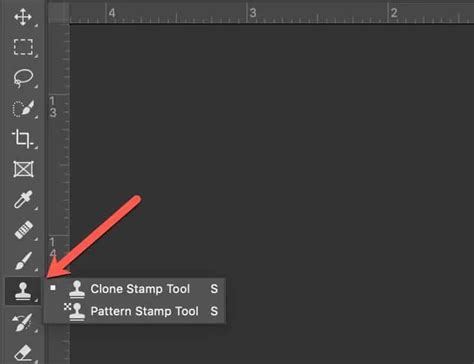
To initiate the cloning process, the user must first select the Clone Stamp tool from the Photoshop toolbox, typically by pressing the 'S' key. The tool's settings, accessible via the options bar at the top of the screen, offer significant customization. Key adjustments include brush size, hardness, opacity, and flow. Brush size dictates the area of the sample that will be painted, while hardness affects the softness of the cloned edge. Opacity controls the transparency of the cloned pixels, and flow determines the rate at which the effect accumulates. These settings are paramount for achieving a seamless blend and avoiding an obviously "stamped" appearance.

The critical first step in using the Clone Stamp tool is defining the source point. This is achieved by holding down the Alt key (Windows) or Option key (macOS) and clicking on the desired area of the image. This action "samples" the pixels at that location. Once the source is set, the user can then move their cursor to the target area-the part of the image they wish to cover or modify-and begin painting. As the user paints, a crosshair will appear on the image, indicating precisely where the pixels are being copied from in relation to the brush cursor. This visual cue is invaluable for maintaining spatial relationships and ensuring accurate replication.
Non-Destructive Editing: Preserving the Original
A cornerstone of professional image editing, particularly in fashion CAD where original assets are valuable, is the practice of non-destructive editing. This approach ensures that the original image data remains intact, allowing for revisions and experimentation without permanent alterations. The Clone Stamp tool can be employed non-destructively by diligently working on a separate layer.
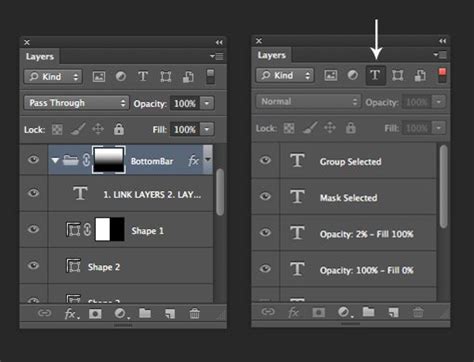
To implement this, one would first open the desired image in Photoshop. Then, within the Layers panel, a new layer is created by clicking the small icon at the bottom. This new layer is then named, perhaps "Retouch," to clearly distinguish it from the original. "It is a good idea to make the changes non destructively by keeping them on a separate layer. So if you need to go back, you can do so without problems," emphasizes the provided material. To further safeguard against accidental modifications to the underlying layers, the "Retouch" layer's position can be locked by clicking the small cross in the top section of the Layers Panel.
When working on this separate layer, it is crucial to adjust the "Sample" setting in the Clone Stamp tool's options bar. Selecting "Current & Below" or "All Layers" ensures that the tool samples pixels from the original image layer(s) while painting onto the new, empty "Retouch" layer. This method effectively "builds up" the desired edits on the new layer, leaving the background layer untouched.
Applications in Fashion Retouching: Perfecting the Model
The fashion industry's demand for flawless presentation makes the Clone Stamp tool a vital component of model retouching. The exercise materials highlight its utility in refining a model's appearance, such as correcting teeth and skin imperfections.
For instance, when addressing blemishes on a model's cheeks, the Healing Brush tool is often suggested. However, the Clone Stamp tool proves superior when dealing with crisp edges or fine details like stray hairs. The provided training materials note, "The Clone Stamp is better than the Healing Brush near crisp edges." If a model has flyaway hairs that detract from the overall image, the Clone Stamp tool is the preferred method for removal. "You don’t want to use the Healing Brush because it would blend the hair into the skin and darken it," the notes caution. Instead, by sampling a clean area of skin or background and carefully painting over the unwanted hairs, they can be seamlessly eliminated.
Similarly, when retouching teeth, the Clone Stamp tool can be employed to remove minor discolorations or fill in small gaps, ensuring a uniformly bright and even smile. The process involves sampling a clean section of tooth and carefully painting it over the imperfect area.

Beyond Retouching: Moving Objects and Creating Textures
The versatility of the Clone Stamp tool extends beyond simple blemish removal and hair tidying. It can also be used to reposition objects within an image, a technique that can be invaluable in fashion photography and product layout. Imagine a flat lay photograph of clothing or accessories where an item is slightly out of place. The Clone Stamp tool allows for the object to be "lifted" from its original position by sampling it and then "replanted" in a more aesthetically pleasing location.
The process for moving objects is similar to retouching. First, the background layer is selected, and the object to be moved is sampled using the Alt/Option-click method. Then, switching back to the "Retouch" layer, the user paints over the original position of the object to cover it with background texture. Subsequently, the sampled object is painted onto the new desired location. The Clone Source panel, accessible by clicking the small folder icon, offers additional controls to adjust the angle and size of the cloned image before placement, allowing for more sophisticated manipulation.
Furthermore, the Clone Stamp tool can be used to create or enhance textures. While the Pattern Stamp tool is specifically designed for applying predefined patterns, the Clone Stamp tool can be used to sample existing textures from one part of an image and repeat them elsewhere, adding depth or consistency. For example, if a designer wants to create a "grungy and vintage" look, they might use the Clone Stamp tool to sample and repeat textured areas, or to add texture to elements like clothing or accessories.
Advanced Techniques and Considerations
To achieve truly professional results with the Clone Stamp tool, several advanced techniques and considerations come into play. Understanding the nuances of brush dynamics, blending modes, and the "Aligned" option can significantly elevate the quality of the final image.
The "Aligned" option in the Clone Stamp tool is particularly important. When checked, the clone source maintains its relative position to the cursor as you paint. This means if you move the cursor down and to the right, the crosshair indicating the source also moves down and to the right from its initial sampled point. If "Aligned" is unchecked, the clone source point remains fixed, and every brush stroke starts from that exact same sampled area. For most retouching tasks, leaving "Aligned" checked is preferable as it allows for a more fluid and natural application of cloned pixels.
As mentioned earlier, opacity and flow are critical for controlling the intensity of the cloned effect. Lowering opacity allows for a more subtle build-up of cloned pixels, which is essential for blending and avoiding harsh lines. Flow controls how quickly the paint is applied. A lower flow can be used for gradual blending, while a higher flow provides more immediate coverage.
Photoshop also offers various blending modes for the Clone Stamp tool, similar to those found in other brush-based tools. While "Normal" is the default, modes like "Darken," "Lighten," or "Overlay" can be used to achieve different integration effects with the underlying pixels. For instance, using "Lighten" might be beneficial when trying to lighten an area by cloning from a lighter source, while "Darken" could be used to subtly deepen an area.
Even when using the Healing Brush, the "Fade Healing Brush" option in the Edit menu, available immediately after a brush stroke, allows for opacity adjustment, offering a similar level of control to the Clone Stamp's opacity setting. This feature is particularly useful for fine-tuning the blend of healing effects.
Common Pitfalls and Troubleshooting
Despite its power, the Clone Stamp tool can lead to undesirable results if not used carefully. Some common issues include picking the wrong source area, inadequate blending, and an inconsistent texture or pattern.
One of the most frequent mistakes is sampling from an area that does not logically match the target area. For example, cloning skin texture from a heavily shadowed region onto a well-lit area will inevitably look unnatural. Always strive to sample from a source that closely matches the target in terms of lighting, color, and texture.
Inadequate blending is another common problem. This often arises from using a brush that is too large, an opacity that is too high, or not taking the time to feather the edges of the cloned area. Using smaller brush sizes, lower opacities, and varying the angle of the cloned source can help create a more seamless transition.
An inconsistent texture or pattern can occur when the same source area is repeatedly cloned without variation. This can lead to repetitive, unnatural-looking patterns. Regularly re-sampling from different but compatible areas of the image is crucial to maintain visual integrity.
The "Clone Source" panel, with its ability to adjust the angle and size of the cloned image before placing it, can also be a powerful tool for overcoming textural inconsistencies. For instance, if a pattern needs to be rotated to match the surrounding area, this can be adjusted directly in the Clone Source panel.
Alternatives and Mobile Applications
While Photoshop's Clone Stamp tool is a professional standard, there are free and online alternatives available. GIMP, a powerful open-source image editor, offers a similar cloning tool. Photopea and Pixlr are popular web-based editors that also provide cloning functionalities, making them accessible for users without dedicated software.
Furthermore, the capabilities of the Clone Stamp tool have extended to mobile platforms. Adobe offers a version of Photoshop for iPad that includes the Clone Stamp tool, allowing for sophisticated image editing on the go. This expansion democratizes powerful editing features, enabling a wider range of users to refine their images.
Ultimately, whether used on a desktop or a tablet, the Clone Stamp tool remains a fundamental instrument for achieving polished and professional-looking images. Its ability to precisely replicate and manipulate image areas makes it an indispensable asset in the toolkit of anyone involved in fashion CAD, photography, and digital art. The key to mastering it lies in understanding its core mechanics, practicing non-destructive workflows, and paying close attention to the subtle details that differentiate a skillfully edited image from one that looks overtly manipulated.