Watermarks are a common sight on digital images, serving to protect copyright and indicate ownership. However, there are many legitimate reasons why one might need to remove a watermark from a photograph. Perhaps you've accidentally lost the original, or you need to repurpose an image for a specific project. Whatever the reason, Adobe Photoshop offers a powerful suite of tools to tackle this task. This guide will walk you through various methods, from simple to advanced, to effectively remove watermarks and reclaim your images.
Understanding Watermarks and Their Purpose
The term 'watermark' refers to an element, often a text or logo, that is superimposed onto a document or piece of content, most frequently seen on photographs. Its primary purpose is to illustrate the photographer's copyright intent, acting as a deterrent against unauthorized use. Watermarks can appear transparent or opaque, and while they serve a crucial protective function, they can also impact the polished appearance of a photo.

There are two main perspectives from which a watermark can be viewed as helpful. Firstly, it’s a protective measure for the creator. Secondly, for the user, if the original image is accidentally deleted or lost in some other way, removing the text or logo watermark can be the only solution to get back to the original shot. While many photo editing programs can handle watermark removal, Adobe Photoshop stands out for its robust capabilities.
Essential Photoshop Tools for Watermark Removal
Photoshop offers a diverse toolkit for image manipulation, and several features are particularly adept at removing watermarks. These tools range from automated solutions to those requiring more manual precision.
1. The Spot Healing Brush Tool: Quick and Effortless Removal
For a swift and straightforward approach, the Spot Healing Brush Tool is an excellent starting point. This tool functions much like a digital eraser, intelligently removing unwanted objects from an image.
Why use it?It is ideal for removing small text, watermarks, or logos, especially when they are situated on plain backgrounds like the sky, skin, or a wall.
How to use the tool?
- Open your image in Photoshop by navigating to
File > Open. - To preserve the original, create a duplicate layer by pressing
Ctrl+J(Windows) orCommand+J(Mac). - Select the Spot Healing Brush Tool from the left-hand toolbar.
- In the top settings bar, choose "Content-Aware" for the blending mode.
- Adjust your brush size to be slightly larger than the watermark text you wish to remove.
- Zoom in on the watermark area by pressing
Alt(Windows) orOption(Mac) and clicking. - Click or drag your brush over the watermark. Photoshop will automatically remove it by sampling and blending nearby pixels.

2. The Clone Stamp Tool: Precision for Textured Backgrounds
When Photoshop's automated tools struggle due to intricate backgrounds with patterns, textures, or details (such as bricks, leaves, fabrics, or faces), the Clone Stamp Tool becomes invaluable. This tool grants complete control over the removal process, making it perfect for tricky areas where automatic guessing might lead to undesirable results.
Why use it?It's highly effective for watermarks situated on textured or patterned areas like grass, bricks, or fabric.
How to use the tool?
- Open your image and duplicate the background layer (
Ctrl+JorCommand+J). - Select the Clone Stamp Tool from the toolbar on the left.
- Adjust your brush size and hardness in the options bar to suit the area you're working on.
- To sample pixels, hold down
Alt(Windows) orOption(Mac) and click on a clean area adjacent to the watermark. - Release the key and then paint over the watermark using controlled, thin strokes.
- To avoid noticeable repetition, frequently re-sample from different clean areas by holding
Alt/Optionand clicking again. - Employ light strokes for a more refined removal of the watermark.
- Zoom in closely to clean up any edges for a seamless finish.

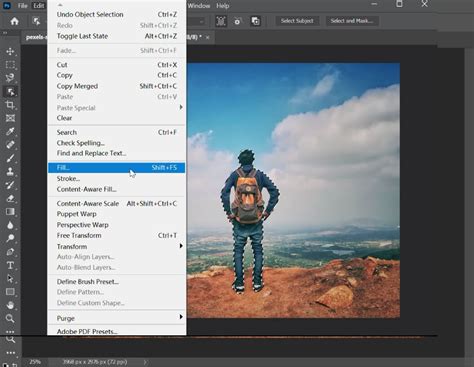
3. The Lasso Tool combined with Content-Aware Fill: Smart Selection and Blending
For a more intelligent approach to removing watermarks, particularly logos or text-based marks, the combination of Photoshop's Lasso Tool and Content-Aware Fill is exceptionally useful. This method involves selecting the unwanted area and then allowing Photoshop to intelligently predict and fill what should be behind it. It offers more control than the Spot Healing Tool without demanding the extreme precision of the Clone Stamp.
Why use it?This method is well-suited for medium-sized logos or clusters of watermarks on backgrounds with moderate detail.
How to use the tool?
- Open your image and duplicate the background layer.
- Select the Lasso Tool and draw a loose selection around the watermark. Avoid making the edges too tight.
- Navigate to
Edit > Fill(or pressShift+F5). - In the pop-up box that appears, choose "Content-Aware" under the "Contents" dropdown menu.
- Ensure the Blending Mode is set to "Normal" and Opacity is at 100%.
- Click "OK" to allow Photoshop to automatically fill the selected area.
- Deselect your selection by pressing
Ctrl+D(Windows) orCommand+D(Mac). - If the filled area appears unusual, repeat the process or refine the result using the Spot Healing Brush.
4. Content-Aware Fill: Intelligent Image Analysis
Content-Aware Fill is a powerful feature that allows Photoshop to "see" your image and intelligently predict what should replace a selected area. This tool provides more granular control than the basic Fill option and is excellent for removing watermarks surrounded by patterns or gradients.
Why use it?Ideal for removing watermarks that are situated over patterns or gradients.
How to use the tool?
- Duplicate your image layer.
- Use any selection tool (Lasso, Marquee, or Quick Selection) to select the watermark.
- Go to
Edit > Content-Aware Fill. - A new window will open. The green overlay indicates the sampling area. Adjust the sampling brush to exclude irrelevant parts of the image from the analysis.
- Under "Output Settings," select "New Layer" for non-destructive editing.
- Click "OK." Photoshop will generate a new layer with the filled result.
- Use the Healing Brush or Clone Stamp for any minor touch-ups required.
How to remove watermark from video with After Effects content aware fill tool After Effects Tutorial
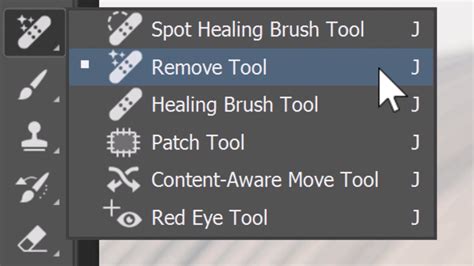
5. The Remove Tool: A Swift and Modern Solution
Introduced in more recent versions of Photoshop, the Remove Tool offers a convenient and swift way to eliminate unwanted elements, including watermarks. Its operation is straightforward, making it efficient for quickly clearing up images.
Why use it?The Remove Tool is not only useful for removing watermarks but also for easily getting rid of people or objects.
How to use the tool?
- Open your image in Photoshop.
- Select the Remove Tool from the toolbar (it might be grouped with the Healing Brush tools).
- Adjust the brush size to cover the watermark.
- Paint over the watermark. Photoshop will analyze the surrounding pixels and remove the selected area, blending the result seamlessly.
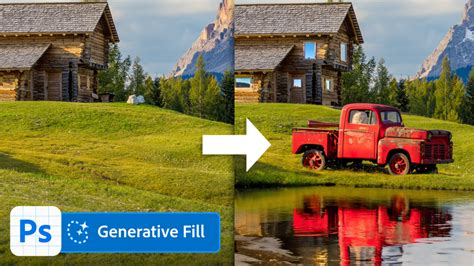
6. Generative Fill: AI-Powered Image Reconstruction
Generative Fill, a standout feature in Photoshop 2024 and later versions, leverages Adobe Firefly AI to generate entirely new pixels based on the context of your image. Instead of merely copying adjacent pixels or guessing textures, Generative Fill understands the image content, removes the watermark, and fills the area with novel, realistic content. This AI-driven approach is surprisingly effective, even on complex backgrounds.
Why use it?Excellent for transparent watermarks, complex image fills, and AI-assisted healing.
How to use the tool?
- Open your image in Photoshop 2024 or a later version.
- Create a duplicate layer (
Ctrl+JorCommand+J). - Select the Lasso Tool (L) or another selection tool. Draw a loose selection around the watermark. Precision is not critical here.
- A context bar will appear at the bottom of the screen. Click the "Generative Fill" button.
- A prompt box will appear. You can either leave it blank for Photoshop to auto-detect the background, or you can enter a simple prompt like "remove watermark and match background" or "replace with plain wall."
- Click "Generate."
- Once satisfied with the result, click "Apply." The generated content will appear on a new Generative Layer in your Layers panel.
7. The Patch Tool: "Cut and Replace" Functionality
The Patch Tool acts as Photoshop's "cut and replace" feature. You select the area containing the watermark and then drag that selection to a clean, similar part of the image. Photoshop then intelligently blends the sampled area into the original location, effectively replacing the watermark.
Why use it?It's perfect for removing medium to large watermarks from areas where the surrounding texture is smooth or consistent, such as clouds, walls, or skin.
How to use the tool?
- Duplicate your image layer.
- Select the Patch Tool from the Healing tools dropdown menu (it’s often grouped with the Spot Healing Brush).
- Draw a selection around the watermark.
- Click and drag the selection to an area of the image that has a similar texture or pattern.
- Release the mouse button. Photoshop will blend the sampled pixels into the original selection area.
- Deselect by pressing
Ctrl+D(Windows) orCommand+D(Mac) and zoom in to inspect the results.

Methods to Be Cautious With
While Photoshop offers many powerful tools, some methods require more care to avoid noticeable artifacts.
Covering Up with Nearby Areas
This method involves selecting a nearby area and using it to cover the watermark. While it can work in some situations, it often leads to visible edges where the copied area overlaps the original.
How it can be done (with caution):
- Start by using a selection tool, like the Rectangular Marquee Tool, to select a nearby area that you intend to use as a cover-up.
- Press
Ctrl+J(Windows) orCommand+J(Mac) to duplicate the selected area onto a new layer. - Position this new layer over the watermark. You may need to adjust the opacity or blend mode, and often, significant refinement is required to mask the edges of the cover-up.
Common Mistakes to Avoid
When removing watermarks in Photoshop, certain pitfalls can detract from the quality of your results. Being aware of these can help you achieve cleaner, more professional outcomes.
- Over-cloning from a single area: Sampling too much from one spot can lead to repetitive textures and unnatural-looking, blurry patches. Always sample frequently from multiple sources to maintain realism.
- Relying solely on automated tools for complex surfaces: Photoshop might misinterpret textures on surfaces like grass, chain-link fences, or detailed cloth. For such areas, manual healing or the Clone Stamp Tool is often a better choice.
- Working at full image size: Fine flaws and imperfections are much harder to spot when working at the default zoom level. Always zoom in to at least 100-200% when performing detailed retouching.
- Editing the background layer directly: Never work directly on the original background layer. Always duplicate it first. This non-destructive workflow allows you to easily undo changes or make adjustments later without compromising the original image.

The Role of AI Tools in Watermark Removal
Beyond Photoshop's built-in features, several online AI-powered tools offer simplified watermark removal. These tools often employ sophisticated algorithms to automatically detect and remove watermarks with minimal user input.
Popular AI Watermark Removers
- Pixelbin's Studio Editor: This tool is praised for its ease of use, even for beginners. It requires no complex brushwork; you simply upload the image, and the AI handles the removal. Its batch processing capabilities make it a game-changer for managing large numbers of product photos.
- Online Watermark Remover (various platforms): Many free, beginner-friendly tools are available that require no signup or login. These often feature clean interfaces and accurate AI algorithms that work well even on complex backgrounds.
- AIEase: Marketed with a "one-click watermark removal" tagline, AIEase offers fast AI cleanup and supports batch processing. It also provides dual-mode auto and manual editing options and is accessible via smartphone browsers.
While these AI tools can provide quick results, Photoshop remains the most versatile and powerful option for professional-grade watermark removal due to its fine-tuned control and advanced features like Generative Fill.
Why Do People Place Watermarks?
The practice of watermarking images is rooted in protecting intellectual property. A photo's watermark serves as a clear indicator of copyright, preventing unauthorized use and attribution. For photographers and content creators, it's a crucial step in safeguarding their work.
Conclusion: Mastering Watermark Removal in Photoshop
Knowing how to remove watermarks in Photoshop is a valuable photo-editing skill that empowers you to effectively reuse images. Whether you are refining your own branded photographs, restoring older images, or preparing licensed media for final delivery, the methods discussed-from the precise control of the Clone Stamp Tool to the AI-driven capabilities of Generative Fill-provide you with a comprehensive toolkit. By understanding the strengths of each tool and avoiding common pitfalls, you can confidently tackle watermark removal and achieve professional-quality results.