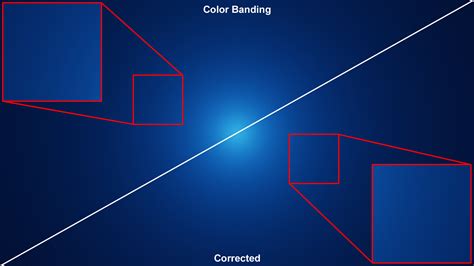
Banding is a visual artifact that manifests as distinct stripes or bands of color where a smooth, seamless graduation of tone or color should exist. This phenomenon is particularly noticeable in areas with subtle gradients, such as a clear blue sky, and can significantly detract from the aesthetic quality of an image, drawing the viewer's eye away from the intended subject and potentially ruining the overall visual impact. While it might seem like an inherent issue tied to digital photography, understanding its causes and employing effective techniques in Photoshop can mitigate and even eliminate color banding.
Understanding Color Banding: The Root Cause
Color banding occurs when the available color information within an image file is insufficient to represent the smooth transitions being applied, often during post-processing. Essentially, the editing process pushes the image values beyond the file's capacity, forcing Photoshop to approximate the necessary color changes with discrete steps, resulting in visible bands. This means that every instance of banding signifies that the image data has been pushed to its limits. The challenge lies in achieving desired creative outcomes without exceeding these boundaries.
The Bit Depth Dilemma: 8-bit vs. 16-bit Editing
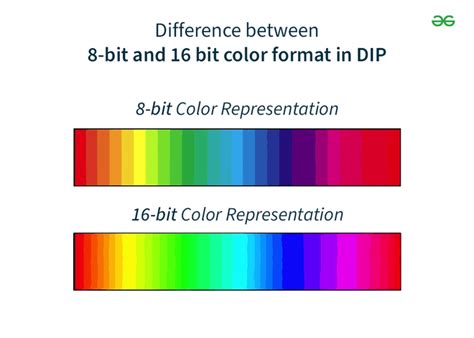
The number of colors an image file can represent is directly related to its bit depth. An 8-bit image file offers 256 shades for each of the Red, Green, and Blue color channels, totaling approximately 16.8 million possible colors. While this sounds like a vast number, it can become restrictive when significant color or tonal adjustments are made. In contrast, a 16-bit image file provides a much larger palette, with 16,384 shades per channel, resulting in trillions of possible colors.
The key to minimizing banding lies in starting with the richest possible color information. Shooting in RAW format is paramount, as RAW files capture a broader spectrum of data and are inherently capable of being edited in 16-bit mode. Conversely, JPEG files are typically 8-bit, and while they can be converted to 16-bit in Photoshop, the initial color information is already limited. Therefore, the ideal workflow begins with RAW capture, allowing for 16-bit editing throughout the post-processing stages.
The 8-bit vs. 16-bit Debate: A Deeper Dive
The distinction between 8-bit and 16-bit editing is crucial for understanding banding. In 8-bit files, integer formats are often employed, which clamp values at 0 (black) and 1 (white). This means any information beyond these limits is discarded, similar to how JPEGs handle data. Floating-point file formats, on the other hand, are designed to store additional information beyond these standard ranges, allowing for greater flexibility.
TIFF files, commonly used in professional workflows, can be either 16-bit half-float (which retains more dynamic range) or 16-bit integer. However, upon importing a 16-bit TIFF into Photoshop, it often defaults to an integer format, potentially clamping values. This is a theoretical limitation where Photoshop might not fully leverage the dynamic range available in a 16-bit half-float file, leading to potential value clipping and subsequent banding when aggressive edits are applied. True 32-bit full-float files (like EXR or HDR) offer the most dynamic range but come with the drawback of limited tool compatibility within Photoshop.
While Adobe Lightroom and Capture One may handle 16-bit files with greater fidelity, especially when used in conjunction with plugins like NIK Collection, Photoshop's processing of 16-bit TIFFs can sometimes lead to a degradation of dynamic range. This theoretical limitation underscores the importance of minimizing extreme adjustments within Photoshop itself.
Proactive Measures: Preventing Color Banding
The most effective strategy for combating color banding is to prevent it from occurring in the first place. This involves a combination of shooting techniques and workflow choices.
Nail Your Exposure and Shoot RAW
The first line of defense against banding is to capture the best possible exposure in-camera. This means avoiding extreme highlights and shadows that are beyond the camera's dynamic range. For scenes with high contrast, bracketing exposures and merging them in post-processing is a superior approach to pushing sliders to their limits in a single image. Always opt for uncompressed RAW files, as they retain the maximum amount of image data.
Optimize Your Workflow
Perform as many adjustments as possible within your RAW converter (e.g., Adobe Lightroom, Capture One) before importing the image into Photoshop. RAW files have unclamped values and significantly more information, leading to better results even when using external plugins. When exporting from your RAW converter to Photoshop, use an uncompressed TIFF file with the widest available color space, such as ProPhoto RGB, to maintain maximum flexibility.
Gradient Tool Considerations
If you are intentionally creating gradients within Photoshop, such as for skies or smooth transitions, ensure the "dither" option is checked in the gradient settings panel. Dithering introduces a subtle amount of noise that can help to break up potential banding and create a smoother appearance.
Detecting Color Banding: Knowing When It's There
Sometimes, color banding can be subtle and may not be immediately apparent on your monitor, especially in bright areas like skies. However, it can become glaringly obvious when the image is printed. To accurately assess the presence of banding, consider these methods:
Channel Inspection
Open your image in Photoshop and navigate to the Channels tab. Examine each color channel (Red, Green, and Blue) individually. Banding is often much more pronounced and easier to detect in these single-channel views than in the full RGB display. If you observe banding in any of the channels, it's an indication that the image will likely exhibit banding when printed.

The Solar Curve Method
A highly effective technique for revealing banding is the "Solar Curve." To implement this, create a new Curves adjustment layer. Place numerous points along the curve and then manipulate them to create a steep, wave-like pattern. This exaggerated curve will amplify any subtle banding present in the image, making it clearly visible. While it requires some practice to interpret reliably, the Solar Curve is a robust method for pre-print assessment.

Correcting Color Banding: Fixing the Problem
Even with the best preventative measures, banding can sometimes occur. Fortunately, Photoshop offers several techniques to address this issue.
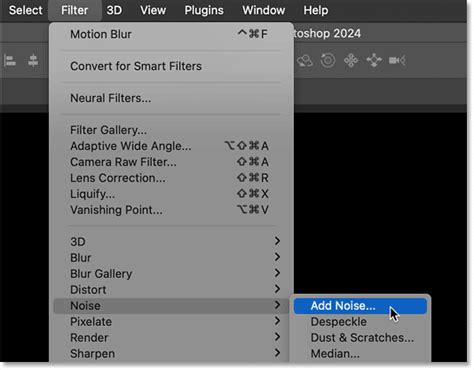
Method One: For 16-bit Files (Adding Noise)
If you are working with a 16-bit file that exhibits banding, the most effective solution is to introduce a controlled amount of noise.
- Create an Overlay Layer: Create a new layer by pressing
Ctrl+Shift+N(Windows) orCmd+Shift+N(Mac). Set the layer's blend mode to "Overlay" and ensure it is filled with 50% gray ("Fill with Overlay-neutral color (50% gray)"). - Add Noise: With the new overlay layer selected, go to
Filter > Noise > Add Noise. - Configure Noise Settings: Set the "Distribution" to "Gaussian." The amount of noise required will depend on the severity of the banding, but typically a value between 1% and 5% is sufficient. You can use the Solar Curve to help gauge the precise amount of noise needed.
- Masking: Apply a layer mask to this noise layer. Paint with black on the mask over any areas of the image that did not have banding issues, ensuring that the noise is only applied where it is needed to smooth out the problematic gradients.
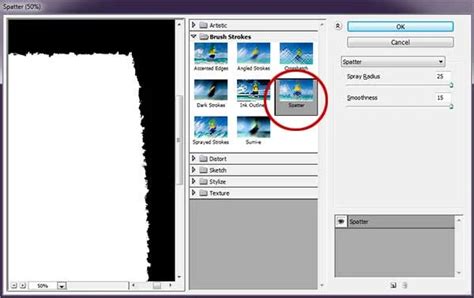
Method Two: For 8-bit Files (The Spatter Filter)
For 8-bit files, or when you want a solution that also helps to keep the image cleaner, the "Spatter" filter can be highly effective.
- Select the Banded Area: Isolate the portion of your image that is suffering from banding. For example, if it's the sky, the Magic Wand tool can be a quick way to make a selection.
- Duplicate to a New Layer: Press
Ctrl+J(Windows) orCmd+J(Mac) to duplicate the selected area onto a new layer. Make all other layers invisible and lock the transparent pixels on this new layer by clicking the appropriate icon in the Layers palette. - Apply the Spatter Filter: Go to
Filter > Filter Gallery. Navigate to the "Brush Strokes" group and select the "Spatter" filter. - Adjust Filter Settings: Adjust the "Spray Radius" to a high value, potentially the maximum of 25. Set the "Smoothness" to its lowest value, typically 1.
- Apply and Refine: Click "OK" to apply the filter. You should observe that the banding has dissipated. If you notice any bright speckles, particularly near bright objects in the image, these can be masked out on the Spatter layer.
By understanding the underlying causes of color banding and employing these preventative and corrective techniques, you can ensure your images maintain smooth, professional-looking gradients, whether they are destined for the web or large-format prints.