Blending modes are one of Photoshop's most powerful, yet often intimidating, features. They determine how pixels in one layer interact with the pixels in the layers below it, creating a vast array of visual effects. From subtle enhancements to dramatic transformations, understanding blend modes can elevate your image editing and digital art to new heights. This guide will demystify these modes, breaking them down into understandable categories and exploring their practical applications, particularly in enhancing fine art images with textures.
The Foundation of Blending: Understanding Base and Blend Layers
At its core, blending in Photoshop involves two key components: the Base Layer and the Blend Layer. The Base Layer is the layer beneath, and the Blend Layer is the active layer whose pixels are being blended with the Base Layer. When you select a blend mode, Photoshop applies a specific mathematical formula to the color values of the pixels in the Blend Layer and compares them to the corresponding pixels in the Base Layer. This interaction results in a new color that is displayed as the final output.
It's crucial to understand that blend modes are non-destructive. This means that the original pixel data of your layers remains intact. You can always change the blend mode, adjust opacity, or revert to the default "Normal" mode without permanently altering your image. This flexibility is a cornerstone of efficient and creative editing in Photoshop.
Accessing Blend Modes in Photoshop
There are several ways to access and apply blend modes within Photoshop:
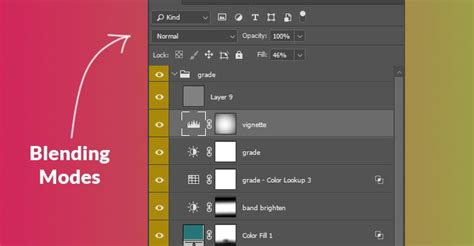
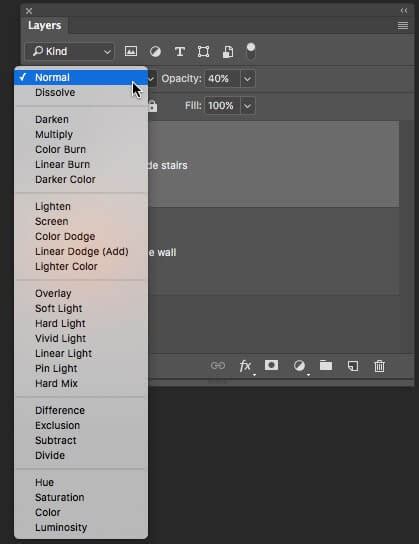
- Layers Panel: The most common method is through the Layers panel. At the top of the panel, you'll find a dropdown menu that typically displays "Normal." Clicking this menu reveals all the available blend modes, organized into categories.
- Menu Bar: You can also access blend modes via the menu bar by going to "Layer" > "Layer Style" > "Blending Options."
- Keyboard Shortcuts: For quick cycling through blend modes while a painting or editing tool is active, you can use Shift + Plus (+) to move forward and Shift + Minus (-) to move backward through the list. If the focus is on the Layers panel's blend mode dropdown, these shortcuts will change the blend mode of the selected layer.
It's important to note that not all blend modes are available for 32-bit images. If you find some options are grayed out, you may need to convert your image to an 8-bit or 16-bit RGB Color image by navigating to "Image" > "Mode."
The Six Categories of Blend Modes
Photoshop's blend modes are logically grouped into six distinct categories, each with a general characteristic:
- Normal: These are the most straightforward modes, primarily used for standard compositing.
- Darken: These modes generally make the resulting image darker by comparing pixel values.
- Lighten: The inverse of Darken modes, these generally make the resulting image lighter.
- Contrast: These modes increase contrast by combining the effects of Darken and Lighten modes.
- Inversion/Comparative: These modes involve inverting color values or subtracting them, often used for unique effects or alignment.
- Composite/Component: These modes combine color components (hue, saturation, luminosity) from the layers.
Let's delve into each category and explore the individual blend modes within them.
1. Normal Blend Mode Group: The Basics
This group contains the most fundamental blend modes, essential for basic layering and compositing.
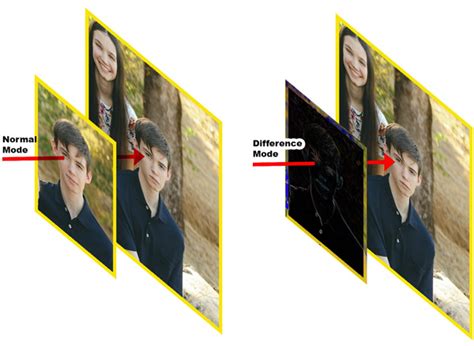
Normal: This is the default blend mode. It displays the pixels of the blend layer exactly as they are, with no interaction or modification of the underlying layers, except for the layer's opacity. If a layer is set to Normal and has 100% opacity, it will completely cover the layers below it.
Dissolve: This mode creates a speckled or dithered effect. Instead of smoothly blending pixels, it randomly displays pixels from either the blend layer or the base layer. The intensity of this effect is controlled by the layer's opacity. At 100% opacity, it might show more pixels from the blend layer; at lower opacities, more from the base layer. This mode is excellent for creating textured effects, simulating noise, or adding a gritty feel.
2. Darken Blend Mode Group: Deepening the Image
The Darken group of blend modes works by comparing the color values of the base and blend layers and retaining the darker of the two. White is typically the "neutral color" for these modes, meaning it has no effect, while black results in a darker output.
Darken: This mode compares the RGB channel values of the pixels in the base and blend layers. It then displays the darker of the two colors. If a pixel in the blend layer is lighter than the corresponding pixel in the base layer, the base layer's pixel is shown. Conversely, if the blend layer's pixel is darker, it replaces the base layer's pixel. This mode is useful for removing white backgrounds.
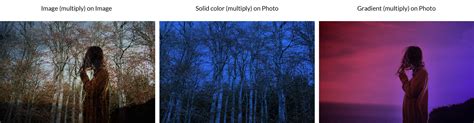
Multiply: This is one of the most frequently used blend modes. It multiplies the luminosity values of the base layer's pixels with the blend layer's pixels. The result is always a darker image. White pixels in the blend layer have no effect (multiplying by 1 leaves the original color unchanged), while black pixels turn the result black (multiplying by 0). This mode is excellent for darkening images, adding shadows, or creating atmospheric effects. When used with a gradient from white to black over a colored layer, the white areas remain the original color, and the black areas become black, effectively darkening the color based on the gradient. This is a common technique for creating vignettes.
The ONLY Photoshop Blend Modes you need to know
Color Burn: This mode darkens the base layer while increasing the contrast between the base and blend colors. It uses the blend color to "burn" into the base image. The effect is generally darker and more saturated than Multiply. Unlike Multiply, white in the blend layer has no effect, but black will darken the image significantly. Color Burn is one of Photoshop's "special blend modes," meaning that the Fill and Opacity sliders can have different results.
Linear Burn: Similar to Color Burn, Linear Burn darkens the base layer. However, instead of increasing contrast, it decreases the brightness of the base color based on the blend color's value. The result is darker than Multiply but often less saturated than Color Burn. Like Color Burn, it's a special blend mode where Fill and Opacity can yield different outcomes.
Darker Color: This mode compares the overall luminosity of the base and blend pixels and displays the color with the lower luminosity value. It's similar to Darken but works by comparing the combined channel values rather than each channel individually. This can sometimes lead to less color shift than the Darken mode.
3. Lighten Blend Mode Group: Illuminating the Image
The Lighten group is the inverse of the Darken group. These modes compare pixel values and retain the lighter of the two. Black is the neutral color here, having no effect, while white results in a lighter output.
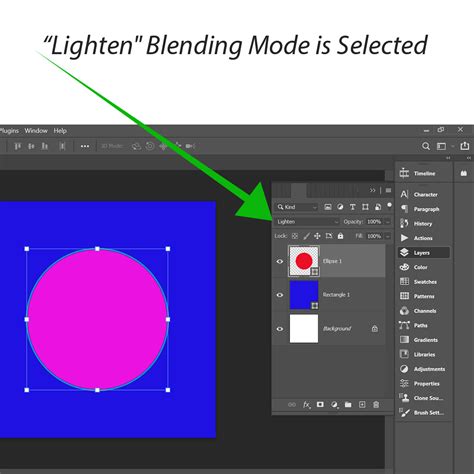
Lighten: This mode compares the RGB channel values of the pixels in the base and blend layers and displays the lighter of the two colors. If a pixel in the blend layer is darker than the corresponding pixel in the base layer, the base layer's pixel is shown. If the blend layer's pixel is lighter, it replaces the base layer's pixel. This is the inverse of Darken and is useful for lightening images or removing black backgrounds.
Screen: This is the counterpart to Multiply and is another highly popular blend mode. It inverts the luminosity values of the base and blend layers, multiplies them, and then inverts the result. The outcome is always a lighter image. White in the blend layer results in white, while black has no effect. Screen is exceptionally useful for brightening images, adding highlights, or compositing light effects like lens flares or glow. Making a duplicate of your image layer and setting it to Screen mode is a quick way to globally lighten a photo, which can then be refined with opacity adjustments or masking.
The ONLY Photoshop Blend Modes you need to know
Color Dodge: This mode brightens the base layer by decreasing the contrast between the base and blend colors. It uses the blend color to "dodge" the base image. The effect is generally brighter and more saturated than Screen. White in the blend layer will result in white, while black has no effect. Color Dodge is a special blend mode, so Fill and Opacity can produce different results.
Linear Dodge (Add): As the name suggests, this mode brightens the base layer by increasing the brightness, effectively adding the blend color's values to the base color's values. It's similar to Color Dodge but works by adjusting brightness rather than contrast. The result is often stronger than Color Dodge or Screen. Linear Dodge is also a special blend mode.
Lighter Color: This mode compares the overall luminosity of the base and blend pixels and displays the color with the higher luminosity value. It's the inverse of Darker Color and works by comparing combined channel values.
4. Contrast Blend Mode Group: Enhancing Dynamism
The Contrast group of blend modes increases contrast by combining the effects of the Darken and Lighten groups. They essentially make dark areas darker and light areas lighter, often preserving highlights and shadows while altering midtones. The neutral color for many of these modes is 50% gray.
Overlay: This is a very popular blend mode that combines the effects of Multiply and Screen. It uses Screen when the base layer is lighter than 50% gray and Multiply when the base layer is darker than 50% gray. This preserves the highlights and shadows of the base layer while increasing contrast and saturation in the midtones. It's excellent for adding texture to images, as it enhances the detail in both light and dark areas without washing them out or making them muddy.

Soft Light: This mode is similar to Overlay but with a more subtle effect, as if shining a diffused spotlight on the image. If the blend color is lighter than 50% gray, the image is lightened. If the blend color is darker than 50% gray, the image is darkened. The degree of lightening or darkening is less intense than with Hard Light.
Hard Light: This mode is similar to Soft Light but with a more intense effect, as if shining a harsh spotlight. If the blend color is lighter than 50% gray, the image is lightened by increasing contrast. If the blend color is darker than 50% gray, the image is darkened by decreasing contrast. It combines the effects of Color Dodge and Color Burn, using the brightness of the blend layer to determine whether to dodge or burn.
Vivid Light: This mode brightens and darkens colors by changing contrast. It uses the blend color as a guide: brightening lighter areas by decreasing contrast and darkening darker areas by increasing contrast. It's a more extreme version of Overlay and Soft Light. Vivid Light is a special blend mode.
Linear Light: This mode brightens and darkens colors by changing brightness. It uses the blend color as a guide: brightening lighter areas by increasing brightness and darkening darker areas by decreasing brightness. It's a more extreme version of Soft Light. Linear Light is a special blend mode.
Pin Light: This mode combines Darken and Lighten simultaneously. If the blend color is lighter than 50% gray, pixels darker than the blend color are replaced. If the blend color is darker than 50% gray, pixels lighter than the blend color are replaced. It's an extreme effect that pins pixels in place. Pin Light is a special blend mode.
Hard Mix: This mode adds the RGB channel values of the blend and base layers. If the sum for a channel is 255 or greater, it becomes 255; otherwise, it becomes 0. This results in pixels that are either pure red, green, blue, cyan, yellow, magenta, white, or black, creating a posterized or solarized effect. Hard Mix is a special blend mode.
5. Inversion/Comparative Blend Mode Group: Exploring Color Differences
These modes often work by subtracting or inverting color values, leading to unique and sometimes abstract results.
Difference: This mode subtracts the luminosity values of the blend layer from the base layer, or vice versa, whichever results in a higher value. The result is never negative. If the two layers have identical colors, the result is black. Blending with white inverts the base layer's color. This mode is incredibly useful for aligning layers with similar content; when two layers are perfectly aligned, the result will be black.
Exclusion: This mode is similar to Difference but produces a lower-contrast result. It also subtracts the blend color from the base color, but the midtones are not inverted as dramatically. Blending with white still inverts colors, but with less intensity than Difference.
Subtract: This mode subtracts the blend color values from the base color values on a channel-by-channel basis. As the blend values increase (become brighter), the result becomes darker. Blending with black has no effect.
Divide: This mode divides the RGB channel values of the base layer by those of the blend layer. The darker the blend layer, the brighter the base layer appears. Blending with black results in white, while blending with white has no effect. This mode can be useful for removing color casts.
6. Composite/Component Blend Mode Group: Color and Luminosity Manipulation
This group focuses on blending specific color components â hue, saturation, and luminosity â allowing for precise color and tonal adjustments.
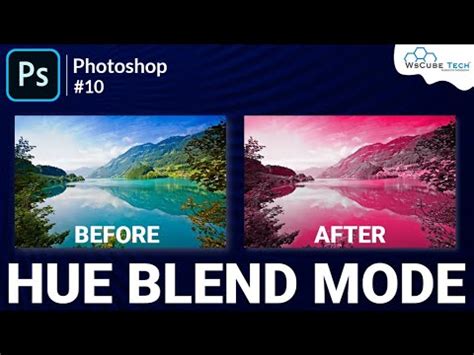
Hue: This mode retains the hue of the blend layer while using the saturation and luminosity values from the base layer. It's useful for changing the color of an object without affecting its brightness or color intensity.
Saturation: This mode retains the saturation of the blend layer and uses the hue and luminosity values from the base layer. It's effective for increasing or decreasing the color intensity of an image.
Color: This mode retains the hue and saturation of the blend layer and uses the luminosity values from the base layer. This is a very popular mode for colorizing black and white images or for applying a color cast to an image without altering its brightness or contrast.
The ONLY Photoshop Blend Modes you need to know
Luminosity: This mode is the inverse of Color. It retains the luminosity (brightness and detail) of the blend layer while using the hue and saturation from the base layer. This is useful for applying tonal adjustments or textures without affecting the color of the underlying image.
Practical Applications and Creative Exploration
Understanding the mechanics of blend modes is the first step; the real power comes from experimentation. Here are some common and creative ways to utilize them:
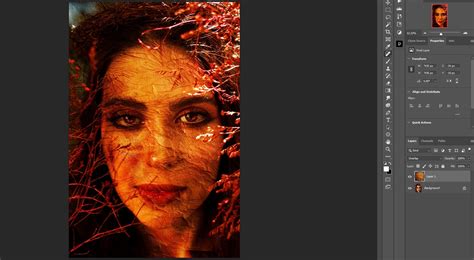
Texture Overlay: Applying textures to photographs is a popular technique. Use blend modes like Overlay, Soft Light, or Hard Light to integrate the texture seamlessly, preserving the details of both the image and the texture. Converting the texture to black and white before applying it can give you more control over the tonal impact.
Color Correction and Enhancement: Modes like Color, Hue, and Saturation offer precise control over color adjustments. Color Dodge and Color Burn can be used for localized lightening and darkening, respectively, to refine tones. Screen and Multiply are excellent for global adjustments to brightness.
Creating Special Effects: Experiment with modes like Hard Mix for abstract results, Difference for alignment checks or unique color effects, and Dissolve for gritty or noisy textures.
Compositing Elements: When combining different images, blend modes are essential. Multiply is great for placing dark elements (like text or graphics with transparent backgrounds) over images, as it hides the white. Screen is ideal for placing light elements (like light leaks or glows) over darker backgrounds.
Opacity vs. Fill: A Subtle but Important Distinction
While Opacity and Fill might seem to function identically in most blend modes, there's a critical difference when working with Photoshop's "special" blend modes (Color Burn, Linear Burn, Color Dodge, Linear Dodge, Vivid Light, Linear Light, Hard Mix, and Difference).
- Opacity: Reduces the transparency of the entire layer equally. This affects all pixels uniformly.
- Fill: Reduces the opacity of the layer's "effect" rather than its base pixels. In special blend modes, this can lead to more nuanced results. For instance, with Color Burn, reducing Fill will affect the shadows more gradually than the highlights, maintaining richer dark tones compared to reducing Opacity, which would simply make the entire layer more transparent.
Understanding this distinction allows for finer control, especially when working with these particular blend modes to achieve more natural or desired outcomes.
The Art of Experimentation
The true mastery of Photoshop blend modes comes from hands-on practice. There are no strict rules; the best approach is often to try all the available modes on your layers and see what results you achieve.
- Experiment with Opacity: Don't be afraid to reduce the opacity of a layer. A blend mode that seems too strong at 100% can become incredibly effective at lower settings.
- Utilize Layer Masks: Combine blend modes with layer masks to apply their effects selectively to specific areas of your image. This is crucial for targeted adjustments and complex composites.
- Duplicate and Vary: Duplicate your texture or adjustment layers and apply different blend modes to each. This opens up a world of creative possibilities.
- Collect Your Textures: Build a library of textures, whether photographed or digitally created. This resource will be invaluable for future projects.
By understanding the fundamental principles and categories of Photoshop blend modes, and by embracing a spirit of experimentation, you can unlock a powerful toolkit for enhancing your images and bringing your creative visions to life.