Procreate, a powerful digital art application for iPad and iPhone, offers a suite of intuitive tools designed to streamline the creative process. Among these, color matching stands out as a fundamental skill for artists aiming for accuracy and cohesive palettes. Whether you're trying to replicate a specific hue from a reference image or build a harmonious color scheme, Procreate provides elegant solutions. This tutorial delves into the various methods for color matching in Procreate, from utilizing the eyedropper tool to leveraging advanced color theory features.
Accessing and Utilizing the Eyedropper Tool
One of the most direct ways to color match in Procreate is through its eyedropper functionality. This tool allows you to sample any color directly from your canvas.
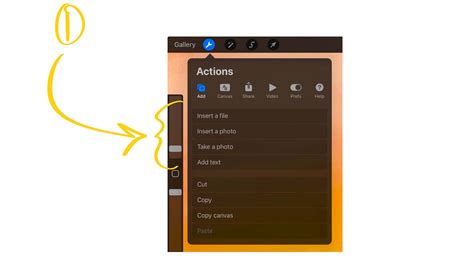
Method 1: The Color Drop Swatch
To use the eyedropper in Procreate, you will need to drag the color swatch located in the top right corner onto your canvas. This swatch represents your currently selected color. Move the swatch directly over the top of the area you would like to recolor or sample from. As you hover over different parts of your artwork, the color swatch will update to reflect the color beneath it.
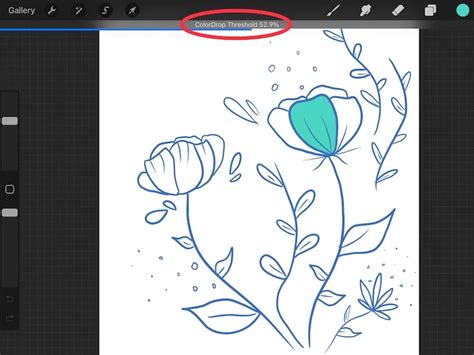
The ColorDrop Threshold at the top of the screen indicates the percentage of the shape within your selected layer that will be recolored. This threshold is crucial for controlling how much of an area is filled when you use the ColorDrop feature.
Method 2: Long-Press Gesture
A more immediate method for invoking the eyedropper is through a simple gesture. You can also long-tap anywhere in your canvas to pick up color. This action will bring up a color ring around your cursor, enabling you to precisely select the desired hue. The top half of this ring displays the new color that will be sampled, while the bottom half shows your current color. Releasing your tap at the desired location samples that color. This gesture-based approach is particularly efficient for quick color sampling without interrupting your workflow.
Method 3: The Sidebar Square
For those who prefer a more traditional tool selection, Procreate offers a dedicated eyedropper option within the slider menu. Select the square icon, located between the size and opacity sliders. This action will bring the eyedropper tool into view, allowing you to click and drag it over the area you wish to color match.
You can now toggle whatever Gestures you would like to use for color matching, and untoggle the ones that feel weird for you to use. Understanding these different methods ensures you can seamlessly integrate color sampling into your artistic workflow.
Understanding ColorDrop and Threshold
ColorDrop is a powerful feature that, when combined with the eyedropper, allows for efficient color filling and recoloring. When you drag the Active Color (your currently selected color) into any area of your artwork, a colored dot will detach from the Active Color and hover over the canvas, helping give you a precise location for ColorDrop.
Adjusting the ColorDrop Threshold
At lower thresholds, the color will confine itself to smaller areas. To activate the Threshold adjustment, drag the Active Color over the area you want to fill, but don’t release it. After a moment, ColorDrop Threshold will activate. A thin bar above the artwork represents the threshold amount. Drag your finger to the left to fill less area, and to the right to fill more area. This allows for granular control over how extensively a color fills a shape. SwatchDrop, a similar function when dragging colors from a palette, remembers your chosen Threshold setting until you change it again.
Continuing to Fill with Recolor
After performing a ColorDrop or SwatchDrop, an option will drop down from the top menu bar saying "Continue Filling with Recolor." This initiates the Recolor mode. A small crosshair will appear in the middle of the screen. Now, slide the Flood slider at the bottom of the screen. Your chosen color will gradually fill with the replacement color. Your new color displays on the top half of the loupe and the current color on the bottom half. This feature is invaluable for making significant color alterations across your artwork.
Exploring Procreate's Color Interfaces
Procreate Pocket offers multiple color interfaces tailored to suit the way you work, providing a comprehensive environment for color selection and management.
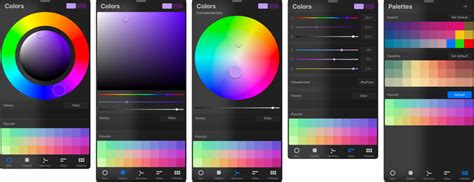
Color Disc
When you first open the Color Panel, you see the Color Disc by default. This interface offers an outer Hue ring around an inner zoomable Saturation disc. It provides a visual and intuitive way to explore the full spectrum of colors and their variations.
Classic
The Classic interface presents a traditional take on color selection, often resembling a color wheel or a square color picker found in other applications.
Value
For those who require precision, the Value interface offers sliders along with numerical and hexadecimal values. This is ideal for replicating exact color codes or for users who are accustomed to working with precise color data.
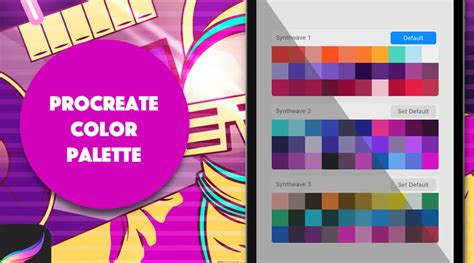
Palettes
The Palettes tab gives you access to sets of color swatches. Procreate includes several standard palettes, and you can also import palettes from external sources or create your own custom palettes. This is essential for maintaining consistency and for developing your unique color language.
Harnessing Color Theory with Harmony
Supercharge your art with the power of color theory. The Harmony tab within Procreate builds instant color schemes based on your color choices, acting as a powerful assistant for creating visually appealing and balanced compositions.
On the right-hand side of the top menu, you’ll see the Active Color. Tap to open the Color panel, then tap the Harmony tab. Colors on the edge of the wheel are at maximum saturation.
Harmony Modes
Procreate's Harmony feature offers five different modes to generate color schemes:
- Complementary: This is the default Harmony mode. Complementary colors are exact opposites on the color wheel. Because they are exact opposites, complementaries can make each other appear brighter. One will always be a cool color, and the other will always be warm. Together, they create the highest possible contrast on the color wheel.
- Split Complementary: Split complementary schemes use a base color and two secondary colors placed symmetrically on the color wheel. In split complementary, the three reticles position to form a narrow triangle. This gives you a combination of one warm and two cool colors, or vice versa. Unlike the complementary color scheme, split complementary schemes are often more balanced and easier on the eyes. Generally, the color at the ‘sharp’ end of the triangle is the main shade.
- Analogous: This scheme uses one base color and two secondary colors, similar to Split Complementary. The base color is best used as the main shade in the artwork, with the secondaries reserved for highlights and accents. Because the three shades of analogous color are positioned so close together, the result is uniformly warm or cold.
- Triadic: This variant of the split complementary color scheme puts equal distance between all three colors, resulting in a trio of colors that are equally dominant.
- Tetradic: Four reticles select colors in a square formation. Like the Triadic scheme, the Tetrad places equal distance between all the colors chosen. This results in no clear dominance of one color over another. The results are vibrant and colorful, though these shades can be aggressive in combination.
You can tap any reticle to select the color within it and immediately start painting with that color.
Advanced Color Management: Palettes and History
Beyond immediate color sampling, Procreate offers robust tools for managing your color choices over time.
Creating Custom Palettes from Images
Procreate allows you to sample colors from an image and add them to a custom color palette. This is incredibly useful for maintaining consistency across projects or for creating palettes inspired by specific artwork or photographs.
To create a color palette from an image in Procreate, you will first need to sample colors from the image using the eyedropper tool as described earlier. Once you have sampled a color, you can add it to a palette. Open the Color menu by tapping the round color disc in the top-right corner of the screen. Navigate to the Palettes tab. You can create a new palette or add the sampled color to an existing one. Double-tap the text to highlight it and rename your palette. Once completed, you will have your own custom color palette, derived from your image, that you can use in any other document you may be working on in Procreate.
Utilizing Color History
The Color History section is automatically populated as you select colors. Up to ten colors are stored in your History. You can find this when your Color Companion is set to the Palettes tab. Tapping the icon to set your readout to include your Color History instead of your active palette makes this readily accessible. The Active Color displays your currently selected color. Press and hold it to switch between your current and previous color, a quick way to revert or compare.
How To Make A Color Palette From An Image In Procreate For The iPad
Procreate Pocket Considerations
Procreate Pocket, the iPhone version of the app, mirrors many of these functionalities, offering a streamlined experience for mobile artists. The Active Color displays your currently selected color. Drag the Active Color into any area of your artwork. A colored dot will detach from the Active Color and hover over the canvas, helping give you a precise location for ColorDrop. Tapping your canvas will initiate ColorDrop. Note that ColorDrop with hover requires iPadOS 16.1 or newer running on specific iPad Pro models.
Streamlining Your Workflow
The beauty of Procreate's color tools lies in their integration and ease of use. Whether you're color matching for accuracy, building harmonious schemes with Harmony, or saving frequently used colors in custom palettes, the app empowers you to achieve your artistic vision. Experiment with the different methods and interfaces to discover what works best for your personal workflow, and unlock the full potential of color in your digital art.